
Updated 22/05/2024
Is your HP, Epson, Brother, Canon, Ricoh or Samsung printer not recognising a replacement ink or toner cartridge? This is something that we find our customers experience every now and again so you aren’t alone!
A printer not recognising a new ink or toner cartridge is one of the most common issues that print owners experience when changing or replacing an empty one, irrespective of what brand printer you have, and one that our customers frequently ask us about.
This can mostly affect your printer when you a replacing compatible, remanufactured, generic or refilled ink cartridges (cartridges not made by the printer manufacturer) and you may be looking for a way to fix this issue. Read below where we’ll explain why this happens and how to fix your printer.
Firstly, try our 8 tips to help solve this problem, then if you need further help we have tips for specific brands at the bottom of this guide.
What happens?

Computer error message when printer cartridge not recognised.
There may be occasions when, after installing a new ink or toner cartridge in your printer, you might see a message on your printer like:
- Your printer says ‘toner is not compatible.‘
- Your printer says ‘printer cartridge not detected,‘ or your printer cannot detect ink.
- A low or empty level of ink and toner is displayed on your computer.
- An HP Printer displaying ‘cartridge error‘, ‘HP cartridges locked‘, ‘cartridge protection enabled‘ or ‘HP ink cartridge not compatible‘.
- A message on your printer warning ‘no cartridge installed‘, ‘cartridge not recognised‘, or words to that effect.
Here are the most common reasons why your printer isn’t recognising a cartridge:
Internal memory reset needed:
Your printer should automatically recognise when you install a new cartridge and reset its internal memory, ensuring that it’s displaying full ink and toner levels. However, sometimes the printer just doesn’t do that correctly and believes that the old one, or no cartridge, is currently inserted instead. Click here for the solution below on how to fix this
Protective strips haven’t been removed:
Problem: – You forgot to remove protective covers or plastic strips that are attached to a new cartridge when you first take it out of its packaging.
Solution: – Take the cartridge out of your printer and make sure all strips, tabs or plastic covers are removed before installing the cartridge again.
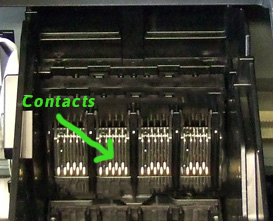
Dirty / damaged contacts stop chip data from being read:
The new ink or toner cartridge has a number of metal contacts that connect to similar metal contacts in the printer allowing them to communicate. Dirt or damage on the contacts inside the printer, or on the cartridges can prevent the contacts from connecting and can stop the printer from reading the information on the chip. Click here for information on how to clean metal contacts.
HP Cartridge Protection is enabled
Whilst updating the firmware is often necessary if you have an HP printer an update may be installed to ‘enable cartridge protection’ this then prevents your HP ink cartridges from working in any other printer. Cartridge protection may also stop compatibles from working in your machine at all. This can be switched off. See how to fix HP cartridges locked to another printer.
The Incorrect consumable installed in a slot:
It’s an easy mistake to put a colour ink or toner cartridge into the incorrect slot or purchase the wrong cartridge model for your printer. Also, suppose a drum or fuser or other maintenance item was accidentally purchased instead of a toner cartridge and installed without the toner. In that case, the printer will not work and still needs a new cartridge.
Take all the cartridges back out of the printer and double-check they were in the correct colour slots and all the required cartridges are present. If not, reinstall them and switch the printer off and back on to reset the system.
An Ink cartridge has not been inserted in its slot correctly:
If an ink cartridge isn’t fully clicked into its designated slot, the printer can’t detect the new ink cartridge and will display an error message. All you’ll need to do is lift your cartridge cover again and double-check each of the inserted cartridges to make sure that they have been clicked in properly, then close the cover again and try once more.
In the case of toners, sometimes broken plastic parts can cause the toner to not sit correctly in the printer slot. The toner would need to be replaced to fix this issue.
A printer software update has rendered the chip data useless or stamped it with an ’empty’ status
This is a very grey area of legality for printer manufacturers as it’s against the law for them to stop you from using a compatible or remanufactured cartridge in your printer. However, printers that are connected to the internet frequently automatically update their firmware (software). These updates can fix bugs, but can also stop compatible cartridges from working in your printer, displaying messages like ‘cartridge not compatible‘ or ‘cartridge not recognized,’ or even ‘counterfeit cartridge installed‘.
HP printers also contain anti-counterfeit software in all of their machines. This software is meant to stop the use of fake cartridges (ones that are made by criminals and pretend to be original HP cartridges) but it can also stop compatible or remanufactured cartridges from working. The only solution here is to replace the cartridge with a new one or bypass the warning.
If you have a Canon printer, click here to read how to bypass this error.
If you do plan to use compatible or reman inks and toners, it may be wise to disable automatic software updates on your printer. You can do that on your computer via the printer properties (Control panel > printers and devices > right-click your printer in the list > properties > software tab > un-tick ‘automatically update’ your printer).
How to override the ink cartridge error – 8 steps to try
The first thing to do is not to panic! Whether you’ve bought your ink cartridges from us or another supplier, there really shouldn’t be any reason why a good quality original or compatible cartridge wouldn’t work in your printer so, with a little patience, we’ll get you through it. Try the following 8 steps to correct your issue.
How to reset the printer memory:
- Remove your new cartridge and replace it with the old one. Leave your printer and go and do something else for 10 minutes.
- Replace the old cartridge with the new one again. These two steps alone often resolve the issue, so see if your printer now recognises your new cartridges. However, if you’re still having trouble…
- Remove the new cartridge. Make sure you place it in a clean and safe place where the cartridge or the surface won’t be damaged.
- Turn the printer off using its power button
- Unplug your printer at the wall. It’s important to do both steps 4 and 5 separately, as some printers can remain in sleep mode if you’ve only switched off the power button on the printer control panel. Leave your printer like this for about 10 minutes or so.
- Plug your printer back in at the wall (but don’t press the power button just yet)
- Insert your new cartridge
- Press the power button on your printer
Hopefully, you should be able to now print with your new compatible ink or toner cartridge! If this doesn’t work, move on to the next step.
Clean the metal contacts:
The metal contacts can usually be seen on one side, the back of a toner cartridge or the back of an ink cartridge and look like a flat piece of copper, metal or even like circuit board (please note that some ink cartridges have no contacts at all). Here are the steps to follow:
- Power down and unplug your printer (for inkjet printers ignore this step as cartridges must be removed before powering off)
- Carefully remove your toner or ink cartridge and place it to one side on a flat surface where it will be safe.
- Inspect the cartridge for the metal contacts
- Inspect the inside of the printer for the connection point
- With a lint-free/dry cloth lightly wipe the contacts on both cartridges and printer to remove any dirt, or residue being careful not to cause any damage.
- Replace the cartridges in the printer
- Power the printer back on
- Try to print again.
This should now fix any issues you may have with dirty contacts or microchips.
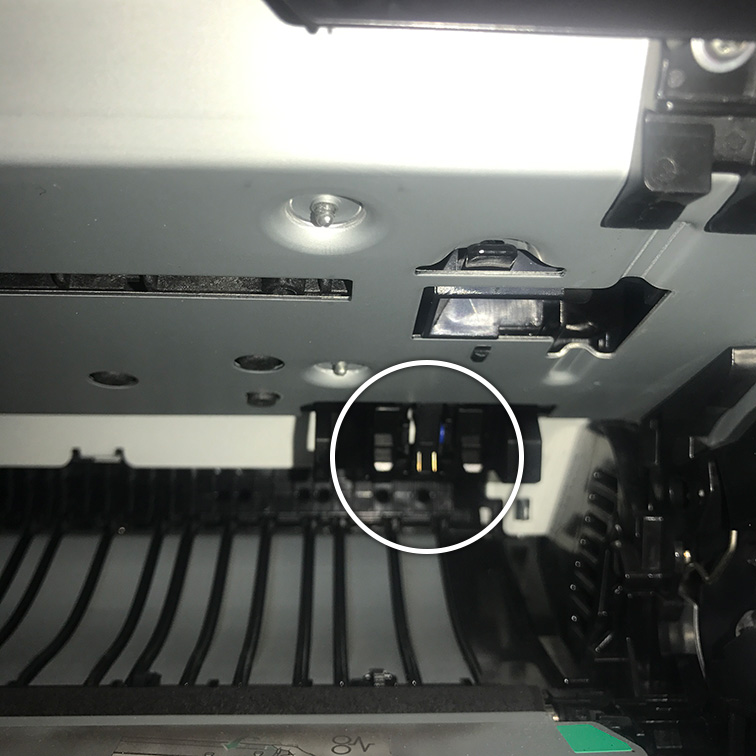
Contact pins inside printer.
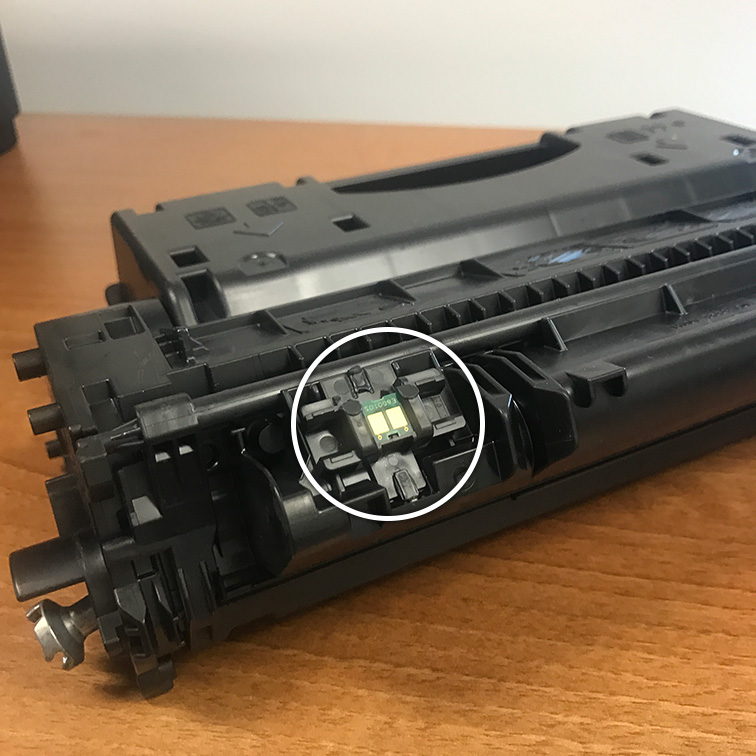
Contact chip/pins on toner cartridge
Still having trouble?
If you are still having trouble there are a few more things to check:
- Make sure all protective covers and strips were removed from your new cartridge when it was installed. You normally get instructions in the box that will indicate how to do this.
- Make sure that you purchased the correct consumable. Believe me this does happen to the best of us. Make sure you purchased an ink or toner and not a new drum unit or other maintenance item. If you need help, we can check this for you.
- Update your printer software by following the instructions manual on how to update the firmware. You can normally do this by visiting the manufacturer website and searching for your printer.
If you have exhausted all these options, then there’s a possibility that you may have faulty cartridge or faulty microchip and providing you made your purchase with a reputable supplier, you should be covered. Also with modern technology in printers some manufacturers are making it even harder for you to use a compatible or remanufactured cartridge such as HP locking cartridges to a specific printer.
If this is the case, simply get in touch with your supplier and they will check if you qualify for a refund or exchange it for a new cartridge.
Tips for specific Brands
Here are some tips for specific brands that are different to the 8 tips above. However, it’s best to first try the tips above which are more common.
HP printer won’t recognize new ink cartridge:
- Remove the unrecognised cartridge and put in an older one
- Leave your printer alone for around ten minutes
- Take the old cartridge out and put the previous one in again.
- Restart the machine and it should now work. If not, you may have to clean the cartridge.
- Some of HP’s newer model laser printers have a setting that only allows original HP toners to be used in the printer. If this is switched on, it will reject all non-original toners.
- You can switch it off from the security section of the printer menu.
- Newer HP machines also have automatic seal removal which can cause issues if you don’t pre-remove seals and tabs from a generic cartridge.
It’s frustrating if you’re trying to get ink cartridges to work in your HP printer. The main culprit is HP’s new printer setting that locks cartridges to another printer. you can find out more information about that and how to fix it here.
The final culprit could be a ‘supply memory error’ similar to the Samsung issue above, where metal contacts on the cartridge don’t connect to the printer. You can read how to fix a supply memory error here.
Looking for a deal? Check out our latest offers on HP ink cartridges

Epson Printer Doesn’t recognise a new ink cartridge
If your Epson printer has an ‘ink cartridge not recognised’ message and none of the general steps above have worked, try the following fixes that are specifically for Epson printer errors.
Firstly, try to override the ‘Epson ink not recognised’ issue by holding down the OK button (often the ‘continue’ button) for 5 seconds and this should get the cartridge working right away. If this doesn’t work try the following:
- Remove the unrecognised Epson ink cartridge and reinstall. Make sure all protective strips are removed (covering the chip) and ensure the cartridge has clicked in place properly (into the correct colour slot) when you reinstall it.
2. Remove and inspect the golden or metal cartridge chips / contacts. Clean away any dirt or dried ink that may be preventing the cartridge from connecting to the printer and being recognised. Refit the ink cartridge and check if this has solved the problem.
3. Take out all the cartridges and turn the printer off.
After 30 seconds, power the printer up and install the cartridge that is ‘not recognised’ on its own. Close the lid, press the ‘ink’ button and see if this has solved the issue. If it now recognises the cartridge, re-install all of the other cartridges and press the ‘ink’ button.
4. Try reinstalling the original cartridge that came with your Epson printer, if you have it. If the error doesn’t appear, it may mean that the ‘not recognised’ cartridge is faulty.
5. Remove all cartridges and check the printer model’s chip contacts. Epson printers contain thin gold wires inside the printer, that the chip will press against once the cartridge is installed. If it breaks or is dirty, the cartridge won’t work correctly. Firstly, using a lint free cloth, try wiping the contacts in the printer to make sure they are clean. Also you can use isopropyl alcohol on a cloth to clean them.
If they appear to be damaged, you’ll have to arrange a printer technician to take a look, or get a replacement printer model if it can’t be fixed.
6. On your computer, go to the control panel or settings cog and find the printers & devices section. Right click on the Epson printer and click ‘preferences’. Click the ‘speed & progress’ tab, and then deactivate the ‘status monitor’ and click save.
It can be frustrating when your Epson printer won’t recognise compatible cartridges, so give our above steps a go to see if it fixes the problem. If your Epson printer still doesn’t recognise the new cartridge, try our general tips. You should also ensure your printer is working correctly rather than assuming it is an issue with the cartridge.
Looking for replacement inks? Check out our range of Epson ink cartridges.
Brother printer not recognizing cartridges
If you specifically have a Brother printer and you’ve tried the 8 tips above without success, the following extra tip will help you to get your printer to recognize your compatible cartridge.
Firstly, try to reset the printer by pressing the power button 7 times. This will clear the error message and the printer should start to print again.
For Brother machines it’s also possible to reset the cartridge via the menu on the printer. Follow the steps above, then lift the cover on your printer, press the clear or back button and use the arrow keys to scroll to the reset options. You can then choose which cartridge to reset. Click OK, and press 1 to reset. The Clear or back button will allow you to leave the menu. To enter the ‘Reset menu’ for inkjet printers, hold the cancel and print buttons at the same time and follow the same instructions.
Looking for a great deal? Buy low cost Brother ink cartridges at TonerGiant.
Canon printer not recognising a new ink cartridge
If your Canon printer isn’t recognising a compatible ink cartridge, this may be because the data on the cartridge chip is stamped with an empty status before it was remanufactured or it may be remembering the status of the last cartridge that you used.
You can fix this by disabling the printer function that monitors the cartridges.
Hold down the stop / cancel button for 5 seconds to bypass the ‘ink has run out’ message and your cartridge should work.
The cancel button is a red button that normally looks like a triangle in a circle.
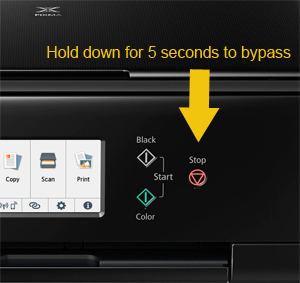
Your ink cartridges will no longer report ink levels but they will start to work correctly.
Get the best deals on Canon ink cartridges on the TonerGiant website.
Ricoh Printer Not Recognizing new toner
Ricoh laser printers often suffer with known firmware issues that can cause the toner cartridges to not be recognized. Sometimes the incorrect firmware version can be installed, causing the problem.
Search Google for Ricoh [your printer model] firmware, then find the correct firmware version for your machine and products and install the most up to date available firmware via your computer. This will normally correct the issue and get your toner cartridge to be recognised again.
Samsung Printer not recognising toner
The most common reason for Samsung printers not recognising a toner cartridge is due to the golden metal contacts on both the cartridge and inside the printer not connecting properly, check the contacts and make sure that no dirt or damage is present. Once cleaned, the printer will normally start to work again.
Lastly, as HP manufacture cartridges for Samsung printers across the world, they are also regionally encoded. Check that the cartridge you have installed is the correct cartridge for your region as this can cause the same error and the toner will need to be replaced.
What about Refilled ink cartridges?
If you’ve used a refill service or refilled ink / toner cartridges yourself, you may encounter any number of issues. Ink cartridges that have been refilled can damage the integrity of the ink cartridge which can sometimes cause leaks in your printer.
The manufacturers chip would also need to be reset as the printer may read the chip and think that it is empty. Once a cartridge has been used until it is empty the chip records that the cartridge has no remaining ink or toner and so when it’s refilled, the chip needs to be reset. If this isn’t done, then the printer will fail to recognise the cartridge. You would need special tools to reset the chip and as firmware is updated on the printer, the chip may need to be reset again.
How to get a refilled cartridge to work
One thing to try to get around any issues with refilled inks is to go to your printer’s general settings and navigate to preferences and switch off any setting that would be set to send usage data to the printer manufacturer.
The message might say something like, ‘Store anonymous usage information’.
This setting is normally default to on, and it’s the setting that allows the printer to monitor the use of the cartridges. By switching it off, you’re telling the printer it can’t monitor what inks are being used and it should allow refilled inks to work. However, this would prevent you from knowing how much ink is left in the cartridges at any given time.
If you did purchase your cartridge from us, you’ll be covered by our 3-year guarantee for our compatible ink and toner and a 6 month guarantee on any original cartridge and we’ll be more than happy to help you out. You can contact us on 0845 365 3605 or click live chat on TonerGiant.co.uk.
Did this work for you? Let us know in the comments below, or tweet us @TonerGiant.
I have been working in the printing industry with TonerGiant for over 18 years, and I'm the resident technical printer expert, helping people fix their printer problems for over 16 years. I have taken part in many training courses with HP, Samsung, Brother, Canon and Xerox to further my knowledge, and I'm also the Digital Marketing Manager at TonerGiant.co.uk (degree qualified).
Tried all above options with my Canon Pixma MG5650, no chance. Final option useless because cannot replace cartridge without power on!
I have faced the same problem but I recover the solution of the problem as follow 1) power tern 2) open front cover 3) fine cartridge remove and finally safety tape is removed.
Did you manage to sort it out? Mine.(exactly the same model) does the same. Just out of guarantee 🙁 very upset.
I have gone through the same hell with my Cannon TS8151. No online solution I have seen so far seems to sort this problem. It will not accept compatible inks. Has anyone managed to resolve this issue? I have heard it is illegal for printer suppliers to stop one from using compatible inks. But how does that work?
You’re completely right, it’s illegal for printer manufacturers to prevent the use of compatibles in their printers. As a consumer you’re entitled to a fair choice of cartridges you want to use but here’s how they get around it. They keep changing the firmware on the printer or the chip so that the compatible cartridges won’t be recognised if the chip software is out of date. Sometimes, you just have to get a replacement from the place you bought them from as you can’t update the chip yourself.
My Canon Pixma TS5120 will NOT accept remanufactured ink, and I was totally stunned to find this out. I will not purchase another Canon printer. I even called Canon and they (so nicely, I thought…) assisted me to purchase a comparable printer model to my former printer. NOT!! I am hunting all the sites to find a solution.
Hi Margaret, is there a specific error code number displayed on the printer screen, or could you tell me what the message says? My best guess about your cartridges not working is that the printer would say something like FINE cartridge not recognised or not installed and it’s likely that the chip on the compatible cartridge you are using is out of date (doesn’t match the current printer software. This normally happens when the printer gets an automatic update. All you can do in that situation is to get a replacement ink compatible cartridge (contact the place you bought it from and tell them it’s faulty).
Tried with Canon TS5150, didn’t work
I wasn’t able to turn the my Pixma off and get access to the cartridges, so I removed the new replacement cartridges, then turned it off and unplugged it, waited for a few minutes, then reconnected power and powered it on. I then put the new cartridges back in and it worked. I never put the old cartridges in. I call it “voodoo technology!”
I have an Epson XP-446 and I tried everything above but NOTHING works. Keep getting “Ink cartridge is not recognized please replace the cartridge”.
Everything worked fine until I did a “DriverUpdate”. Then it stopped recognizing the aftermarket cartridges.
That’s typical of firmware updates I’m afraid, they will often stop aftermarket cartridges from working. The chip software would need to be updated with a spacial machine for it to work again.
This worked perfectly to reset my inks for my Canon Pro 9000 Mark ii. So awesome. I’ve been working on reinstalling the drivers and reprogramming the settings to no avail. It was seeing the printer, just couldn’t print. It was certainly simple. Thank you!
Pixma TS9100, 280XXL black ink ran out. I had a 250XXL which is exactly the same size but was rejected. I moved the little circuit board from the 280 to the 250 and the printer says, yeah that’s the right one.
The board is mounted on 4 plastic studs molded into the cartridge. The ends come through the board and are melted over like a rivet. Shave them off with a sharp blade, swap boards, then use a hot pin or nail to mushroom the plastic post.
I had such high hopes when I saw there were solutions to this support code 1660 which then became a support code 7100. I went to remove the cartridge that was not recognized as correct, but the blue button does not trigger the removal of the cartridge. I don’t seem to have a way to get it out. What do I do now?
I’m afraid I’ve never come across this issue, what model do you have? It sounds like a damaged spring or clip. You may need a technician to look at it.
C’est cartouche sont du vol j’ai acheté 2fois au grand complet toute les cartouche m’en suis servi 1 fois le lendemain impossible que mon imprimante reconnaisse les cartouche,c’est du vol cela me met hors de moi vous devriez avoir honte de vendre ce genre de cartouche qui ne fonctionne pas le pire vous le savez mais argent appel argent
Utilisation de Google Translate – De nombreux clients sont de plus en plus frustrés par les pratiques des fabricants d’imprimantes qui empêchent les cartouches de fonctionner. Tout ce que nous pouvons faire, c’est essayer de garder les micropuces aussi à jour que possible et notre société offre une garantie de 3 ans pour couvrir tout défaut des cartouches si elles ne fonctionnent pas afin de pouvoir les retourner.
I have a Canon Pixma MP620 printer. It is out of support from Canon.
In Oct-2022, I bought 10-pack ink cartridges. I didn’t need to replace the old cartridges until Jan-2024. So, it is out of warranty.
I replaced the old BLK cartridge 220. The indicator light would not light up. I ignored that, closed the printer cover, and tried to print a document. I got a “Error Printing” “Printer Not responding” messages. I tried plain copying and it copies fine.
I tried all the remedies, and none of them corrected the problem.
Help.
It sounds like an issue with the software on the cartridge chips. All you can do is try another replacement.
Hello everyone, None of the above recommended steps works in my case!
Simple my printer say the color ink must be replaced constantly, with every new ink cartrigde also! But I get it to work for a short time with a few steps in the printers Information menue and printer cover open and close one time.
Depending on the printer model you have there are sometimes ways to bypass the errors but mostly this will be an issue with the software on the cartridge chips in combination with automatic printer updates.
I have a Samsung SCX3405FW printer and have installed a compatible ink cartridge; but it doesn’t recognize it. I have done the 3 things listed above and no success. Can you help me?
Hi Leslie, unfortunately if the advice didn’t work it’s likely an error with the chip on the cartridge so it would need to be sent back to where you purchased it so you can get a replacement.
I have new printer canon 2425 i was trying to install new toner cartridge ink
What is the problem
Is that a new Canon brand or compatible cartridge? If it’s compatible, it’s likely due to a faulty cartridge.
I have a Canon Imageclass that uses 067 toner cartridges. Is there a way to take the chip from the OEM cartridge and put it in an aftermarket cartridge? If so, would I need to reset it? The aftermarket cartridge works, but doesn’t seem to have a chip.
Yes you can normally do that, I’m not sure if you would need to reset it or not though!
Hi Stuart, thank you for this information. I am at a dead end trying to resolve error code 1680/1681 on my Canon Pixma iP8750 with macOS Sequoia using compatible cartridges. I have tried removing, unplugging, cleaning chips and connections, replacing. I have tried uninstalling and reinstalling the printer including new driver download. I have tried holding down the stop/cancel button (although this doesn’t seem to work on the iP8750 as on other Canon printers) and I still get, seven flashes and all but one ink tank illuminated red (not flashing). I have tried the above solutions multiple times on different days and am stuck. If there is any possibility you might be able to suggest something I would be most grateful as a replacement printer is not an option for me currently.
Hi there, the error code refers to ink tanks being installed in the incorrect position. Assuming that isn’t the case for you, it could be that you need a printer technician to service the printer and determine the fault but I’d first try a new cartridge to see if you get the same error code in case it’s a faulty chip on the cartridge.
Unfortunately none of you solutions worked and Samsung say without proof of purchase they will not be able to help.
Bought TWO toners whilst in the shop location and both genuine Samsung toners.
So my next solution is buy a new printer.
Hi there, if you purchased your compatible cartridges from us there may be more advice we can give you to get them to work or if this is indeed a fault we should be able to help you further or determine what is going on. Please contact our customer care team on 0845 365 3605. Thanks, Stu.
I am having the same problem and have resolved to not buy another Samsung product. Getting the runaround and landing on the HP site because Samsung dropped their printer line!!
Tried everything and now so frustrated I want to throw this boat anchor in the trash.
Yes Samsung Printer division has been bought by HP now. All printer manufacturers do similar things so you’d get the same problem with other brands unfortunately.
Good
I have a Canon MG5450 and change the cartridges when they read empty and the printer code comes up. Having changed them 3 weeks ago the magneto cartridge indicator light would not come on, but all of the rest have, I changed the cartridge for a genuine Canon and no change. Tried 4 other cartridges and no change. Is there a solution to this before I buy a new printer?
The only thing you can try is to take all cartridges out again, then switch off the printer (while the cartridges remain out of the printer) and unplug for 10 minutes. Plug in and switch back on, then reinstall all the inks and see if it corrects the issue.
I have a canon mg8200 it won’t recognize the replacement toner and I can’t find an alternative for it to accept it. Anyone can help please
Canon are notoriously bad for changing the firmware and causing compatible chips to fail. You will need to find a better supplier for your cartridges or return them for a newer batch where the chips are up to date and make sure your printer isn’t connected to the internet.
Hi please I am have an issue with my hp office 7720. It’s a ink problem saying” this printer is not designed to support refilled ink cartridges remove refilled ink cartridge and reinstall a compatible cartridge. I cannot hide the pop up message again as I used to do previously after I tried to reset the printer, please assist me through the problem.
Hi Bruce, unfortunately if the tips on this page didn’t work its likely the data on the cartridge that’s a problem. All you can do is get a replacement cartridge and try again. HP printers are particularly aggressive when it comes to blocking refilled / remanufactured inks.
Worked for me 3rd time trying, just kept swapping old/new back and forth and got there , thanks v much!
I have a HP ENVY 5549(5540 series). We bought a combo package of colored and black size 62XL, made by “ink oon”, they are a remanufactured ink cartridges. Shows on the box, it is Compatible with HP printers. We bought it from Walmart.
Now I go to put the colored cartridge and the printer is telling me the cartridge is Incompatible! Now the printer calls for 62 HP Ink Cartridge, but I have used 62XL before and it worked fine. So I am not sure what is going on this time around.
It sounds like the inks are faulty (cartridge chips have an issue).
I have done what you suggested about replacing the new with the old (which, incidentally, is the same make of compatible cartridge), gone away to do something else and found that the printer recognized the old one and printed the test page. When I replaced it with the new (identical) cartridge, the HP message “failed cartridge” came up. This is a Wilkinsons own brand cartridge. I have used them before, but they started to throw up this message and I reverted to HP originals. However, some shops charge over £20.00 each for HPs own brand. This is too expensive. I am printing 154 pages = 3 volumes in total of 462 pages plus covers, so I cannot really afford to pay much over £8 or £9 per cartridge. They don’t seem to print very many pages per cartridge before a new one is required. Any suggestions? Thanks.
Ps. I’ll try what Simon above said about try it for three or four times.
Hi Stanley, if you’ve tried what we suggested above, the only other options are to try and update your printer firmware on the HP website or try to wipe the printer metal contacts and the cartridge contacts in case they are dirty and not communicating properly. If that doesn’t work, I would suggest contacting where you purchased your cartridge and asking for an excahnge as the chip or contact may be damaged in some way. Thanks, Stu.
I had the same thing. I had been using Wilko brand and having to by pass Canon block by pressing reset button. Then, one day, when changing a Wilko for a new WIlko a new block appeared which I cannot get round. The new block disables the reset button
My brother printer isn’t recognizing the new TN760 cartridge that I purchased, could it be something wrong with the cartridge?
Hi, yes, it’s likely its a faulty cartridge.
I bought set of 4 expensive HP122A from HP online shop…. I bought the black first but could not use it until some months after bought the complete set in June.. I hardly use the printer and the ink display level was showing full for all the four colours since June 2016. All of a sudden in October, on the 28th of October 2016 to be precise it started indicating as empty that i should replace the black cartridge. This is suppose to give me 7,000 prints and I seldom use it since June
I have tried all your suggestions above but it’s still saying I should replace black ink… I hardly use this printer since i
Hi Sarah, thanks for your comment. It sounds like an automatic software update may have triggered a fault with the chip in the toner cartridge, there should be a standard 6 months warranty from HP so that you can get a replacement. Here’s a number you can call to get in touch with HP about your order with them: 0345 270 4142
Absolutely sick to death of compatible cartridges they just dont cut the mustard, stop selling them.
Hi Dorothy, thanks for your comment. Have you actually purchased compatible cartridges from us before? I know the perception out there is that compatibles have lots of problems but in my experience it really does matter where you buy them from. For example our failure rate is below 2% and we only manufacture the best quality compatibles. Thanks, Stu.
how about you stop buying them?
Which test showed that compatible cartridges were often better than the makers products
The problem is not the compatible ink manufacturers – but rather the underhanded selling practices of the machine manufacturers who sell their product to you outright and then through devious methods try and force you to purchase their overpriced original inks…..
Hello, i have a Samsung Xpress M2026 laser printer and I changed the toner with non-original toner. But it said that the toner is non compatible. I made all the steps that you mentioned but is still not working. I change also the toner with new non original but the same non compatible. What can I do?
Thanks in advance.
Hi there, thanks for your comment. The issue you described is normally caused when a printer update has been applied to the firmware. Whilst it’s against the law for printer manufacturers to stop customers from using compatible cartridges, they do often cause them to fail and get around it by saying that they are preventing the use of illegal copies. It’s likely that the chip in the compatible toner needs to be changed. The only way to fix is usually to contact the company you purchased from and get a replacement. If you purchased from us, please call us on 0845 365 3605 and we’ll be happy to help! Thanks, Stu.
What bugs me about Samsung is that their laser printer cartridges are region coded, which means I have to buy them in New Zealand where there is only one place I can buy. Well, I could find only one on the Internet. The price is NZ$120 plus $10 to send it to me, almost twice as much as on amazon.com. Consequently I am going to have to put up with part of the page being more grey than black until I can find the wherewithal. Grrr! It makes me feel that I never want to buy another Samsung product of any sort.
I hate these ink sucking printers, I’m here to share what worked for me. I know several fixes now. It’s a Brother J285DW and I don’t print often, but when I do it invariably fails for one reason or another, usually low ink or paper jam. It’s because I don’t print often enough and have cartridges sitting in the machine longer than the company would like. Things I have done: unplugged machine, removed and replaced cartridges (not Brother cartridges) to reset memory countless times, took the chip off the old cartridge and stuck it on the new cartridge, put black electrical tape where the sensor detects ink level, and, of course, leave it unplugged when not in use so it can’t do it’s cleaning process which eats ink and wakes me up in the middle of the night sometimes.
All of these worked after receiving messages about low ink. Finally, I got stuck with the message “cannot detect ink” and the above steps weren’t working. It just wouldn’t print my document. I read somewhere about not letting the printer do automatic SW updates (because they obviously read about our “fixes” online and do things to render them useless with every update) so I was looking in the settings to see if it was setup for SW updates. Not that I thought there was anything I could do about it after the fact, but I know from experience that if I mess with my machine long enough, it will eventually do what I want, even if what I did made no obvious sense. Like in this case:
I came across “print user settings” and clicked on it immediately. The machine decided it was okay to print this (maybe because it was an internal document?) and it did, perfectly. No more “cannot detect ink”. Then I went back to my document and tried to print it from my computer and it printed it, no problem. So we’ll see how many pages it will give me yet again after another “fix”. Thank heavens for social media and people sharing fixes or I would be bald from this printer.
Hi Karen, printers can be a big pain at times can’t they! thanks for your comment, you touched on an issue not mentioned above, that we mentioned in a previous comment. Often updates to the printer cause cartridges to fail. Unfortunately it’s usually the printer manufacturer trying to prevent the use of compatibles.Thanks for the great tips, I’m sure they’ll help everyone to get around this issue! Thanks, Stu.
I have Samsung Multixpress 8385 nd copier. when I replaced new toner cartridge. But toner is not compatible
toner is original Samsung toner from south Korea
can you help me
Hi, is the printer also from South Korea? If not, it would be an issue with the region coding in the printer/cartridges as cartridges from a different region won’t work.
My problem is not that the cartridge is not recognized to print but now that it is empty the printer does not recognize it and will not automatically line it up to replace. I cannot find any instructions anywhere on how to manually align the cartridge so I can change it. I have a Canon MB2360. It is really annoying me as I do colour menus and can’t use the yellow. Anyone got a solution, would be greatly appreciated. Cheers
Hi Catherine, it could be a mechanical issue from the sounds of things. Have you had it for under a year? If so it should still be under warranty with Canon you can contact them here: Call Canon 13 13 83
From within Australia Monday to Friday – 8am to 5pm
Hello Stuart I have a couple of questions. My printer is a canon mx490 that uses pg245 black and cl246 color cartridges. I would like to know wher to buy a cartridge chip reset tool or programming tool. I also want to know if there is a way to stop firmware updates on my printer within settings somewhere.
Thanks Jason
Hi there Jason, unfortunately I wouldn’t know where you would get a chip reset tool. Yes, there will be a setting in the printer to stop it from connecting to the internet to search for updates. You will need to check your printer manual for where to find the setting.
I have a deskjet plus 4140 and new hp 67 cartridges, I installed them and it just keeps giving me E0 flashing a little orange light.
Error E0 means the cartridges are not recognised. Given that they’re new cartridges it either means the contacts on the cartridges are dirty, the contacts in the printer are dirty (or both) or the cartridge is damaged.
I have a HP printer scanner, all my drivers and stuff and firmware are all up to date but it still wont accept my refilled black ink cartridge which came with my printer scanner even though its been refilled but my local computer store where I bought it from so I bought a new catridge and tried all kinds of ideas from the technical guys and what it says on the internet and instruction manuals plus the comment of keep swapping old for new and so on and still no joy this is the second time I have bought one of these models and its doing same as my last one so think I’ll just smash it and go to a different make and model instead of wasting money.
I had to create a tiny shim to stick under the cartridge so the contacts would fit snuggly together.
Great Information…
I am using Samsung LaserJet Printer. Thanks for your support and sharing Information about Samsung Printers.
Help, mine is aficio dsm520pf and after replacing the toner, it is still saying toner empty so I don’t know if its the sensor or the toner I replaced is not compatible. Does the sensor stop working or not.
Hi Kelvin,
have you tried some of the tips above and on the comments left by others here? If it’s a cartridge you only purchased recently it could be that the printer memory needs to be reset but if none of the tips help then its likely that it’s a faulty toner. Try and place your last cartridge that you removed back in to your printer (if you still have it) and if that also displays an error then you may have a printer fault. Let me know how you get on! Thanks, Stu.
I have two different Brother printers and both say the same thing, “Cannot detect the ink. Please replace the cartridge with genuine Brother part or cartridge” Is there a way around this?
Hi Scott, it’s generally caused by a similar issue explained above, if you’ve tried those options to no avail it could be an issue with the chips on the ink cartridges.
Thanks,
Stu
I wonder if you can help – I have a HP OFFICEJET PRO 8620 which comes up with the message
” PRINTER FAILURE, THERE IS A PROBLEM WITH THE PRINTER OR INK SYSTEM TURN THE PRINTER OFF AND TURN ON AGAIN” If problem persists ring HP.
Which I have done, they say because I have used non standard HP cartridges I have damaged the print head and my CARE PACK is invalid because of it. I have tried everything I can including removing the print head and cleaning everything but I suspect HP are up to their old tricks and shutting down remotely anyone who tries to not use their overpriced inks. I will now buy another Printer – can you either see a way round my problem or recommend a printer that is more able to accept non standard cartridges since HP’s cartridges are outrageously overpriced.
Hi there, thanks for your question. I’ll do my best to help! It does seem that the ‘Printer failure’ message does refer to a print head issue but in my experience it is very rare that a compatible or remanufactured cartridge would cause a fault like that and I’ve been working in the industry for 10 years now. Your printer warranty cannot be invalidated by the use of compatibles unless a printer technician checks your printer and confirms that. Unfortunately a HP technician will usually give that reason if you have been using non HP cartridges, even if they weren’t the cause so your options are to get a non HP technician to check your printer and confirm what the issue is (hopefully confirming that it isn’t your non HP cartridges fault) and then your warranty will not be invalidated and you can also get HP to foot the bill for the technician as they told you your warranty was void without even checking your printer.
my epson stylus refuses to accept any inks other than their own expensive ones – nothing l do will alter that
I have the same problem. From what I have read it is because of a recent printer firmware update. I cannot find a solution to it. Does anyone know how to fix this pls?
Hi Roger My Epson Expression XP-760 has the same problem
if its an H P printer the best thing you can do is find a very big hammer and smash it up , or pay the ripoff prices hp charge ..
my epsom stylus dx8450 will not recognize ink cartridges
Hi Joe,
have you attempted the suggested fixes?
Stu
Stuart I too have an epson and today updated the software/firmware – NOW I know that was a mistake. I HAVE tried all the above tricks that I was able to. The closest I got was installing the old cartridges, let printer do it’s check and it ok’d those cartridges and then I quickly switched out the old for the new generic cartridges. Printer didn’t detect it….at first. I let it sit while I was looking for something to print and 3 minutes later the printer detected the ‘alien’ cartridges, beeped loudly and put up the same old message again. Back to square 1. I don’t dare call Epson and tell them I put generic cartridges in!! Has anyone found any other tricks that work? Or is it back to purchasing only the more expensive Epson cartridges?
Hi Louisa,
you don’t need to go back to buying genuine Epson, what’s happened is that the chips on the compatible cartridges are now out of date. The best thing to do is contact the company you bought them from and get an exchange for somewhere the chip is up to date.
Stu
hi stuart I have a canon MG2570S printer and after refilling the cartridge printer doesn’t recognize the ink and even when the ink is full my printer doesn’t print anything…. it tries but even the printing process starts but a blank page comes out please help me out here thanks mate
Hi there, I had a quick search around to see if I could solve your problem and the suggestion is that the print head could be damaged or completely blocked up see here. Did you actually refill the cartridge yourself or purchase a compatible? Thanks, Stu
Pls help – I have a strange one using compatible on HP Officejet 8600. Inserted, seems okay, ink shows ‘full’. But when it prints, it says missing or damaged cartridge. All I have to do is open and close the front cover of the printer (as if accessing the cartridges), even just for 1 second, it prints fine. And it does that at every file, even if I send the second file straightaway before it sleep…missing cartridge…open and close cover, prints. Annoying as it loses the wifi function. Any suggestion?
Hi Andy, the damaged or missing cartridges issue seems to be a common problem with the HP OfficeJet Pro 8600 printers but there doesn’t seem to be a clear fix for the issue. One suggestion is to try a hard reset of the printer.
To do a hard reset, turn the printer on and wait until all sounds stop and it’s in idle mode, then unplug the printer at the wall. Wait for about 10 minutes, then plug it back in. Make sure it’s plugged directly into the wall and not into an extension cable. Allow the printer to warm up and then go back to an idle state and try and use it again.
Hopefully this will fix your issue! Let us know how you get on.
Stu
Thank you for your help, unfortunately I have tried 4 times of the suggested method, each time waited for more than 10 min and into idle before the trial, so far it has not been successful. Any other suggestion? The printer is getting quite annoying. Kindly regards.
I use a brother DCP-J100 printer and it works fine. But recently it says “cannot detect ink” “replace magenta ink” and when I reinstall the ink it still won’t work. I’ve tried all the steps but it won’t work and now I can’t print my school works. I don’t know what to do anymore.
All you can do in this instance is try a replacement cartridge. You can try everything but sometimes they just don’t work.
worst help page ever. “turn it off and on again” this is not helpful it is just ridiculous and a way for you to make a page to sell advertising.
waste of time
Hi and thanks for your input, we do appreciate any, even if it is negative! I think you’ll find if you follow the instructions that this solution is the correct way to fix the problem described. Also ‘turn it off and on again’ is the number 1 solution to most tech problems (by the way that was a light-hearted joke).
I have an Epson SX430 printer which, until recently, would accept non-Epson cartridges. This has now stopped and I can only think that is because of a recent printer update. Does anyone know of a fix for this pls?
Hi Angela, unfortunately it sounds like since the firmware update you mentioned the chips in the compatibles may now be out of date. The best thing you can do is send them back as faulty and try some newer ones from a reputable supplier.
i had a cannon pimxima i think that is the right name drove me mad with the colour so i got a printer black only it uses a roll not a cartridge and it has never let me down i dont need colour and the rolls are much cheaper and last longer
it’s as simple as this…..it,s cheaper to buy a new printer than a new cartridge.i just replaced my ink and nothing works can’t print anything.
I believe this is right. I’m on my 3rd printer due to running out of the initial black ink cartridge and the printer not accepting the new one.
Just buy a new printer every time you run out of ink. Quite the scam, printer manufacturers!
New printers come with start ink toners.
When you buy a toner the life of that toner is often twice or 4 times that of the starter toner.
Buying a new printer is actually not feasible.
However, for long life consumabels for lower end machines it is cheaper to buy a new machine. (E.G Fusers/Transfer Belts as these will have lives of 10,000 pages upwards and cost as much as the printer)
Today, I came across your web site by accident, since I too have printer problems with my Samsung SCX-4600. I find the requests and your answers very interesting indeed and will continue to read your offerings. It almost appears, that the printer world is full f crooks with all the problems which ‘they’ program into their products. Regards Dierk from Germany
when you remove cartridge then switch off a 2540, it moves cartridge holder back then ,un plug wait 10 mins, plug in…. the cartridge holder is “hidden” unavailable…
so can not complete your sequence ( above) and insert cartridge before switching on..
Hi Thomas, reverse the two steps so you install the cartridge once the printer is is powered on.
I’ve got a seven-year-old Brother printer that’s beginning to get senile. It has a long think before it does anything and flashes up odd error messages now and again. It’s latest trick was to stop in the middle of a print run (where all the inks were crystal clear and the black nice and black) and declare that it couldn’t detect the black ink. Lots left in the cartridge, but I put a new one in. Same message. Unplugged and plugged back in, fiddled with cartridges etc but still says the same.
On the floor behind me is a nice new printer. It also cannot detect the ink cartridges – for the simple reason that they cost as much as I paid for the printer and I simply can’t afford them.
What do I think of modern technology? You wouldn’t be able to print it.
It sounds like you’ve had nothing but trouble with printers Frankie!
Is there any specific error message on screen (if there is a screen)?
Stu
Just bought an Epson WF-3640 but when trying to install the printer isn’t recognising the set up ink cartridges, any ideas so I don’t have to return the printer to catalogue and wait for new one to arrive
Hi Kelly, Epson printers like to be a little more awkward than most other brands. There are a few things you can try…If you’ve already tried some of these skip over them:
1. Make sure the cartridges have all tabs or protective clips removed and are clicked into place in the printer properly.
2. Make sure the printer software / firmware is up to date by downloading the most recent drivers.
3. Try a memory reset of the printer by turning on and removing the cartridges, turn the printer off, unplug at the wall and leave for 10 minutes. plug back in, turn on and re install the inks.
Let me know how you get on!
Stu
Hi Stu, tried all that and nothing is working
Hmmm, is there a specific error message on screen or error code? If there is one it might help us to get to the bottom of the problem.
Other than that, something I read suggested it could be remembering the error and not clearing it properly. You can see more info on that here
All it says is installation incomplete, ink cartridges unrecognised, try again
Every site I’ve tried to get info has nothing for problems with initial set up of printer, they’re all just for replacement of cartridges
There’s one more thing I’ve seen someone mention on a forum that actually sounds a bit odd but maybe worth a try.
It sounds like the contacts on the ink cartridge chip are the problem or that it for some reason can’t connect properly to the printer.
The suggestion is to use a pencil eraser and gently rub the metal contacts / chips to clean them. make sure there is no eraser left on the contacts and try to install them again.
Other than that, I think it could be a printer problem. As you mentioned. There doesn’t seem to be any solution for a brand new printer that I have experienced.
Stu
I’ll give it try Hun thank you, if that fails I’ll send it back and get a replacement
Didn’t work hun
Sorry I couldn’t fix it for you! You can contact Epson on this page here
Could you tell me if the ink cartridges for a Canon Prixma MG5550,
Will work in a Canon MG 5750.
Old printer gone to the big printer in the sky, but still got inks for it and the MG 5750 looks to be the same all bar model number.
Many thanks Barry
Hi Barry, oh no that’s sad news! I’ve had a look and unfortunately the ink cartridges that go in the MG5750 are different to the ones you currently use (You printer took CL551 but the MG5750 takes CL571). Here’s a list of the printers that take the CL551 inks:
Canon PIXMA iP7200
Canon PIXMA iP7250
Canon PIXMA iP8750
Canon PIXMA iX6850
Canon Pixma MG5450
Canon Pixma MG5550
Canon PIXMA MG5650
Canon PIXMA MG6350
Canon Pixma MG6450
Canon PIXMA MG6650
Canon PIXMA MG7150
Canon PIXMA MG7550
Canon PIXMA MX725
Canon PIXMA MX925
after leaving my hp deskjet ink advantage 2135 for 3 months when i sstarted it says color cartriges are incompatible. what to do
Hi there, are they compatible or original inks? They may have actually dried up you see as they were left for a long period of no use. It could also be a software update that caused the issue.
I have a Canon pixma ip90 I have changed the head as well as the catridges it does not print
Hi Edward, could you tell me if there is a specific error code or message on the printer when you attempt to print?
My cartridges are stuck, So I cannot do the steps you provided. HELP
Hi Mari, what’s your printer model and could you give me some more detail on what happened? Stu
i filled the cartridge with ink but the system saying tha ink has run out… what have to do?
If you refilled the cartridge yourself you would also need to reset the chip on the cartridge to get the printer to see that the cartridge now has ink.
Hi Stuart. My Hp Office-jet 8610 was working until I changed router. Now the screen shows printhead missing or failed. I have tried everything. When I contacted HP for help the person assigned to help me tried to get me to exchange my printer for another one at a cost of $122. I can get a cheaper one at Best Buy or Staples for less.
My ink level is almost full. If I purchase a reset the chip cartridge could this solve the problem or should I just purchase another printer?
Hi there, I don’t think that using a chip resetter will help you in this case. It sounds like some damage has occurred to the print head as suggested by the error you get on screen. These can be replaced but for what it would cost, you may as well buy a new printer. Sorry to be the bearer of bad news! Stu
Hi,my Canon ipf710 cannot detect a new catridge at all,ave tried above steps but still can’t..kindly assist what might be the problem
Hi Jackie, as you’ve already tried all the listed steps I thinks it’s more than likely that there is a larger problem at play. If the cartridges are compatible ink cartridges it’s probably a fault with the chips on the cartridge and you’ll need to speak to the company you purchased them from.If they are original, I would contact Canon Support here
Stuart
Hi. My Mom has an HP 2134 printer and she has been using Real HP ink cartridges which she has just replaced but the light still keeps blinking. A possible connection is that where I push the ink cartridges in, it’s a little shaky now where before it was firm, I have to hold the back in order to push them in. Is this causing the blinking lights? I have turned it off anyway and unplugged it and am waiting half an hour! I have cleaned the ink cartridges. Thanks
Hi there, it certainly is possible that the inks aren’t touching the contacts correctly if they haven’t clicked in fully. Is there any warning message on the printer? Depending on which light is blinking can mean different things.
Thanks I figured out what was wrong! After buying a new printer!! The REAL HP ink cartridge was dried out or something and not recognized by printer (the colour one was ok!) I think I will try out what you sell! Thanks for all your support.
No problem, thank you!
Stuart, I have a Samsung Xpress C430. The yellow/magenta/black are non-Samsung cartridges but the cyan is a Samsung cartridge. I was printing and then all of a sudden the printer gives me the error message that they yellow and magenta are not compatible. I did not get a message for the black. I’ve tried cold resets but does not work. Any other Suggestions?
This sounds like a printer update may have caused the chips on the compatibles to fail. The only way to fix that is to get the chips reset or replaced by the company you bought them from.
Cannot make my brother MPC430W accept a new cartridge purchased from (Office Outlet) despite the fact that it is an identical brand and model to the previous one.
There appear to be no electrical contacts on the cartridge. I do not know the brand but was purchased as a replacement from a reliable supplier.
Any ideas?
Hi David, I’m not sure these specific cartridges have a metal contacts or chips, are they there on your old ink that you removed? If not then it’s likely to be a clogging of the ink in the cartridge and you may need to contact Office outlet for a replacement cartridge.
I have a HP LaserJet4plus. Replaced the toner cartridge with a HP98A LaserJet print cartridge.(92298A) Get 14 No Cartridge message.
When I insert the old cartridge, I get the same message. I have gone through the 8 steps and the additional Still Having Problems steps…and still get the same message. HELP!
Hi there, is this a compatible / remanufactured toner that you installed? I take this is likely the case as HP have discontinued original toners for your printer now. If so then it will be the toner that is at fault and you’d need to get that replaced by where you purchased it.
We bought a genuine Samsung toner cartridge from you guys back in December last year. It has been stored in a cupboard and kept dry and in its original packaging. I’ve just put it into the printer and it is saying it is not recognised. Could this be due to the age of the cartridge? I was under the impression that these cartridges lasted more than 12 months? Tried all of the above twice with no luck. Any advice greatly appreciated.
Hi Gary, you shouldn’t get an issue like that with a genuine cartridge after only 12 months so it sounds like a fault. The packaging should have protected the cartridge while it was being stored so I’d imagine if anything the firmware on the chip / contacts is out of date. As it’s been almost 12 months, it’s out of the 6 months warranty but if you give us a call on 0845 365 3605 and ask for Lou (our customer care team leader) mention you spoke to me online and we’ll discuss if there’s anything we can do for you. Stu
hi ….. what is the difference between samsung printer toner mlt-d111s and mlt-d111s/els
i recently bought mlt-d111s/els for my samsung printer M2070 but it keep on giving me (not compatible toner cartridge) can you please tell me what is the reason for this? and how i can fix it?!
regards
Hi Pedros, the ‘/els’ part of the product code is just something that is sometimes used or not. Technically all cartridges should have /els but most retail websites leave it off, they’re the same cartridge.
It sounds like the issue you have with your printer is caused by the chip on the toner. If you’ve tried everything on this page without success, you’ll likely need to return the toner as a faulty product to the company you bought it from.
Stu
Have a Canon Pixma MG4250 – it came with cartridges installed – they have now run out – tried to change them with new Canon cartridges – says I am not using the correct cartridges???? bought at the same time of buying the printer. Right numbers – so what do I do now?? Any ideas
Hi there, could you let me know what the cartridge numbers are (product codes) and where you bought them from (a url would be a great help). It’s very strange that original inks would do this.
second step worked for me, many thanks.
I have a Office Jet 3835
Latest new cartridges coming up not compatible. I subscribe to Instant ink printing plan.
I would assume you’re using the cartridges provided by HP. HP did an update that rendered a lot of their own cartridges useless. You’ll need to Contact HP support for help reversing the change / updating the printer again.
This printer still won’t work with the new cartridges. No matter what I have tried, it does look like the black cartridge was accepted but not the color cartridge. HELP!!!
Hi, if you can let me know which printer do you have, whether the cartridges are original, compatible or refilled and if there are any onscreen error messages.
Congratulations on the article! I would like your help! How to clear firmware on old printers? Is there any way on the HP c4780 printer? This printer, strangely, no longer receives rechargeable cartridges.
Hi Jardel, thanks for the compliment. As far as I’m aware there isn’t a way of removing new firmware once it has been installed.
Stu
Hello Stuart.
There is no doubt that the printer companies are making it more and more difficult for
people to use replacement ink cartridges that are not manufactured by them. I just wonder as to the legality of this ?
Can they do this legally ?
Why should I be obliged to buy their cartridges at ridiculously inflated prices ?
Hi Chris, all very good questions!
It is in fact illegal for an original printer manufacturer to not allow a customer to use compatibles or remanufactured cartridges in one of their printers. This is part of the fair competition law.
However! As you mentioned, it seems that printer manufacturers make it difficult for people to use them.
The biggest competitor printer manufacturers have, even bigger than each other, are companies that produce compatible or remanufactured cartridges.
That’s because OEM manufacturers sell printers at a heavy loss, banking on making the money back with sales of consumables. It’s also why original consumables are so expensive. At the end of the day, they are businesses and need to make money, as frustrating as it is for us!
What printer manufacturers tend to do is constantly update the firmware of printers and the chips of inks, so that the chips on remans go out of date and printers don’t recognise the inks / toners anymore and deliver a cartridge not recognised message. There is no law against them updating printers so technically, they aren’t breaking laws.
I suppose it’s like buying a new car at an extremely discounted price and then being told, you have to buy the petrol from the manufacturer and for more a lot more money than you have to. Its not exactly the best business model to keep customers coming back!
Stu
Hello-
I have an old workhorse (well, ok, maybe a pony) HP 1012 inkjet- i bought a knock-off brand from a company nearby and it worked for maybe 30 on and off different pages over a few weeks. For some reason today it said it could not print due to low toner. I cleaned the contacts as best i could see them (looked like the heads of paper clips inside the side of my printer that would make contact with some flat shiny metal bits on the sides of my cartridge, the left side of the log-shaped cartridge). Did the unplugging routine, left for quite a while…could the cartridge just have failed, or did my trusty steed just “croak” for all intents and purposes?
Hi, I doubt the printer is the problem. It’s more likely that the cartridge software has become out of date. Original printer manufacturers tend to keep updating printers and cartridges so that the firmware on the chips of compatibles / remans doesn’t match anymore and the cartridges can’t be read. Without updating the cartridge chips (usually done by the manufacturer before sale), they won’t register in the printer anymore.
Can a genuine toner cartage be replaced with a compatible cheaper one by
removing the chip from genuine one to the replacement one?
Hi Marion, no that wouldn’t work. If it’s an empty original, the chip would register as an empty cartridge.
It is evident to me that the firmware updates are generally the cause of the problem. I have a Samsung MX-830 I purchased a few years ago and I’ve been using alternate suppliers’ ink cartridges for 3 years.
Yesterday I loaded my samsung setup disc into a new computer and stupidly allowed the firmware update to install.
Now the set of alternate ink cartridges–that worked fine the day before–are all showing as “empty” and I can’t print.
These printer manufacturers bait us with cheap printers and burn us with absurdly expensive ink.
Not much to say for their ethics!
Just swap the new chip for your old (from the empty but was functioning cartridge) this solved the incompatible cartridge issue for my Samsun ML2165-W!
Hello, I have an HP Photosmart 7525. A message appeared that read cartridge was missing or damage. I followed all the steps. Unistalling cartridges,turning off printer,unplugging from wall outlet, waited for 10 mins. Plugged back on, waited for printer to calibrate and so on. And still get the same message. I replaced the damage cartridge(cyan) with a new one. Now I get the same message with a different cartridge which is black photo.
Hi Laura, are you using compatible inks or originals. If you are using compatibles, it sounds like the software on the cartridge chips have been knocked out of date by a printer firmware update. Replacing the cyan with a new cartridge with a more up to date chip, solved the issue for that colour.
This happens because basically compatible or remanufactured cartridge manufacturers have to keep the chips up to date with the printer software and the printer manufacturer will continue to bring updates that put old chip software out of date (to stop old compatibles from working). The only thing you can do is get a faulty replacement from where you bought the cartridge.
Stu
Hi we have a SAMSUNG CLP-415N printer and we have ordered replacement cartridges and when loaded there would be an alarm indicating “not compatible toner cartridge”. I have checked with the old cartridges and the number has slight deference like for Black the new cartridge we have is CLT-K405/SEE while the original was CLT-K405/ELS. I tried and printed out the built in supplies information and it was indicating that the printer and supplies are from Europe. I am thinking that the new cartridges may be for another region and we have to change the region of the 2 printers we have as we have already spent a lot on the newly purchased cartridges. Please suggest anything to resolve our problem. Many thanks.
Hi there, as far as I can tell the cartridges with /ELS are UK toners and the cartridge with /SEE would likely be manufactured for Germany. Unfortunately I’ve never attempted to change the region of a printer so I’m not sure if this will help but it could cause issues with Samsung if you have a warranty with them. Could you return the cartridge to the company you purchased them from and get a refund?
Hi I have an Epson WF 2760 Printer that will not recognize the ink cartridges. I used the same cartridge the last time i printed when it was time to replace it, the printer will not work.i want to replace only the black.
I have an Epson 315xp, colour cartridges were low, so
replaced with genuine Epson cartridges, but not the black
as that is Half full. message came up “cartridges not recognised”
Saw on the pack is 4 months past use by date (don’t do much printing)
could that be the reason? or should I have replaced the black as well, that is in a different pack because I had already used the black which was in the same pack as the colour ones
Hi there, the ‘use by date’ is only a guide so shouldn’t cause an issue. It’s more of a best before date. What’s probably happened is that the changing of the empties has triggered the printer to check the cartridge chips again and a software update in between has caused the black ink to be unrecognised. It’s very frustrating but it’s likely this software update means that you’ll need to replace the black now.
Hi Stu
I was looking for a replacement printer and ran across your very helpful website. I currently have an Epson XP620 all in one which has proved to be the most worthless, exasperating poorly constructed, techno joke I have ever had the misfortune to purchase. I previously had a Canon Pixma all in one (can’t remember which model). It was expensive, but it did everything it said on the package and I never encountered any problems installing compatible cartridges in it. It gave up the ghost after 5 years but for the money was still economically viable and, most importantly, stress free.
I absolutely refuse to bullied into paying the exorbitant cost of brand name ink cartridges, when the compatibles are every bit as good at a third or even quarter of the price. Every time I attempt to install a compatible cartridge into this Epson, it takes at least an hour of frustration to force it into compliance, and now after 3 years of wanting to demolish the darn thing, I’ve finally reached the end of my tether, but am totally gutted to learn that these underhanded tactics are now included in all printer software.
Apart from manufacturers greed, I’m wondering why we need updates at all? My old Canon worked 10 times better than this one without being complicated by creepy Big Brother technology. Next thing we know we’ll have to provide passwords and bank details to operate normal household appliances!
I do lots of artwork, writing, and printing, therefore I require a printer that includes WiFi, printing from PC, duplex printing, scanning, copying and good quality photos, and easy installation of compatible cartridges. Simples!! I don’t need a mobile app, cloud scanning, email print etc etc. I have other devices that serve that purpose.
I’m no techno expert so am wondering if you know of any way to avoid installing the offending bits of updating software at the outset if you don’t require them? Or, what if you don’t install the branded cartridges provided and start off with compatibles?
Hi there,
thanks for your comment. I share your frustrations as well. I bought an Epson inkjet for home use myself and it’s a nightmare to use! I’m not surprised you’re at the end of your tether!
You’re completely right, these days all the manufacturers place these software updates in that cause similar issues but I would say that you’d probably have the best experience with Canon or Brother machines so if I were buying a new printer, that’s what I’d go for.
If you start with compatibles, it’s unlikely to have any difference as they come pre-installed with software / firmware but you can of course stop further updates by not having the printer connected to the internet or stopping certain settings. Although, I think soon enough the printer will run into problems and demand an update of some description and I’m not too sure how long you’d be able to go without one. There are lots of good reasons for these updates such as security improvements, bug fixes and added functionality and the ones that normally cause the printer to reject cartridges are firmware updates rather than software updates. Most times, you will be asked if you want to go ahead with a firmware update so it might be possible to connect the printer to the internet but just say no to these. Hopefully that would help.
You would also need to disable automatic updates by going to the settings (control panel on the PC) finding the printer settings options, right click your printer and navigate to properties of software update settings and setting that to ‘never’. This way, you won’t automatically get these pesky updates without being given the option to say no first.
Hopefully this will help!
Stu
Stu,
First of all my compliments on all the help you are offering here. In one of your replies you offered to point someone in the direction of a printer that would better serve their needs (i.e. not rejecting compatibles) but did not actually say what make/model(s) you had in mind. It seems to me that all the main OEMs out there are all playing the same game and the consumer is losing out, the only option then is for consumers to vote with their custom and to give it to OEMs that play fair – so in that vein how about putting up a list of makes/models that your experience has shown to be friendly to compatibles?
Hi there, thanks for your comment.
Unfortunately as new printers have been released the problem has become even more apparent. What I’m trying to say is that there aren’t any printers anymore that are friendly to compatibles. Every OEM manufacturer are using software to prevent compatibles from being used. It’s absolutely unfair, and the way they are doing it is to keep changing the software on the chips of ink and toner so that remanufactured cartridges are no longer recognised by the printer. Unfortunately, it’s not against the law to do that but it’s definitely doesn’t seem to meet the fair play laws to me. I think the only way to stop this would be a court case against the manufacturers and if they lost, it would be likely that they would have to stop preventing the use of compatibles in this way.
I know this is an older post, but I’m curious… is there any major printer manufacturer that does NOT actively prevent (via so-called firmware updates, etc) off-brand, generic ink cartridges from being used?
I have recently been incredibly frustrated with Epson, due to their questionable (illegal?) handling of non-OEM cartridges, and I would like gladly purchase a printer from a company with less unsavory business practices!
Unfortunately not! They all seem to do this these days, it can’t be escaped.
They tend to offer the explanation that they are preventing fake products (products that are copies and try to pass off as original products) coming from the far east, which is an illegal act and they are within their rights to prevent, but it allows them to conveniently block other compatibles or remans at the same time.
This is just the impression I get from feedback, not necessarily the absolute truth!
I used ink in jet printer and now it wont-work. Supposedly the inquest compatible, but now, it doesn’t work at all. Should I buy a new printer or fix it?
Depending on the brand of the printer you can normally get them to work, if none of the tips on this page worked, often the problem is the software on the chips of the cartridges. You may need to get the cartridges replaced for a new one and see if that works.
I am appalled by the spelling in the title of this information and would not seek help from you Mr. Deavall based on this alone. What grade education do you have? What is your current reading level?
Perhaps you should work on your academics before you tackle these sorts of things as it will serve you better in your future. Unless you spell words differently in the UK, you should learn the proper spelling of words when dealing with those of us living in the United States. For future reference the word is spelled RECOGNIZE with a “Z” not a S.
You define yourself using the word “giant”? You are certainly no giant academic scholar. Isn’t this embarrassing? What a shame.
Hi Robin Ann Tussey!
Thanks for your comment about my grammar, I actually don’t have any grade education but I’m not that embarrassed as I was educated here in the United Kingdom where we spell ‘recognise’ with an ‘s’ not a ‘z’.
Luckily, we can both accurately spell things either way! Happy post 4th July!
Stu
I have a Canon mg 5750, bought a compatible ink tank. but my printer won’t take it.
rejects it saying unknown or uncompatible ink tank, incert new. there I stand.
I have done a lot of tests, cleaning, on and off, even wall socket. I’m fed up, I have two other compatible who work. wonder why?
Hi Svein, thanks for your comment. The reason for this tends to be a race against time. What I mean by this is that when compatible cartridges are manufactured, the information on the chips are made to match the software on the printer, but over time as the printer software updates, the information on the chips goes out of date and the cartridges are rejected by the printer, so sometimes the chips are still valid and sometimes they are out of date. It sounds like you have experienced both instances.
Issue solved within the first 8 steps after an initial period of panic. Thank you for this informative guide!
Hi I have a brother printer model MFC-J450DW. I purchased ink from LDproducts.com. It says that the cartridges are compatible with brother, its showing that the cartridges have been replaced and it shows that they are full. However, when i try to print the page comes out blank. Will you be able to help? I’ve tried several ways but I’m still stuck.
Hi there, that’s very strange, this sort of thing tends to happen if the plastic protective strips haven’t been removed from where the ink comes out of the cartridge. Do they have any protective strips on them?
Tried every step – nothing worked. I have a Samsung M2026W printer & am trying a MLT-D111S/XSG toner, which is supposed to be compatible. And it is a genuine Samsung toner.
Hi, which country did your printer originate from? I have a suspicion that your issue is regional encoding. The toner MLT-D111S/XSG originated and is meant for printers in South Africa or the Middle East but if your printer is encoded to another continent then the cartridges will be rejected.
I’ve tried series of the methods above to my less than 1 week old printer (canon MG2540s) but it seems not working here, the printing continue complaining that the following ink cartridge cannot be recognised. color, and black etc. I allowed it to rest, cleaned the electric contact of both, yet the problem still persist, please help… from Nigeria
Hi Ezekiel, this is a strange thing to happen in a printer that is less than 1 week old. Are the inks, Canon inks or remanufactured inks? If they are remanufactured then it’s likely there is a fault with the chips on the cartridges and they’ll need to be replaced. If it’s the starter inks that you received with the printer or other original Canon inks, there may be a problem with the printer and I’d advise to contact Canon and ask them to replace your printer.
I have a Xerox Phaser 7800 and have recently come off a Xerox contract due to the appauling service they were offering. This means however that I now have to either purchase official Xerox cartridges at £200 + VAT each or the Toner Giant ones at £70 + VAT, so no brainer! This seemed to be working out fine for me but I have now got a recurring error that is very frustrating. The copier accepts that I have put a new black cartridge in and shows as full on the screen. However after a few prints it goes into a processing state and changes the level of the black to empty and wants another cartridge. I know that this is a brand new toner Giant Cartridge so there is plenty of ink. If I switch it of at the wall and leave overnight it comes back on saying black has toner again only for it to change to empty after a few copies. I am finding it very difficult to get anything printed and as this is my only machine is causing a serious headache. I have made sure the firmware on the printer is up to date. What tells the copier that the cartridge is empty? Can you advise please?
Hi Chris, thanks for your comment and for buying our compatibles.
There is a chip on the toners that carry the capacity info and it will have a code or serial number that matches the printer software. Automatic updates to the printer can cause the chip to no longer match. It’s normally how original manufacturers prevent the use of compatibles in their machines.
Best thing to do is if we get in touch with our tech team and see if they can advise a way to correct the issue and if not we can possibly replace the toners for you. I’ll ask one of our customer care team to get in touch. If you’d rather call, you can contact us on 0845 365 3605.
Stu
Touch wood, your tip of putting the original cartridge back and going off to do something else before replacing with the replacement (compatible) cartridge seems to have worked. It will still be a long time before I touch another HP printer with the proverbial bargepole. I am fed up to the teeth with the inability of the HP Officejet 6230 to deal with images pasted into Word documents, meaning that I have to save as a PDF if I want Word documents to print correctly.
Hi Neil, I’m glad that’s helped so far (Touch wood).
I got to the office and saw that I had an error light on my Samsung CLP-415NW Printer. Not sure what it was I cycled the power.
Once back on, still had an error light. The printer display stated, “Not compatible M toner cart”.
I then opened the Samsung Printer Status icon and it told me the same thing, showing the other three ok.
I had installed off market Cyan and Yellow toner cartridges prior to March of 2018. (The after market Black didn’t work well so I replaced that with a Samsung cartridge)
I then opened the printer door and slid out the cartridge rack, slid back in, now all three after market cartridges, (Cyan, Magenta and Yellow), show “Not Available”. . . Not Compatible!!!
I’m running Windows 7, and have my automatic updates turned off. I have not run a Windows update since 4/22/18.
I have purposefully in the past NOT downloaded the optional Samsung Printer updates as I had heard that they were attempting to prohibit the use of after market printer cartridges from being used in their printers.
So, why all of a sudden after at least 6 months of running with after market cartridges has my printer decided that they are not incompatible?
Either the chips on the after market cartridges were programed to fail today, on 9/12/18, or Samsung has somehow, without my permission, updated their firmware on my printer without my permission!!
Per this website, I’ve tried replacing the old, out of toner original cartridges in, (The printer just tells me that they are empty), re-installed the aftermarket ones and still no go.
The only change to my system is that my internet provider has installed a new router/modem, doubling my speed. (Although I was never able to use this printer wirelessly, it’s connected via usb)
Is there a way of physically taking it apart and restoring it to its original firmware, and stopping the firmware from ever being upgraded again?
Hmmm if the originals that you put into the printer are also causing issues it could be a memory issue. Try taking all toners out, power off, unplug for 10 – 20 minutes, plug back in, install toners and see how you get on. It could possibly be a firmware update which can be installed separately from software updates that has caused the issue with the remanufactured cartridges but unfortunately once firmware is changed, I don’t believe that it can be reverted to a previous version.
Good thorough article. About the same time that Bret (Sep 12 2018) had his problem I also had the same problem on my two Samsung Xpress SL-C1810 colour laser printers. Never a problem for years then both within 6 hours don’t work!?!?.
Tried most of the suggested fixes. Highly probable its a firmware update that has created the issue for users. The problem even continues with the genuine Samsung toners, while they are not empty they are older ones.
I tried installing an old 2015 firmware – no good. Took out the C2032 battery (RHS panel) – no good and had to reset the date – should have wiped internal memory. Installed latest firmware. No good.
On principle I don’t want to add to landfill which appears to be the result of printer companies dubious consumer tactics. HELP!!
Hi Bret, it sounds like a definite firmware update caused your issue, unfortunately I think when you try installing old firmware it starts to cause issues and I’m not aware of any way of correcting the issue you have. Maybe try installing the newest printer drivers onto your computer. I’m not sure what else you could try I’m afraid!
Hi, I own colour laser all-in-one printer Samsung C1860FW. It had non-original toners installed and was working fine. When cyan toner finished – i have replaced it with another not original one. Surprisingly after that Yellow and Black toners appear to be “not compatible” even tho they were not touched… any thoughts? P.S. Before changing and after – printer was not connected to the computer or WiFi and still shows firmware from 2015…
Hi Martin, I’m quite stumped with this. It’s possible that because the data on the chips don’t match for each of the toners, that has caused an issue but other than that I’m not entirely sure what has happened as you mentioned not being connected to the internet. I guess it could be possible that the contacts on the toners aren’t properly connecting to the printer, that could be one thing to double check.
no, I do not think it is chip/printer contacts as that was one of the first things I have checked/cleaned…
I’m sorry Martin,
I’m not sure what could be the issue. If you haven’t already, I’d try to reset the memory and install all toners again in one go (as per the advice in the article).
Stu
Done that aswell… thinking of trying with new set of toners in one go… but thats bit pricey option in case of fail – hence trying everything else possible first…
Question to Stuart or else who can help.
I have a leaser printer Samsung SCX 4725FN and while I insert the toner cartridge I got an error message “Install Toner” and I can’t clear this massage and this prevent from the printer to work.
I bought an additional cartridge but same error remain.
Any idea will be appreciated.
Hi Aaron,
If this has happened to two different toners it could be a problem with the metal contacts where the toner chip connects inside the printer, remove the cartridge and have a look at the toner to see where the contacts are and try to spot inside the printer where they connect. It’s possible they have been squashed back instead of sitting proud, causing them to not connect correctly when the toner is installed. Make sure the printer is unplugged and if you can use your finger to gently pull forwards, but not too much that would damage them. Then try and install the toner again and plug in and see if this works.
Stu
THE INK IS MG3250—BUT IT KEEPS SHOWING SOMETHING ELSE
Hi Len, it sounds like the cartridge chip information is incorrect and I would class these as faulty inks, they would need to be returned to where you purchased them for some that are correct.
Tried the 8 steps and not worked. I have a new HP6950 and have purchased a replacement cartridge. Any other ideas please
Hi Mark, if the replacements are compatible or remanufactured it’s likely that there is a fault with the inks (if all steps don’t work correctly).
I have a Brother printer (MFC-J6910DW) and recently replaced the yellow, cyan and magenta cartridges with Calidad cartridges (compatible with Brother). The cyan and magenta cartridges are fine, but the printer cannot detect the yellow cartridge, which is very infuriating as I now cannot print anything at all. I have tried everything on this list that I can do (it is an inkjet printer), as well as suggestions from other articles and websites, but to no avail. Any ideas for how I can get the printer to work?
Hi Mia, that is extremely frustrating! It’s likely that the data on the ink cartridges microchips are now out of date and the only thing you can do is replace the ink cartridges with some new ones and see if that fixes the issue.
WOW after 4 days of trying to get compatible ink to work on my epson sx235w even uninstalling the printer your 8 STEPS worked for me thanks
Brilliant article and overall fantastic information shared Stu, I’ve been in this industry for 10 years and thought I knew it all! I have learnt more in reading these articles and comments in the last hour than I ever could have by myself. Even though I’m technically a competitor (albeit I’m by myself in a back bedroom as an office LOL) I don’t mind admitting that TonerGiant paves the way for customer service skills and is the standard I try and aspire to. Keep it going, OEM manufacturers will never change their habits so the consumers will always be on the look out for good quality compatibles AND excellent service. Cheers Stu.
Hi Charles,
thank you so much for your kind words! I’ve been in the industry for a similar amount of time to yourself so it’s nice to e-meet you!
Stu
Can i use a one ink tank on a cannon printer of 5 ink tanks?
Hi Noel, if the printer is asking for replacement inks on the other cartridges or you haven’t yet installed some it wouldn’t work without all cartridges in place. If all are in place but the other ink tanks have run low, it will allow you to continue printing for a short period of time in the colour that’s left but will give up and require all cartridges replaced eventually.
My Canon ip2600 keeps saying cartridge not recognized, and also keeps printing without magenta(pink/red) ink even though there is plenty of it in the cartridge.
It sounds like there’s an issue with the data on the cartridge chip. The only thing you can do is replace the inks.
I was getting a “cartridge not recognized” error from my Canon PiXMA iP2702 after I replaced a compatible cartridge, and did this:
• with the lid up, removed the cartridge, and pulled the plug without first turning off
• went to the kitchen to refill my drink (Scotch)
• returned and replaced the cartridge, plugged power cord back in, put lid down
• Control Panel > Printers > Canon iP2700 series > Printing Pref’s > Maintenance
• did Nozzle Check, then Print Head Alignment (takes a while)
Printer works fine now.
As changing the software could be a problem with compatible cartridges – what if I turned wireless off so it cant make any updates. I used the printer in the same room as laptop so no hardship for me to put what I want to print onto an SD and print from that?
That’s probably worth a shot. I’m not sure exactly how the printer software / firmware works but it could also be a date based that doesn’t require an update when checking the cartridge chips. That would mean you’d still get issues but it could be worth trying.
Just ran out of my first ink set on my HP2620. Replacement cartridges
were installed and am getting “older generation cartridge” error on the color cartridge. BW seems fine. Put the original back in and got the same error. They are the correct cartridges. Went through all the steps but no joy. Any ideas?
Hi Jim, you can’t fix this issue unfortunately, the software on the cartridge chips are now out of date.
Hello. A friend of mine has an HP printer and has his cartridges refilled. Recently he has run into a problem. The cartridges were working fine and then suddenly it will not recognise them as compatible cartridges and cancels the print job. He has not just had them refilled and they were working fine. Do you have any idea what is going on? Could it be the printer updated over the internet and HP sent something down the line to disable the cartridges?
Hi Dale, you are correct. The printer update has rendered the current cartridge information as old and they no longer work in the printer. HP recently did this for many of their machines and caused lots of problems for customers but they tend to do it to prevent the use of refilled / remanufactured cartridges. There’s nothing you can do unfortunately except get replacement cartridges.
Hello, Stuart. I refilled two ink cartridges in my HP 6978 and now the printer won’t recognize any of them. Can you suggest a fix? If not, what do you think of refillable printers like Epson – Expression EcoTank ET-2650 ? Thanks.
Hi Lora,
I don’t have a lot of experience with refilled cartridges and I normally recommend not to use them as they can cause problems with the printer. It’s likely that the chips are out of date by a software update. If you’re interested in Epson Ecotank, have a look at the article I wrote here / the comments from people who have them:
Should you buy an Epson ecotank printer?
Stu
Canon ts5150 not accepting ink refills, if I buy the originals and it doesn’t work I’ll be launching this printer all the way to Ireland, I’m a student I can’t afford the Canon prices total rip off
I had high hopes when I read your instructions for the “Incompatible Toner” message on my HP LaserJetM1212nf. I had reset, pulled the plug, rebooted, uninstalled countless times but never in the order you gave. But it didn’t work.
My printer will print pages that are in the print queue after I reboot the computer and printer but then it stops, and gives the “Incompatible Toner message.
HP p&scan doctor says it can’t communicate with the printer even though it has installed it. I’m at a loss unless you have an idea for me.
My toner supplier already sent me new cartridges, but those don’t work either.
Thanks
Hi Bob, I was just looking at the manual for your printer, try turning the status messages off in the printer settings on your computer:
Control Panel -> Devices & Printers -> Right click on the HP printer -> Printer Properties -> Device Settings -> Status Messages – Turn to Off
I was going nuts trying to figure out why I couldn’t print with my cannon compatible cartridge, and then I realized I had forgotten to remove the ink protective label. Thanks for reminding about the basics.
Hello! I have an Epson XP-440 that I am using with a CSS and even with OEM cartrdiges I can’t get it to recognize them. I’ll put in one at a time and it’s fine until the last one, then it says all 4 can’t be recognized. I’ve tried EVERY solution I have found online with zero luck. PLEASE help!!
How old are the OEM cartridges? If you’ve had them for a number of years, it could be the chips on them that is causing the problem. Other causes could be damaged or dirty chips on the inks, damaged or dirty connectors in the printer, or printer requires a firmware update.
I’ve tried everything u suggested here but doesn’t work. I’ve been using remanufactured HP61XL cartridges for quite some time but early this year i faced ‘Incompatible black cartridge’ error msg. I sold one and buyer feedback that he was able to use it on his printer. After wasting money on 3 new remanufactured cartridges, should I purchase an original one and try to revive my Deskjet 3050, or is it time to give up?
Hp have done a large amount of printer updates this year so it’s likely just bad look with the cartridges that you’ve been buying. You could try a different source for your cartridges but it’s a risk that they also won’t work. There isn’t much else you can do really.
Canon iP7240 does not recognize any of the cartridges. Worked without problems for over 18 months with non-Canon cartridges.
HP Envy 4500 printer error message:
Ink cartridge problem. The following ink cartridge must be replaced.
Compatible cartridge was installed over a month ago and printing ok when suddenly this error msg occurred, indicating the black installed cartridge.
Why would printer reject cartridge now?
How can I fix this?
Thank you
It’s likely now that the printer software has rendered the cartridge software unusable. It would need to be replaced unfortunately.
My Canon MP630 worked happily for over 8 years, including DVD printing, then it suddenly stopped halfway through an important job… “An ink tank cannot be recognised”.
Panic! Purchased nearest equivalent, iP7250, which was a devil to understand! However, it’s been fine for over a year, especially on DVDs, but now the same message pops up… Code 1410.
I replaced the ink ‘tank’ – no luck – then removed, cleaned and replaced the print head. Nope. Carefully followed other advice – unplug, pray, have a coffee, etc etc. Hopeless! Of course, I have plenty compatible cartridges (sorry, not purchased from you – I’ve just found your website – but thanks for your advice). Yikes! This model is now discontinued, and its replacement uses different cartridges. I want to die!
Ah the dreaded 1410 error code. Original suppliers are making it more difficult these days. I read HP did millions of firmware updates last year. It’s probable that the chip information on your cartridges is now out of date and has rendered them unusable. It definitely makes it hard to stock up!
Hey Stuart, I have a HP OfficeJet 6956. I have completed all the steps mentioned above and no success with compatible cartridges (all colour cartridges.) The message that appears is “cartridge problem” and asks me to install and reinstall the indicated cartridges.
Any insight?
It’s more than likely that HP have updated the software and the chips on your inks are no longer working. HP does that a lot to stop the use of compatibles.
I have a hp 6255 that wouldn’t accept generic cartridges.
My solution: Just pulled off the plastic strip on the bottom of the cartridge. No more error code. Prints with the perfect.
Hi Stuart, I have a Canon Pixma MG8150, and have been using compatible cartidges for a few years with no problem. However, I am now getting an U071error message saying “More than one ink tank of the following color installed”. The cartridge highlighted is “Bk”. My printer actually has two different black cartridges. One small and one large. The indications are that the faulty cartridge is the larger one. C-525. I’ve tried the ‘non recognition’ method, but my error message is suggesting I am using two cartridges that are the same, which I am not! Any suggestions please?
Hi John, its possible that the manufacturers of the large black cartridge have put the wrong data on the chip and its indicating to the printer that its also one of the smaller cartridges. The only thing you can really try is a replacement of that cartridge from another company to see if it fixes the problem.
Hi Stuart et al.
Just bought a Brother MFC-J6930DW from Currys/PC world yesterday and am setting it up. It was the last (display) model as Brother have no more to send out yet, so I paid full price but got the box.
The intuitive screen tells me that I need to re-install the black cartridge again, slowly. I have done so several times. They are the inkjet cartridges supplied with the machine. It does say to shake the black cartridge horizontally 15 times but not the others. It won’t let me ignore or proceed, even when turning off. I have removed the orange protective plug for transporting and the cartridges go in fine. Any thoughts? Could the machine (and corresponding cartridges) have been there for a long time on display and out of (6 month suggested) elapsed time to use?
Hmmm that’s quite strange. Cartridges have a shelf life of around 2 years so you shouldn’t have any issues there. It sounds like it could be an issue with the cartridge chip. Your best bet is probably to contact Brother directly and see if they can help you bypass the issues. Original inks shouldn’t have any issues like this but they / the printer are under warranty so they would fix it for you or replace it if need be.
Hi, I have a Canon MG5450 and have been using compatible ink for the last few occasions and have suddenly come across the ‘An ink tank is no compatible’. I’ve tried all the reset tasks mentioned on a number of web sites and nothing appears to work? Seems like a software update has prevented the compatible ink cartridges from working. Are there any other ways to override this?
Hi Matt, once the software on the inks is out of date due to a printer update, there’s no way to get them working again. They would just need to be replaced.
Hello Stuart
I have an Epson WF-7525. I’ve gone through all the options without success. However, there are 2 strange patterns? (It’s the black cartridge which is causing the problem).
Pattern 1. Removing all cartridges except black and the printer recognises the cartridge. Add all other cartridges and they’re recognised but the black isn’t.
Pattern 2. Removing all cartridges except black and the printer recognises the cartridge.
Add the other cartridges one at a time and all are recognised. Except when adding the last cartridge, then all are recognised except the Black!
So it obviously recognises the black cartridge but not when all other cartridges are installed??
Totally confused.
That’s a very strange thing to happen. Have you tried a new black cartridge? It could be damage to the microchip or the contacts in the printer.
This is the exact same pattern I am seeing on my Epson Stylus Photo R340. I recently tried those refillable cartridges and the symptoms as Mike Dicken. I tried various combination of OEM and refillable ones and the same thing happens to the new black cartridge. The only time it recognise the black is when the original empty OEM black was installed. This will trigger that the cartridge is empty and needs replacement.
So it seem there is some check that will only allow OEM to work.
I have a photosmart 7525 printer I followed your instruction and the new cartridges do not wwork.
Hi Irwin, it sounds like the cartridges might be faulty and need replacing.
Got new printer in Dec. It’s May now, it won’t accept the ink cartridges that came with it, tried over and over. I am so mad
Your eight step process worked perfectly for my Epson SC-P6000! I thought I was heading down a rabbit hole with having to call tech support.
Thanks for the dedication in helping people out with their printer problems.
With the process remove cartridge, power off printer, unplug from wall, wait 10 minutes, re-plug into wall, re-insert cartridge, power back on, i have a problem. The carriage does not remain accessible after plugging the printer back in, I cannot re-insert the cartridge unless I power the machine back first so the carriage will move to the left to access the cartridges.
How can I complete this sequence in this case?
Hi, its fine to power on first before you re-install the cartridge.
Samsung Laser printer XL Express C460W error message “Install Toner” on all CYMK I have read all the comments one person mentioned that HP told them a new front panel where the toner goes in should fix it. so I looked at it and removed the internal plastic plate (at your own risk)
Where the brass contacts that touch the Toners if you remove the 7 screws that surround them you will find that on the PCB there are a series of tinned wires 2-4-4-4-4 that the springs of the brass contacts rest on I rubbed them all with a micro fibre cloth put it back together again and all Toner cartridges were now available. Hope this helps. I checked my firmware 2017 before HP bought them out.
I have a dell E525W Dell printer and it told me to replace the black ink cartridge, I have bought the same ink as long as I have owned the printer. It either tells me the cartridge is not in or to reseat the cartridge. I have never had this issue before and I use the Dell brand replacement cartridge. I did notice that the new ones I have I really have to push them in hard to get them to catch. I have tried to separate one’s because I always keep a couple here. Nothing like being in the middle of business day and running out of toner. Could you please instruct me on what to try next.
Hi Cheryl, it could be that the contacts in the printer where the cartridges connect could be dirty or need pulling out slightly so they connect properly. They can sometimes get squashed down over time. If you unplug the printer and try to pull them forwards very gently it should give a better connection.
I just got a new Canon 2206 imagerunner copier. On unpacking the machine, I installed the toner and the copier displays an on-screen message that reads, “out of toner” replace toner.
Please, what do I do? I can’t make copies, print without.
This sounds like an error with the chip / metal contacts on the toner or printer, try to give them a wipe and try again. If that doesn’t work it could be a faulty cartridge.
Samsung ML 2162 laser printer not recognising the new toner cartridge. Both red lights on. Saw your solutions and tried some but without success, then tried the one about cleaning the metals contacts…and it worked! Days of frustration solved. Thank you.
I have a Canon TS6020 that recognized an ink tank fine until one day it didn’t. It still has plenty of ink in it, but it won’t print. I’ve tried re-installing it, unplugging the machine, resetting it. What else can I do?
It sounds like a printer update caused the error. Unfortunately, all you can do is replace the cartridge with a new one.
I can’t execute steps 4, 5, 6, 7 and 8 (to reset printer memory) in that order, because my HP PSC 2175 takes the cartridge holder to home when I turn off the printer with the power button (in step 4). How can I manage the memory reset with this printer?
Have you tried to skip step 4? Hopefully, that would prevent the cartridge carriage from moving out of position.
I have a Samsung Xpress C480W laser printer, I installed a compatible cartridge and got non compatible cartridge message, now no matter what cartridges are installed genuine or not they all get the same “non compatible toner” message. If this fixable and if so how please.
Hi Colin, if you’ve tried all the steps on this page it’s possible there is a problem with the area where the microchip on the toners is connecting inside the printer, and it’s not quite connecting properly. Try to check and see if the metal contacts have been squashed (make sure the printer is powered off and unplugged) and gently try to bring the contacts forwards a little bit (so as not to break them) and try again. This should help the connection between the cartridge and the printer. I’ve never tried this on one of these machines so this is a bit of a long shot. It could also be that the toner chips are out of date and you need a new cartridge.
Hi Stuart,
I am thinking of buying a Brother MFC-L2690DW monochrome all-in-one laser printer. I am worried that Brother has installed software/hardware on this printer to prevent the use of compatible cartridges. Do you know if the printer manufacturer industry(including Brother) has already/are planning to sell their new printers set up so the new printers can’t take compatible printer cartridges?
Thanks in advance,
Richard P
Hi Richard, it’s actually illegal for them to do that so it won’t have software that stops compatible cartridges, however, they do regular updates to the printers which means the software on compatibles goes out of date. The way around that is to turn off printer updates in the settings.
I have an old R340. This is similar to what is happening with my Epson except I am trying to replace it with the aftermarket refillable cartridge. Currently only my OEM Black and Yellow are empty so I tried replacing only them with the aftermarket. After a couple of power on/off, I was able to get the aftermarket Y to recognise. However, no matter how many times, I wasn’t able to get the B to work. Inserting B only shows it is missing the other 5 colours. Inserting one by one after the B would trigger detecting the correct colour. However, as soon as the final cartridge goes in, it will show unrecognised B. No matter which cartridge was the last, the same message “Unrecognised Black”.
When I do the same test with the original Black cartridge (which is out of ink), the same message “Out of ink” for the Black occurs. If only the OEM Black cartridge is inserted, then the No ink cartridge is found. All cartridge is needed.
So something is checked with specifically to Black. The aftermarket cartridge are brand new. Unless the seller sells a defective Black cartridge. I am going to get a replacement and an OEM and try again.
my canon TS5051 is not accepting any of these fixes. I’ve bought new replacement refillable ink cartridges but still no joy. seems that the cartridge is not making the connection its standing a little proud of the others and the click is not as sharp when inserted. can the whole ink resivoir be replaced and is it worth it. I’ve had the printer for about 3 years but have hardly used it this will be my fourth refil.
As you mentioned, it sounds as though the ink cartridge isn’t inserting/fitting correctly and so isn’t making the connection inside. All you can try is a replacement cartridge really. I don’t think t would be worth replacing the whole ink reservoir, these things normally would cost more than the printer is worth.
hi, I have a brother mfc j6510dw, I followed all the advice, replaced more types of cartridges but I can’t get them to recognize black, the message “unable to detect” always comes out.
what can I do? Is there a way to reset the machine?
Thank you
Hi Arlo, if you’ve tried all the tips on this page, it sounds like it might be a faulty black cartridge.
I followed your instructions for an Epson WF-3270 and the printer is now printing again. Many thanks!
I have new hp “setup” ink cartridges from a new printer that was damaged that I want to use on my current hp 6978 printer. It is saying “Do Not Use Setup Cartridges”. Is there a way to get them to work anyway?
Set up ink will only work on the printer they came with so I don’t think you can get them to work.
Hi, I have a Samsung 3820nd and recently purchased a genuine toner 203u on ebay all sealed and looks totally genuine and legit. However my printer is saying it does not recognise this toner cartridge
This will be an issue with the chip on the toner. It might be a very old cartridge. Check if there’s a use by date on the box or cartridge. It could also be a fake / clone cartridge and not actually a genuine. Was there a hologram on the box?
I have a HP Envy Photo 7855 printer. Black cartridge not communicating with the printer. HP sent me a replacement black cartridge. Issue still persist.
I think you would need a technician to look at this. Any issue persisting across multiple new ink cartridges is normally a hardware issue that needs looking at.
To: Stuart Deavall. Thank you for starting this page. Our organisation owns a Brother printer model – MFC-J6553ODW. I ordered a pack of Brother compatible ink cartridges that arrived yesterday. Unfortunately, when I installed all the ink cartridges, the printer did not recognise them. I became slightly frustrated and left it until today. I was searching on google and located your page. I was sceptical to follow the instructions on the video, but did so anyway. This resulted in all the ink cartridges being accepted. But then the inks did not work when I was trying to print so I cleaned the nozzles several times and everything is working now. I found your page very useful, as well as reading other people’s comments. Thanks for sharing this page with us.
To anyone who has not resolved all your issues regarding you ink printing issues. Don’t give up. Please keep persevering until your printer is working fully.
Peace & Love, Queen Ester, UK
We have a MF Samsung 2070FW printer. Replaced the old toner cartridge ( MLT -D111S/XSG) with a new toner cartridge ( MLT-D111/ELS)
The printer comes up with an incompatible toner cartridge message, when replacing with new cartridge. Have cleaned the contacts on the printer and have done all necessary maintenance.
The printer will still not accept the new cartridge.
I would appreciate your feedback Mr Stuart Deavall.
Thank you.
Hi Manny, is this a genuine Samsung toner that you replaced it with or a remanufactured / compatible cartridge? Also, what country are you based in / where was the printer bought?
Hi Stuart,
We replaced the old cartridge (MLT-D111S/XSG) on our Samsung Printer model M2070FU with
an OEM cartridge ( MLT-D111S/ELS). The printer comes up with an error message saying incompatible toner cartridge, We have cleaned the contacts and tried everything possible to make it work.The printer keeps showing the error message.
We are located in Stockholm , Sweden,
Please help.
Manny Sitabkhan
Hi Manny, you don’t normally see that issue with original cartridges so there can only be one of two issues. The first is that the cartridge is old and therefore the chip data is out of date and the second (I have a hunch is more likely) is that cartridges with /ELS designation at the end are normally the cartridges sold here in the UK but I know that UK cartridges tend to be region locked and only work in UK machines to prevent us from sourcing cheaper cartridges in Europe or the far east. I have a hunch that the ELS cartridge you have isn’t intended for use in your region (or the South Africa region) and why you are seeing the incompatible cartridge message.
I’m afraid all you can do is return it to where you purchased it and ask for a replacement or refund.
Just to add, it is possible if you ring HP support that they can reset the region of the printer. They can only do that once but that could be a way to fix it.
The printer was purchased in South Africa. We are currently based in Stockholm, Sweden.
This is a genuine toner cartridge purchased locally.
Regards,
Manny
Thanks Stuart. We will call HP support and ask them to reset the region of he printer.
Hi Stuart,
We are in Stockholm, Sweden. Can you provide us with HP customer support phone # to call them to reset the region of our Samsung M2070FW printer.
Thank you
Manny Sitabkhan
I have a Epson WF 2950 that takes 232 ink. I purchased remanufactured ink and cannot get my printer to recognize the cartridges. On the Website, there are many reviews that say these cartridges are good replacements for Epson ink. I have tried all your suggestions to override the error messages and nothing seems to work. Any other suggestions?
Hi Ann, it’s likely the error is with the chip’s on the cartridges. The only thing you can do is contact where you purchased them to get them replaced.
Stuart–This site is the only place I’ve found clear, communicative information on the problem of Canon blocking replacement toner cartridges. Thanks! I bought a replacement for Canon’s 071H but I install the cartridge and the printer says it’s not compatible. I try the ‘stop button’ workaround, and it doesn’t work. I will contact the toner company….BUT HERE’S THE WEIRD THING: While I was frustrated, and crosseyed, my wife, downstairs told her phone to print something, and suddenly the canon printer with the pirate cartridge printed out her few pages! How did she get around the programming? We’re both non-techies and have no idea, or we’d set up accordingly. Any clue to what’s happening? Thanks–
Mark in Massachusetts
Hi Mark, that’s strange! Normally when you get the ‘cartridge isn’t compatible’ message, its a chip issue so I’m really not sure how wifi / mobile printing got around it! It’s a good tip to try though! It’s possible it’s something to do with the printer drivers (software) on the phone vs the drivers on the PC.
Thank you for your blog! I held the button down for 5 seconds and my 300-prograf reset right away.
have tried everything to cure wont recognize in cartage for a epson workforce pro wf 3820 still no result. This happened directly after an epson update ! anyone have an answer?
If this happened straight after a printer update, the update has caused the software on the cartridge chips to be out of date. You likely won’t be able to fix the issue and will need to replace them.
Hi,
If anyone is interested. I have reported this same issue to the CMA in the UK because it is anti-competitive behaviour.
I took a picture of the Canon cartridge, then a pic of the re-manufactured cartridge showing the error that locked up the printer. The CMA emailed me stating they are investigating. If more people do this then the CMA will have to take action against this illegal practice.
HP Deskjet 4122e
How to override the ink cartridge error – 8 steps to try
OK, but with power off, how do I load the cartridge please ?
Mabe I have made a mistake ??
Ernie
I would power it back on before installing. The tips are to reset the memory but for printers with a carriage that moves out of reach when switched off, power it back on.
Black ink cartridge cannot be recognize, tried everything i can still the same
This will now be a chip error and will need to be replaced.
HP M2727 mfp. Suddenly started printing faintly whole page (as if it is in economode). Checked settings no better. Cartridge low on printer. Replaced with new original.
First copy was perfect. Then again faint prints with same messages. Tried reset, etc etc no better
Still get cartridge low and faint prints.
Any ideas? I suspect printer is not reading cartridges correctly and automatically goes into economode.
It sounds like you might have the correct answer there, the only thing you can try is to update the printer drivers and firmware to see if its a software issue that has been fixed.
I have Epson Sx515w. When 3 out 4 are installed it recognise the cartridges but 4th cartridge is installed it fails to recognise all cartridges but I remove any one out the rest 3 will be recognized.i am not sure what is problem with this printer.
Please help if anyone knows how to solve this problem
It sounds like a circuit issue inside the printer. Unfortunately you would need a technician to take a look at it.
I have a canon image prograf 250 and it will not recognize the after market magenta all the other colors was recognized just fine. Please tell what can I do to resolve this issue. I only get an error warning and it shows the ink catridge not highlighted.
Unfortunately, it’s probably down to a chip error on the cartridge and it would need to be replaced.
Cannot recognize ink cartridge for my Epson WF-2950 – black ink. I have replaced new cartridge twice – neither new cartridge is recognized. I have turned printer on and off a dozen times and cleaned the cartridges and printer. Help!!!
Is it a new Epson original cartridge or a remanufactuerd / compatible one?
Hi Pamela, I’m sorry to hear the tips didn’t work for you. It’s likely a printer update has stopped the software on the cartridges from working correctly. It really is a frustrating when this happens as major Brands do send very frequent updates that cause issues with compatibles. The company you purchased them from should have a returns policy that allows you to get them swapped or refunded, if you bought them from us, let me know!
I’ve run into this exact issue with compatible cartridges on an HP printer, and step 4 about cleaning the contacts made a huge difference for me.
One thing I’d add is checking firmware updates—some newer updates seem to block third-party cartridges. I recently wrote about troubleshooting cartridge recognition issues as well, in case it helps others: