
Faint Print – 5 Reasons and how to fix
Article updated 21/05/2024
Is your printer printing too light even though it has a full ink / toner?
Faint print or faded text is one of the most common printer issues and at one time or another we’ve all sent something to the printer, only to be left frustrated and irritated when something like this faded print example comes out at the end…
Naturally, for many of us, the first reaction will probably be to assume that our ink/toner levels are low. Whilst you might just need to replace the ink or toner cartridge, there could be something else wrong with your printer that’s causing faint prints or faded text.
If your printer has ink but prints faded, or your HP, Epson, Canon, Oki, Brother or even Xerox printer is printing too light, we’re going to help you to find out why, and help you to fix it without you needing to buy a new printer!
Here are the most common causes of a printer printing faded text or images:
Click each of the 5 reasons below to see the explanation and its solution:
- Low ink or toner levels
- Toner sticking to the fuser roller or problems with the transfer roller.
- Low ink or toner density settings
- Low or high humidity
- The inkjet print head is clogged.
If you’re short on time, get your faint print cheat sheet here otherwise keep on reading…
The 5 most common causes of light or faded prints:
1. Low ink and toner levels
As mentioned above, your cartridges could simply be empty or running low, so give them a check.
You can do this on your PC by going to the control panel and looking at your printer properties / cartridge status. This will tell you exactly how much ink or toner is left in the cartridges and whether they are causing a problem.
If you have a laser printer, it’s also worth giving your toner cartridge a shake (make sure you don’t do this with an ink cartridge or you might end up spilling ink on yourself or your surroundings). This redistributes the toner powder around the cartridge, giving you quite a few more pages before you need to replace it.
Just grab the cartridge with both hands and gently shake it from side to side, and up and down, for about 10 seconds. Then pop it back into your printer and try printing.
2. Toner sticking to your fuser roller or problems with the transfer roller
Problems with the fuser roller – Ghosted images on the page
In your laser printer, the fuser is the part that heats the toner powder, helping it to stick and seal the paper to create a print. (Find out more about how laser printers work).
Occasionally, toner can stick to a fuser’s upper roller. This could well be your problem if you can see a ghosted image of your printout somewhere else on the page. This occurs because the last thing that was printed out leaves toner particles that weren’t completely melted stuck to the fuser, when the next thing is printed it then transfers onto the paper and gives the effect of a faint ghostly picture over the top of the new printout.
How to fix this:
Try removing your fuser unit (after unplugging your printer) and check to see if the upper roller has the toner stuck to it. If it does, then it’s probably worth replacing it with a new one which you should be able to buy online and get one delivered pretty quickly.
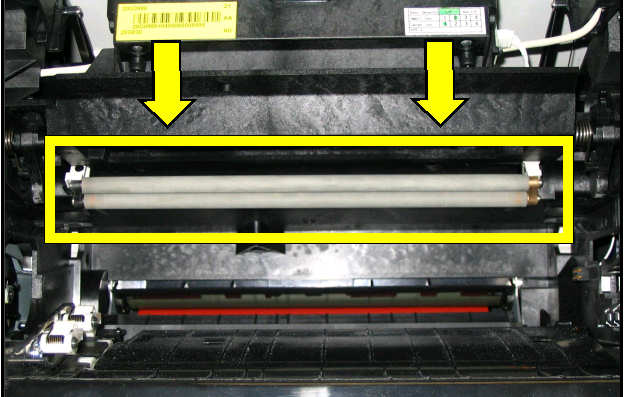
Image courtesy of Lexmark
Problems with the transfer roller
Your transfer roller uses its electrical charge to get the toner from your cartridge’s drum unit onto the page. Sometimes, it may be incorrectly positioned in your printer, causing those light prints. Carefully remove it using the hooks it comes with and try inserting it again. When properly inserted, it should look nice and flat. (If you’re having trouble removing it, don’t break out the tools or try and rip it out! Ask a technician for assistance).
Alternatively, it could have something on its surface that’s having a detrimental effect on its electrical charge and, thus, its ability to transfer toner properly onto your page, causing a faint print.
How to fix this:
Either wipe the surface with a dry cloth or use a can of compressed air to blow it clean. Try not to touch the surface with your hands as this could make it even worse!
3. A low ink/toner density setting
Some printers allow you to change the density settings of your ink and toner and often switch themselves to a low density setting after replacing a cartridge. Your default setting could be set to low, causing you to get those faint prints.
How to fix this:
If your printer does have ink/toner density settings, you should be able to find them once you’ve clicked on your printer in ‘Devices & Printers.’ If it looks like you’re printing at a low density, increase it slightly and then try printing.

Image courtesy of HP
4. Your printer might be located in an area of low or high humidity
We covered this a while ago, but the humidity in your office can actually affect the performance of your printer. Ink or toner cartridges and also the paper you use has an optimum operating humidity rating and if the humidity is too high, problems can quickly occur.
If your printer is in a room that’s got a low humidity level, ink can have a pretty tough job being able to set and dry properly on the page, causing prints that look faint and light. The best place for your printer to be is somewhere that’s neither too humid nor humid enough! And remember that humidity levels will differ depending on the time of year.
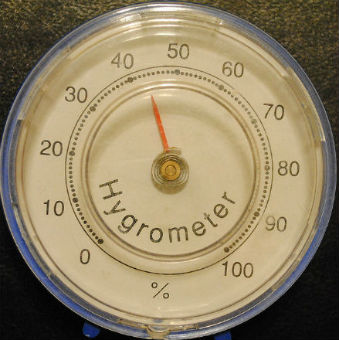
Another reason for faint prints caused by high humidity in your office is that the paper you are printing on can get damp or absorb water in the air around it causing the paper to slightly ripple and become uneven. Then when you try to print, the ink or toner is distributed unevenly across the page and you get poor-quality faded printouts. A good tip is to move any spare paper into a dry non-humid area where you know it can be kept in tip-top condition.
How to fix this:
Position your printer away from windows, doors or near kitchen areas, and make sure you store spare printer cartridges / paper in a dry area.
5. Inkjet print heads are blocked or air bubbles are trapped in the ink well.
If you haven’t used your inkjet printer in a while, the mechanism that transfers the droplets of ink onto the paper (called the print head) can become blocked or clogged and cause faint or missing areas of print on the paper.
Air bubbles can also get trapped in the ink cartridge well and are pushed out of the ink cartridge instead of the ink droplet causing missing areas of print on the paper.
How to fix this:
- Remove the ink cartridges from the printer (be careful not to get any ink on your skin or clothes).
- Wipe the nozzles where the ink comes out of the cartridge with a lightly dampened cloth or paper towel (and remove any dried ink that may have built up).
- Re-insert the cartridges and run the print head cleaning process from your printer menu or PC.
- To clear out air bubbles, wait for 2 hours and run an additional print head cleaning process (retry this stage up to 4 times with a 2-hour break in between each). It’s important to wait a few hours in between or you may make the clogging of the print head worse.
For printers where the print head is built into the printer, you can sometimes purchase print head cleaning cartridges that flush the system clean.
Tips for specific printer Brands
HP printer has ink but prints faded
If your HP printer has plenty of ink but you still get faded prints or text is too light, then the problem will be related to the print head or nozzles being blocked or damaged.
This could be because your printer has been sitting unused for a long period of time (as regular use keeps the ink from blocking the nozzles and maintains the printer)
Solution:
- Run a diagnostic print from the printer menu to confirm which colours are causing a problem.
- Remove the cartridges and using a dampened cloth or ear bud (q-tip) gently wipe where the ink comes out until clean.
- Place the cartridges on a damp paper towel until the ink starts to flow (careful not to spill ink on skin, clothes or furniture).
- Wipe clean the cartridge carriage where the cartridge connects to remove any dried ink (make sure the printer is off and unplugged).
- If the printhead is built into the printer, clean where the ink comes out with a damp cloth.
- Re-install cartridges and run a print head cleaning process.
This should correct the issue. If this doesn’t work, you may need to replace the print head.
Epson printer, printing too light or faded
There are several causes for an Epson printer printing too light / faded.
Epson manufacture their own paper for specific purposes that work in conjunction with their ink technology, and if you select the incorrect type of paper, it can effect the quality of print outs.
Another reason for light or faded prints is a blocked / clogged nozzle in the cartridge or printhead.
- Make sure you have picked a compatible paper type before trying to print (eg. inkjet paper for an inkjet machine, photo paper for photo prints etc…).
- Make sure you have also selected the correct paper type in the page setup settings on your pc before you click print as this can cause the ink quality to change.
- Do a printer nozzle check to see if any are clogged (this can be done from the printer menu or a computer).
- If the nozzles are blocked, initiate the printhead cleaning process from the printer menu.
- If this doesn’t work remove cartridges and with a damp paper towel, gently wipe where the ink comes out of the cartridges until any blockages are removed. Then do the same with the print heads (where the cartridges are inserted).
This should get your Epson printer working again. If you still have any issues, you may need to replace the inks or print head.
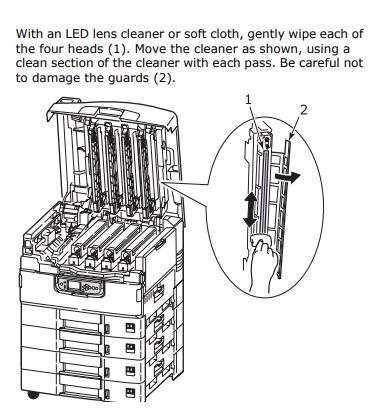
OKI printers with LED heads
Some Oki laser printers have what’s referred to as LED heads located under the top cover of the printer / above the toner cartridges when the cover is closed. Each time you replace a toner cartridge you get a cleaning cloth that you are meant to use to gently wipe down the LED heads. If these become dirty over time, they can cause faint print, faded text and black smudged lines on the page. See the image below to give you an idea of how to clean the LED heads.
Xerox printers – Colour Density setting
Some Xerox laser printers have a menu setting that allows you to control the colour density (darkness of the prints). If your Xerox printer is printing faded, try to find the setting by visiting Menu > Calibrate Colours > Print Reference page.
This will allow you to see what the current density setting is for each colour and how dark the printer is able to print. If you wish to change the density of a colour visit Menu > Calibrate Colours > Adjust colour (eg. if you want to change the black it would say ‘Adjust Black’). Select that option for the colour you wish to change, and use the arrow keys to adjust the setting.
Remember, when you change the toners, you may need to reset the settings as a new toner will naturally print darker than an older toner.
Hopefully, your prints should now be as crisp as a new banknote!
Lastly, there have been a few comments mentioning faded prints when attempting to print PDF’s off. It seems that some PDF’s have their own settings for the density of print and it is possible within the advanced PDF settings to change this for a better result.
If you’re still having problems with faint prints, leave a comment below or tweet us @TonerGiant – we’d be delighted to help or simply tell us about your tips on how you fixed a faint print problem.
I have been working in the printing industry with TonerGiant for over 18 years, and I'm the resident technical printer expert, helping people fix their printer problems for over 16 years. I have taken part in many training courses with HP, Samsung, Brother, Canon and Xerox to further my knowledge, and I'm also the Digital Marketing Manager at TonerGiant.co.uk (degree qualified).
Hi.
I am not sure if you can help us but we need a printer that can handle around 100 sheets of A4 per day BUT (here’s the catch) the printer needs to be able to effectively turn 200-300gsm white card into something that LOOKS like it is a sheet of black card, printed in white both sides.
Oddly, we have found a few printers that (at a push) can handle the thickness (An ancient HP 3550 for example with the back door open) but after about two acceptable prints, the solid black starts to become “greyish black”.
We are printing small quantities of “game cards” in house and because the numbers are small (that 100 sheets is 10 copies each of 10 different designs) it is not viable to get them printed commercially.
I think we are perhaps after a “small commercial digital printer” but just wondered if you could suggest (and/or supply) a laser printer that could do this. Speed is NOT at all important and we do not need colour.
An 8PPM B&W printer would be fine if it could handle DENSE black (about 90% coverage) and thickish card.
In fact the only requirement is at LEAST 250gsm card and it must be able to print DENSE black happily on upto 100 sheets per day (which will be turned over and put back through to do the other side).
If it would make the printer happier, we could even use this to print the “white cards too” which would mean it would print 10 white sheets, then 1 black sheet – repeat 10 times and then flip the whole lot over and print the backs.
Ideally, as we will be using a boat load of toner, it would help if the machine ise easily refilled with toner from a bottle – but I am guessing I am starting to dream now 🙂
We looked at using black card and a white toner printer – but struggling to find one that will handle at least 250gsm and has toner that isn’t a silly price.
Are there any ultra resilient workhorse laser printers that can handle this sort of 90% toner coverage per page?
Thanks for your time
Kind Regards
Mark
Hi Mark, that sounds like quite a task at hand. I’ve had a look through our database and checked with suppliers….The Brother HL-3170CDW can apparently take 300gsm paper or card through the manual paper feed but I don’t know any that will take the card through the automatic feed and unfortunately I don’t know what the results will be like.
If you are set on laser printer then most of the high range OKI machines will print on 300gsm card but unfortunately the toner will be expensive. I don’t think there are any printers that can be refilled with a toner bottle that would be suitable.
thanks
Stu
I have an Epson 3260 printer that recognizes the page to be printed but prints it very faded and not the full page. Replaced cartridges and ran nozzle cleaning program. This printer has not been used in over 5 years so could it be its just dirty.
my xerox versalink 405c black ink is faded but color is crisp and bright. Thought my black was low so i changed it. Still having same issue. Every color but black prints correctly. Checked the density so i moved it to complete darkness and nothing changes. Any ideas?
I think you might have an issue with the imaging unit that corresponds with the black toners.
Hi,
I’m trying to print a very simple .pdf document which shows a plan for a new large garage which is about to be built. The document comes out fine on my Brother office printer, but when I try to print on the home printer, an Epson Photo Stylus T50, there appears to be almost nothing on the page that is easily read anyway.
I’ve followed ALL your advice re density changes (mine is now set to +14) and all the other tips (the humidity info. is very interesting), but nothing makes any difference.
Do you have any clues as to what it could be? I use good quality paper and genuine cartridges.
Much appreciation for what you’ve written.
Thanks and regards.
Hi David, thanks for your comment. I haven’t actually come across this issue before but it could be something to do with either the print heads being dried up or damaged (if print is fine but just very light this is unlikely as this would cause smudges or missing areas of print), or it could be something to do with settings. There is a photo enhance option that could be on, try switching that off and see how you get on.
I have tried to do all that you have mentioned but my Laserjet 700 has remained with the same problem.
It could be a fuser or drum issue. If it’s a drum issue, the toner may need to be replaced.
hi,
i am saheb i have a problem in my printer hp1606dn the printer print well as normal paper but the leeter head in(glossy paper 90gsm) print will fade or the ink has run out the paper. what is the problem of my printer.also i change the teflon and pressure roller.
Hi Saheb, your printer is a laser printer and glossy paper is meant for inkjet printers so the heat from the fuser that seals the toner will melt the gloss on the paper and not work correctly. I hope this helps! Stu
Hi
I’m Gloria. My printer (HP MFP M130a) was printing fine until I refilled my toner. Now parts of the printouts are faded and long vertical lines on the left side of the printouts. I have tried the suggestions you’ve given but nothing worked. What could be the cause?
It sounds like an issue with the drum but could also be a faulty toner cartridge. I think the drum might be part of the toner on that machine so replacing the toner again is the thing to try!
Hello:
I have a basic HP1210 series printer and recently purchased some inexpensive generic 56/57 cartridges from an on-line seller. They print very light! Is there anything I can change or adjust to use these cartridges? Thanks for any help, or suggestions…
Hi Keith,
if the cartridges you were using before you installed these were fine and you haven’t changed any settings then unfortunately it’s likely an issue with the cartridges.
Sometimes the printer can be set to print in draft or economy mode or sometimes the font you use can do that but if you haven’t changed anything then it will be the cartridges.
Stu
Hi, I have a HP laserjet pro MFP 130a printer, the toner finished and I refilled it, after making few printings it started fading and there is enough toner inside the cartridge. What can be the cause?
Cartridges that are refilled (drill and fill) are very temperamental. It’s likely now a faulty cartridge that’s the issue.
Hi Stuart,
Do you know if generic replacement cartridges are voltage sensitive?
I have a Brother printer that runs on 220V and takes a Brother TN 450 toner cartridge. I’ve seen some TN 450 compatible replacements online that mention 110V in their specifications. I’m not sure if this means there are 110V and 220V variants of the TN 450 cartridge.
Thanks!
Hi Vikram, in my experience I’ve never come across different voltage variants. The voltage has more to do with the fuser unit or maintenance kit which is the part that heats the wire and melts the toner sealing it to the paper. The toner should really match the specs of the printer unless it differs internationally due to the specs of plug sockets. I’m sorry I don’t have a great answer for you there! Stu
Hi Stu, I have a brother MFC-J4620DW & when printing black images they are either turning out like a greeny black color or a faded black. I read it could be related to ink cartridges so I replaced them all but still no luck. It is the case on different types of paper.
Your help would be appreciated!
Hi there, it sounds like it could be a print head issue or blockage. You can sometimes buy cleaning kits that flush the print heads and any dried debris out of them. Unfortunately we don’t sell them so I’m not sure where you could get one for your printer model.
Hi
My printer(hp M125a) prints faded despite changing the tonner and drum
Hi Derrick, this could be a number of reasons and there are a few things you can check on. The Paper or media type can affect this (if you are using a type of paper that is absorbing the toner or not fusing to the paper correctly), so you could try some different paper. There is also an econo mode on the LaserJet pro M125a models. Here’s how to disable it:
Go to your control panel / printers and devices on your PC, and then click the printer name in the list of results.
HP Printer Assistant opens.
Click Print, and then click HP Device Toolbox.
Click the System tab, and then select the Print Quality page.
In the Economode area, select Off from the drop-down menu.
Print another page to see if the issue is resolved.
Thanks
Stu
Hi . I am using a zenerick k88 mini thermal printer which doesn’t use ink but it prints very feint. I can hardly see anyvhing
Hi. I’m sorry I’m not familiar with thermal printers! It sounds like it could be something to do with either settings or the heat filament (if that’s how it works)! Stu
As you seem so helpful I’m going to ask you a question too.
I have an Epson Workforce 7610. It prints perfectly when I print from Photoshop. However if I try to print a PDF, word document or direct from my browser it prints much fainter and makes words hard to read/colours look dull etc.
Any suggestions why this would be and how to remedy it?
Hi Nicola,
it sounds like the printer may be printing in draft mode. Draft mode is a setting that can normally be changed on the printer menu or on your computer settings and it’s purpose is to save the ink or toner that’s being used when you don’t need a high quality print. Photoshop would likely ignore the setting as it’s a photo editing software. Try and navigate through the settings on your printer and you should be able to switch draft mode off if it’s on.
My Brother 4040CDN has not been able to print red for a year now and I feel like I’ve tried every possible thing. Began with getting new magenta (now know that yellow is the issue is red won’t print, also replaced yellow); cleaned all of the rollers with both the integrated cleaner thing that slides along a wire for each colour and with alcohol swab; replaced the transfer roller (had to do anyhow as something adhesive from label stuck in one spot and showed up on every printout); changed settings within print properties to enhance red; and more. I’m at a loss 🙁 Any ideas?
Hi Sarah, it sounds like you’ve tried quite a few things with no luck but from my experience there are a couple of things that you didn’t mention that it could be. The first is to check that your drum units are not damaged at all. The drums are responsible for transferring the toner powder from the toner cartridge onto the page, so if a colour is not passing through, it could well be a damaged drum. The second is that the waste toner cartridge could be full or damaged (this normally collects any toner overspill), if that is full, it may also stop the correct printing process. I’d be surprised if it was these things as the printer would normally let you know they are at fault. I would try to ring Brother support as they would be able to get you to put the printer in maintenance mode and run diagnostics. Thanks, Stu.
I have a Oki C9655 and it ran fine for a few years. However in the last few months I suddenly had problems with the colours printing lightly, except for the black, which prints fine. I checked the settings, enhanced all the colours but the result is marginal at best and not remotely as deep in colour as they used to print. I replaced the drums for the colours as some were near end of life. This did not fix the problem. I cleaned the LEDs as often suggested and no effect. The colours are also slightly uneven across an A4, excluding the black so a background colour will not print consistently the same tone. Also the magenta is slightly off by half a millimeter so text is slightly fuzzy. I am at a loss as to why this occurs.
Hi Michael, it sounds like a very frustrating situation with your printer. I’ve tried to come up with a solution for you but the only thing I could find related to poor colour printing / light printing is that the LED head needs to be cleaned although I’m not sure how to do that. Alternatively I’d contact OKI support here: https://www.oki.com/uk/printing/support/contact-support/form/index.html
Hello dear,
I have color laser printer OKI c5950.
Suddenly it does not print Yellow anymore! Not at all!
I replaced the Yellow toner with a NEW one, but nothing!
I checked its drivers and reinstalled the printer.
Can you please help me with this issue?
Thank you in advance
Hi Jim,
it sounds like you may have an issue with the drum unit, does the cartridge register as installed in the printer / on your computer?
thanks
Stu
Hi!
My name is Affan and I have a small problem in my newly-bought printer. The printer is an HP deskjet 5820 and I’m pretty sure i assembled it correctly, but the cartridges print light colours. I don’t know what the problem is and i have auto-cleaned the cartridges an insane amount of times. The ink-level estimates show that my ink level is zero, even though i just inserted them about 2 weeks ago with barely any use.Any help would be appreciated,
Thanks!
Hi Affan, are you using compatible / remanufactured inks or original HP inks? Also if you could let me know what type of paper you are printing on, that would be great as some different paper types can cause issues with faint print.
Thanks
Stu
Hi. I have a cannon pixma mg3022 I refilled my ink myself I followed directions very carefully it printed but my magenta ink is light. I’m thinking I did something wrong but I honestly don’t know. I’ve cleaned my printer. The ink is not low. Just the magenta prints to light. Any suggestions? Thanks
Hi there, if you haven’t changed any settings since the last ink cartridge was installed then it’s more than likely the quality of the ink that’s the problem.
Refilled cartridges are very temperamental.
Stu
Hi,
We have a Toshiba E Studio 3555c. It has started printing yellow very faint. All other colours are fine it’s just the yellow. Any suggestions?
Hi Linda, if it’s only affecting one colour then it sounds like damage has occurred to the drum unit (may be built into the toner). If it was a general setting issue it would occur to all colours rather than one. I’m not that familiar with this machine so I’m unsure of the replacement consumables / drums or developer units etc…
HI,
I have canon pixma MG3170,it has horizontal streaks in black as well colour printouts.I tried nozzle cleaning,Head alignment,deep cleaning,refilled cartridges but the streaks don’t go and its too fade print outs.
Hi, for an inkjet printer this sort of issue can be caused by problems with the print head. It could be clogged up, especially if cartridges were refilled rather than replaced. Take the inks out and with a damp paper towel (be careful of any spillage) gently wipe the nozzles. If the print head is separate to the inks in your printer, this may need replacing.
Hi, when I print a colour image I’m getting lines of faded ink but only at the top section of the page – I’ve flipped the same image and the colour prints perfectly at the bottom of the page but not at the top, regardless of what’s there. The Yellow toner is getting low, but could it be this – it seems odd that it’s only on a specific section of the page and doesn’t affect the colour everywhere else? Many thanks in advance
This is usually due to the rollers or drum unit, depending on which printer model you have the drum may be separate or built into the toner cartridge. If it’s built in, replacing the toner should fix the issue. If it’s the rollers, cleaning them should also fix the issue.
hello,
i have a canon LBP6030W Printer, when i am taking printer test page by long pressing its button, the printout is fine but taking printout of any pdf file, word file or image comes very faded. i have replaced the toner also but of no help.
Hi there, this is a common issue more to do with the, settings in adobe reader when printing the PDF. Unfortunately I don’t have a clear cut solution for that at the minute.
Newly bought Brother DCP1610W laser result half-faded print. I changed laser paper type and increased density (+6).. But same issue still persist.. Please kindly advise..
Hi there, this definitely shouldn’t be happening with a brand new printer. It sounds like there may be either a problem with the starter toner, or something more serious with the printer itself. The best thing you can do is contact Brother support as your printer will be under warranty for 12 months.
Hi Stuart – I have a samsung xpress c480fw which id just over a year old – recently when printing in colour I have magenta and yellow tone running through the print in horizontal lines. Have changed the toner collector – carefully dusted wherevever I could access and now I have drawn a blank … print is b/w perfectly…. any ideas?
Hi Nicola, lines all the way across the page as you described with a laser printer normally get caused by something blocking the distribution of the toner. In your printer model there is a drum unit / imaging unit which is a green metal cylinder. the job of the imaging unit is the roll the toner from the toner cartridge onto the paper so missing lines normally mean there is a mark or fingerprint or some sort of damage to the green cylinder which is very sensitive. The imaging unit looks like the one here and it sits behind the toner cartridges in your printer. You may be able to see marks or damage to it but be sure not to touch the green part as it will cause damage to it.
Hi stuart, I use an HP Laserjet 2015 series printer. I refilled the cartridge when it was empty instead of buying another but when it was inserted into the printer it still showed that red light against the toner label on printer manual. When I print pages it works all the time but worried about that red light. Please help.
Hi there, if it’s still printing fine I wouldn’t worry too much about the light. Refilled cartridges will always give strange results and behavior from the printer because manufacturers don’t like you to use them.
Hi Sanya, jamming can be caused by a number of things, possibly the cartridge not inserted fully or too much paper in the machine.Which printer do you have?
Hi, I have HP 2300DN printer. It prints test page OK but prints are faded? what’s that? if there is something wrong, i mean to clean the printer then the test pages were to be faded as well but that’s not the case. What to do?
Could be something to do with the settings of what you are printing on your computer. It doesn’t sound like a fault with the printer, is it a PDF. PDF’s have their own settings that can be changed.
HI Stuart
I have an HP Laserjet 5P Printer – i know it is an “antique” and it has been printing perfectly for over 30 years – fabulous innings! With only one service!! It was my husbands old printer which I kept after he passed away 15 years ago.
A month ago the old cartridge appeared to be leaking n ghosting.
I managed to buy a replacement HP cartridge (at great expense).and it printed about 25 clear mono copies n all of a sudden the pages were printing with black smear marks n ghosting. I tried cleaning the bottom roller n drum with a dry soft cloth but to no avail.
Would this be caused by the cartridge or another issue? Could it be the roller? I don’t wish to outlay anymore for a cartridge – in case it is the cartridge.
I can still print n i don’t think it is the fuser as the printed copy doesn’t smear when i wipe across the page.
They don’t make printers like this anymore – i managed to get almost 4,000 printed pages out of one cartridge!
Any suggestion as to what the problem could be? Or is it on its last legs.
I would normally say its the drum unit causing your issue but they are built into the toners for the LaserJet 5P. It could be the fuser that might have dirt on the corona wire or transfer belt but I don’t think you’d be able to replace those now with such an old machine. Unfortunately, it might be on its last legs.
Hello. I have an older Brother HL-5150D that has given great service for many years. Now, though, the printing is uniform and clear but really too light even with the print density cranked up to max. Replacing both the drum and the toner made no real difference. I don’t see any obvious dirt/toner residue blocking light from reaching the drum.
The humidity here in winter is very low – around 35-40%, although the problem really developed before the humidity dropped so low.
Is it possible that the light source on older laser printers can get dimmer with age and cause light printing?
Any suggestions would be appreciated!
Hi Wayne, to be honest any printer will deteriorate as they get older and print out quality won’t be as good as it was but I personally haven’t heard of the print becoming lighter without the issue being caused by a drum, toner or fuser. It may be time to replace the printer now unfortunately. Stu
Hello
Thanks for the article, very informative! Could I pick your brains? I’m getting faded prints, very narrow missing lines and the faintest grey banding appearing – all this is to the left-hand side of a page. I think on the black cartridge, in the area the printing is wrong, I can see narrow faint intermittent lines on the cartridge roller. Could this be a fault with the cartridge, its ink (possibly cheap ink) or maybe the drum? I’d love to know as its rattling my brains.
Hi Nigel, it sounds like you have a combination of issues but I also wrote an article about missing areas of print and lines down the page that might help here
I have a Brother HL3070CW color laserjet running latest Windows 10 updates. If the print settings are set to color then the color print is washed out and so is the b/w print. If I choose b/w output, then the color print is washed out but any black color is crisp. I have installed brand new Brother color toner tanks as well as all 4 new Brother print drums. No change in the print. I have used this printer with my MS Surface Pro 4 for 2 years; the 1st year everything was perfect but now I’ve been dancing around this issue for the last year. I’ve tweaked just about everything I can think of through the printer settings/properties. I do not see anything to allow me to adjust the density setting, however. Any thoughts or links to suggestions? I thank you in advance!
Hi there, are you using the exact same type of paper that you’ve always used, it could be the paper type that is the issue but only if you changed it at some point.
Hi Stuart,
I recently bought a HP desk jet 3630 and the black and white print is fine however the color print is really faint. It`s like the photos have to be edited to a really dark filter, i`ve tried this on various photos so it cant be the photo. I`ve tried uninstalling the ink and putting it back on, looked for the density settings but cant find how you reset them. Any ideas, or is my printer fault?
It sounds like the tri-colour HP 302 ink has a problem with it, possibly the print head might be blocked and one or all of the 3 colours aren’t coming through evenly. I’d try a new colour cartridge if you have one, if that doesn’t work then it will unfortunately be a printer fault.
Hi, I am Seun, I have a Canon iR4570 but the right side do fade. What is the solution.
If one siode of the page is faded then it is likely damage to the drum, transfer roller or toner cartridge. If you follow the instructions on this page, you should be able to fix it.
hello, for people having faint printout/letters with the samsung m2020w, i found a solution but the printer gets hotter so i hope the heating element won’t develop any problem. you simply go into the “printer preferences”, under the “paper” tab and change the paper “type” from its default(plain paper) to “card stock”. i think the heater now burns the toner with a higher intensity. my printouts went from barely visible to crisp-sharp-jet-black ^_^ . if this works you can start going down gradually from card-stock to “thick” e.t.c until you find a perfect option that works so reducing the heat generated by the printer.
many thanks, nice option
is there any other option
Hiya.
I have two Samsung CLP-620 printers. Both printers worked flawlessly for years with non-Samsung toner carts. However, lately, print quality is unacceptable from these printers, rendering both useless for color output.
Both printers product hard-copy with three distinct problems:
– color is absurdly inaccurate;
– toner is laid on the media too heavily and sometimes flakes off;
– random ghosting of solid color (yellow, cyan, or magenta) appears along the edges of media.
I’ve searched the internet for a website that shows examples of poor color printer hardcopy, but I cannot find such. That’s a shame, ’cause I feel like examples of crappy output should provide typical troubleshooting procedures.
However, most intriguing is the fact that the printers will not print in “draft” mode AND hard-copy printed at the highest quality setting is unrecognizable. When used for black-only output, the printers produce no grey shades. And again, toner-save settings (ie. “draft” mode) with black-only output does not appear to work.
All consumable components (fuser, transfer belt, take-up rollers, toner carts) appear OK. The printer-generated consumables report for each printer shows that all components are well within their respective lifespans. Drivers are up to date.
My suspicion is that Samsung has hobbled the quality of output (via a driver update) when the printer detects non-Samsung toner is present. I have yet to purchase Samsung toner (due to sheer expense) in order to confirm my theory.
tAny ideas?
Hi there, thanks for your comment! It sounds like your printer is having real problems there! Whilst it’s quite possible that a driver update could do that, it’s very unethical and I doubt Samsung would have done that to a printer with a driver update. OEM manufacturers do tend to introduce software that makes it difficult for a compatible to be used but I’ve never heard of that affecting the quality of prints. Are you still using the same brand of compatibles from the same supplier? If you are it’s possible that the supplier has changed their manufacturer and the quality is way worse from the new manufacturer. This does happen in my experience so I’d be interested to know if your problems happened after installing a new cartridge or in the middle of using an existing one?
Just changed all inks. now getting very faded printing. Epson WF-7610
Just got a new xerox versalink c7000 it’s so new we printed 5 pages perfectly on Sunday (when we first set it up) then Wednesday we went to print again and it’s coming out super faint (the whole page no streaks) almost like tv snow. Xerox sent us a new drum, replaced it, no success. Its super frustrating getting a brand new machine and it’s already not working!
That sounds extremely frustrating! If it’s a new printer you will have 12 months standard warranty and it does sound like there is something wrong with the machine unless some settings have been changed.
I have a cannon pixma it worked great I noticed if I copied something it would look better then the pages I print straight from my phone. I had to replace the ink an now it comes out faint an when I try to copy, the black is coming out grey.
I print a lot of coupons an anymore they will not ring up cuz of it being faint. I’ve tried to take them out an shake them but no change.
This could be due to the quality of the ink if you’re using compatible or remanufactured inks?
I am using HP laser jet p1606dn, and while printing,it is dark on one side and faint on the other…..why is that?
This is due to a drum issue. I believe that the drum is built into the toner, so you would have to replace the toner to fix the issue.
Hi
I have a canon MG3650
When printing in colour the first inch of the image is extremely pale and no detail, however the rest of the image prints fine
Any ideas?
Thanks in advance
Hi there, it sounds like you might have an issue with the print head. Try the steps on cleaning the print head found on the Canon website here.
Hi Stu,
Our office has an OKI MC 362 printer and we recently changed all toner and the drum on it. However it has been printing sheets with the middle being faded. Is there any idea what the issue could be?
Thanks
Hi Evan,
this is normally an indication of a problem with the drum unit or possibly fuser unit. The drum unit is responsible for distributing toner on the page and fuser to melt and seal the toner but if you’ve replaced them this shouldn’t happen.
Is there any loose toner inside the printer anywhere? That would indicate that the toner is falling off the page and into the printer.
If not then I’m afraid it could be something more sinister like an issue with the laser, or data not passing from PC to the printer correctly.
Stu
Have a Samsung CLX 3305FW laser colour printer,very faded print but when doing a test sheet the print is fine ,please help doing my head in
This is very strange, if the test print is fine then there will definitely be no issues with the toner cartridge or drum unit which means it’s a settings issue. Test prints won’t usually print in a low density or draft mode so it could be that the settings for regular prints are as draft mode or low density. Here’s some instruction on the brother website on how to check the settings / change them on a brother printer: https://help.brother-usa.com/app/answers/detail/a_id/77863/~/faint%2C-light%2C-or-faded-printed-pages
my HP photosmart is printing top of page perfectly but begins to fade from middle to end so by end of page it is very faint. This happens with each page so I dont think ink cartridge is low. What is the problem ? Thanks.E
Hi Emmet, I’ve never actually come across this issue before. For an inkjet printer it sounds like an issue with the print head to me. Does the fading start in a perfect line or does part of the line start to fade and then eventually the whole area is faded? If the line is perfectly faded I think it is more of a technical issue with the interpretation of the data in the software. The only thing you can really try is to install a new ink cartridge and see if the issue is fixed or not. If it isn’t then it’s definitely a more technical issue.
Stu
hi hope you can help me, i have a problem with my printer. its printing all the photos red, like they are all tinted. its an advent awp10. i have checked all settings, also does it when i click glossy photo paper. not sure what to do. have also cleaned printheads too. look forward to hearing from you. Bonnie.
Hi Bonnie,
this is a slightly different issue to the normal faint print issue. Try the tips on the following page here about ‘why is my printer printing pink?‘
Hi Stuart I have this problem with my ir2525i printer.
Some two lines are fading. What could be the cause?
Hi, usually if there are 2 faded lines, it’s due to damage to the drum units or dirt on the rollers. If it’s the drums they would need replacing but rollers can be cleaned with lint free cloths.
Hi,
I am Juv. I have a Canon printer LBP2900B. I am getting clouded or blurrei images of the text that I have in a rd document.
P.S. I am not familiar with the technical terms of printers. Please help me out of this. I need to submit my projects I am in this ironic situation.
Thanks in advance.
Hi Juv, it sounds like an issue with the drum unit or the fuser in the printer.
The fuser is built into the printer and cannot be replaced (this melts the toner to the paper). If this is the problem, you would need to contact Canon to get it fixed.
If it is the drum unit (this puts toner on to the paper), it could be fixed by replacing the toner cartridge with a new toner cartridge. This is probably your best option to see if this corrects the problem.
Thanks
Stu
Hi, I have a Brother Printer 2270DW. The Drum light started flashing so I changed out the roller and reinstalled it. Everything went perfect, I reset the drum and the light went out but the ink is still very light on the printouts and my toner is fine. I wiped down the inside and used that sliding thing on the drum itself and I did not touch the roller. Any suggestions?
Hi Jennifer, it sounds like when the drum was changed it’s possible the printer has put itself into ‘save mode’. To turn off save mode on the printer follow these options:
Thanks
Stu
Hi, I have a Canon MG5320 that had an issue with paper scraps stuck inside. We opened the printer up (took the top plastic cover off) and found the paper and got it out. The printer finally started working again. But now, it prints just fine but won’t copy, although it has a brand new black ink cartridge inside (the 226) Or does the copier work from the 225 black ink? That one doesn’t show empty, whereas the 226 showed low, so I changed it out, but it made no difference. Prints come out fine, copies come out barely visible.
Hi there, I’ve never actually come across this issue before but the best thing to do is to check the settings on the computer to see if the copies or prints are set to draft mode which uses less ink.
Please am having issue with my sharp AR 6020 I have change everything drum unit,toner and developer unit but it still print faint
It could be issue with the developer sensors if you’ve already tried all those replacements. You may need a technician to look at it.
HI
I have a brother HL3150 CWD laser printer. Just recently it has started producing fading on the left hand side and sometimes the right hand side. When using colour, the black seems to be printing fine. Any advise before I lob it in the bin
Hi, the cause is normally the drum units or possibly the fuser, especially if it is only faded when printing colour as there would be separate drum units for each colour. If it’s the fuser then I’m not sure you can get a replacement fuser for that printer.
Hi
I have canon IR 2420 photocopier, when photocopying it is making faint papers. When I inserted new toner it started to photocopy better to the left and faint to the light. What could be the problem then?
This is normally a problem with the drum unit being damaged or marked and that prevents the toner distributing to the paper correctly. You’d need to get a new one but you can take the old one out and see if it looks like it’s damaged on the green cylinder. Be careful not to touch the green cylinder though as you may cause damage if there isn’t a problem already.
Hi, I have a Samsung M2885FW. It called for me to replace the image unit… I did and now it prints extremely light. I have many of these printers, so i interchanged these parts with other working printers, those new parts work fine in those other printers… What else can be causing this?
Thanks
Hi Mike,
it could possibly be the settings if you haven’t checked that already. I’ve heard that some printers do set back to draft mode automatically when you change an imaging drum so it’s possible that has happened but would be very strange as you’ve mentioned changing these in other printers and not experiencing the issue. Alternatively it could be an issue with the imaging unit.
Hi Stuart,
I have a 15 year old HP LaserJet 3330 Multi Function printer that has been rock solid. Recently, I discovered a replacement HP C7115A Toner Cartridge new in the box at a thrift store, which has been sitting around no doubt for who knows how long. Being about $100 savings from a new one on Amazon, I took a shot. Unfortunately, the ‘new’ cartridge prints Very faint black with some streaking no matter how much I shake the cartridge. I’m sure years of sitting in the sealed foil pouch have settled the toner material so much that its impacting the operation.
The settings have not changed from the old cartidge to the new, so I’m thinking its the cartridge. Is there any way to bring this cartridge back from the edge? Thanks.
Cheers,
Michael
Hi Michael, unfortunately toner does after around 1.5 to 2 years start to deteriorate. The particles fuse and clump together which causes some of the print issues you’re experiencing. There isn’t any way to fix the issue I’m afraid!
My dorm is humid as heck…that might be the problem.
Stu, thanks for all of this helpful input! We have a Canon IRC2550 and are experiencing a fainting (mostly on the bottom third of the page). It seems to be the Cyan color that’s partly missing. We’ve tried cleaning and even replaced the Cyan cartridge, adjusted gradation settings, increased the cyan density, but so far nothing has remedied the situation. Any suggestions would be helpful!
Hi Ryan, does this always happen to the cyan or just this particular test print? It’s possibly the fuser that isn’t sealing the toner correctly but could also be rollers / damage to the rollers catching the prints. If it’s always the cyan even after the change of toner and on different prints, I’m not sure exactly what would cause that issue.
It has been happening on all of our prints. It seems like we’ve had fuser/roller problems before, so that’s likely the cause, I suppose. Thanks so much for the help, Stu!
Hi there, I have just bought a brand new inkjet Canon TS5120 and I’m trying to use it to print client photos. However, my first 2 prints, I select and use the right glossy paper and I’m 110% positive I’ve selected and used the right glossy paper, my images come out with faded/washed out colors. But I have seen youtube videos of other getting top quality photo prints. please help!
Hi Mitchell, i’ve never experienced this myself so am probably not the best person to give advice but I found the following thread on the Canon community, hopefully there is some advice for you here.
Hi Stu,
I have a new Epson WF-7710 that has only printed in a faded way, unless I manually darken the density. Then it prints perfectly. I’ve searched in settings for any option I can change, like an econo-mode, but find nothing. Please let me know if you can assist me in some remedy other than a manual override each time I print. Thanks!
Hi Laura, if you tried all of the advice on the article, the only thing left to try is a printer firmware update to see if it’s a software issue. If you serach google for ‘Epson WF-7710 firmware’ and download from the Epson website / install. That’s all you can try.
please sir,my printer HP 2130 was printing well before and it is faded sometimes grey colour. there is ink, I cleaned the cartridge,it would be normal then go back to its problem. sir,please what should I do.
Hi, the best thing you can do is follow the tips on this article and if you still have the problem there’s a good chance that the cartridge is defective.
Hi! I have an OKI ES3640pro. After changing magenta drum, blue and black came light. This light printing remains even after changing all drums. I may put the max. +3 to every color but it helps only a bit but do not solve the real problem and in photos you see this very clearly.
Hi, I was looking at the printer manual for your machine and I believe each time you replace cartridges or drums you need to clean the LED heads or it can cause faint print. Have a look at the manual on page 51 of this pdf here. Hopefully that will rectify the issue you have.
I have canon irc3380i, when i bought it, it was printing well but when the black toner got finished, i replaced it with another toner which wasn’t exactly the right toner for it. Now when I print, it comes light and faded. Can something like that affect the black developer that is why it is not printing well? If so, can I replace the black developer for it to print well? Thank you.
I’d be surprised if that caused the issue because using a toner that wasn’t intended for the printer would prevent the printer from printing anything out, so the drums (imaging units) wouldn’t have been in action. On some printers when you change toners, the printer sets back to draft mode and starts printing faded to save on toner. It would be worth first checking the settings to see if that’s happened.
Would anyone know a fix to a printing issue I am experiencing? it appears to be only effecting one user when printing, her Jobs are printing out more faded then if another user were to print the same document.
Could possibly need the drivers on the PC updating.
We have several Brother HL-L8260CDW laser printers in our factory. One of them prints at a much higher output than the others so this one particular printer experiences the following issue quicker. Regardless we have seen this issue on all of them once it hits around 20,000 pages. The overall print quality goes down and eventually it will be faded roughly 1-2 inches from the left side of the paper but appear normal on the right. We have worked with Brother Support to trouble shoot this and their only fix was to replace the entire machine. The replaced machine then experienced the same issue around 20,000 pages. 20,000 pages seems like a short lifespan for a fuser or something mechanical inside the printer so hoping you had some ideas.
Hi David, thanks for your comment / question.
With the faint print down one side and the consistency of the issue you’ve experienced, I’d suggest is normally caused by deterioration of the drum units. For this particular printer, the duty cycle of the drum units are 30,000 pages, however it really depends on the amount of printing you’re doing per day / per month with your printers. High usage (including higher page coverage than 5% on your prints) can seriously deplete the condition of a printer and its replacement parts, and you’d be very unlikely to get the full 30,000 pages. The recommended max output of your printer model is 3000 pages per month according to Brother.
It does seem strange that the issue consistently occurs at around 20,000 pages for each printer. Do you know approx. how much / what page coverage on average that you’re printing at currently? If you’re not actually printing near the recommended maximum, it could be an issue with the quality of the model, ie. a design flaw.
Replacement drums are available for your printer so might be worth giving some a try to see if it fixes the issue in one of the printers.
Thanks for the above reply Stuart (Brother HL-L8260CDW above). We got a replacement unit from Brother support for this issue. While we were waiting on the replacement unit to arrive I took the fuser out of the broken Brother. it looked like on one side the bushing holding the pressure roller was slightly melted making one side of the pressure roller not as tight as the other side. Since the print was off on one side as mentioned above I thought well maybe that is it. So when the replacement unit arrived the first thing we did was take the new fuser out of the replacement unit and put it into the broken unit. The print stayed exactly the same (light colors, faded only on the left side). We then took the fuser out of the broken unit and put it back into the original replacement printer. We then took the consumables from the broken printer (4 toners and the drum unit) and put all of those into the new replacement printer. The print was fantastic. So same fuser, toner, and drum in one printer is good. in another printer it is bad. I am at a loss as to what other piece of the printer we could even try repairing to fix that.
Hmmm that’s a puzzling problem. What you did confirms that it’s neither the fault of the drums, toners or fuser (all common causes of faint print). It must be down to defective design in other irreplaceable printer parts, possibly even the laser diode that transmits the print image onto the drum.
Hi Stuart
We have a Fuji Xerox Docuprint CM305 df that has actually been a fantastic Multifunction for our office, however, of late it has had some issues that we cannot resolve. Firstly I was told it needed a new drum – so we replaced it had a tech come out and do it and then about a week later we had replaced the black toner cartridge as we had to but the replacement cartridge is even worse that light grey.
Thought it might of been the cartridge – so I put another new one in it and no improvement. I was then told by our print supplier that the tech said it needed a new fuser – so yep bought it put it in and still no improvement. Getting a little frustrated – any ideas – I fixed out other Xerox 4622 but simply emptying the waste toner cartridge and it is performing as good as the day we got it.
Thanks for your time Louise
Some printers can change a density setting when you install new cartridges and the print out gets lighter. I’m unfamiliar with your printer model but it’d be worth looking in the menu for some sort of print mode setting and seeing if it’s printing in economy mode, or some sort of draft printing mode.
I really appreciate if you can help me with my printer Brother DCP-9020CDW color laser printer. I use this printer for home use and only printed 1500+ copies. It prints good quality for the first page and then starts fade from the second page; the third page comes completely blank. If it is a picture get fade from the middle of the first page. First I thought maybe toners problem and changed all the toners but problem not resolved.
Hi there, it sounds very strange that it fades so suddenly. It’s possibly a problem with the fuser but with the way it fades to blank, I think it could be a problem with software or some other part of the hardware like the laser. The best thing you can do is get a technician to look at it or speak to Brother as I wouldn’t want to suggest you replace more parts at cost to yourself without knowing what’s exactly wrong.
I have the exact same problem. Did you resolve it by now? I’m curious about the solution!
good morning sir,
please my konica minolta c220 is printing with white white dot dot on it on card why the printing is okay on paper. it stated after i change the transfer belt. please advice me on what to do.
Hi there, it sounds like the card might be too heavy for the printer and the white dot is likely being caused by the rollers or possibly fuser. There isn’t much you can do to fix an issue like this as it’s not a problem with normal paper, you probably just need a thinner type of card.
I have a hp office jet 6962. It will not print a light grey or any light colors.. please help..
it prints black ink fine!
Hi Pamela, what does the print out look like when you try to print light grey?
Hi, Stuart.
We’ve got a Canon ImageClass MP227dw b&w laser. Been ordering replacement cartridges for awhile and not had a problem. Recently replaced print cartridge and am having this puzzling problem:
Print jobs produce a very faint print on the first print or two, then blank page. If I wait awhile and try again, it starts over at “very faint print.” Shaking the cartridge doesn’t help (new cartridge anyway), and trying another cartridge produces same results. Cleaned everything inside printer I could reach with dry microfiber cloth, and used canned air. Suggestions?
Hi Chuck, during printing the drum would get charged by the laser and it would pick up the toner powder using a static charge. It sounds like either the toner isn’t getting on to the paper correctly (it might not be being picked up by the drum) or isn’t being melted towards the end of the process by the fuser. If there’s lots of mess inside the printer after each use, it’s probably a fuser issue. I’m not familiar with your printer model so I’m not sure if you can get replacement / separate drums and fusers to try but if you can, the first thing and cheapest to try would be a new drum. Sometimes the drums are built into the toner cartridge and in that case you’d just have to try a new toner cartridge.
hi Stuart,
i have hp 4675 inkjet 5 in one, i have recently refilled both black and tri color cartridges from the shop and when i put it back and tried for color print it give the mixture of green and yellow color on the image or picture, what ever i print, but when i take print quality diagnostic option, it prints absolutely right colors, means in the diagnostic there is color name printed above and under that exact color is printed, like cyan magenta yellow light cyan light magenta light yellow, so what the problem is, i tried to clean the tip several time but nothing
Hi there, when you see a print out with a green rather than black coming through, it is usually because the magenta colour is missing or too light. In your case, it can indicate that there’s an issue with the magenta colour coming through the tri-colour cartridge. Do you have a different colour cartridge that you can try?
We are having issues with our hp laser jet and pulled out our old inkjet hp that hasn’t been used in a very long time. The ink on the print heads is still wet. What would be the best steps to have it working again?
Hi there, have you tried printing yet? It could be absolutely fine but may need a few updates installing (you’ll get prompted on your PC).
hello
my printer is a kyocera taskafa 3050 and it is printing light images. What is the solution for it…or how can we correct it?
Does your printer have separate drum units? If so it’s probably the drum units that need replacing or it could be a printer setting on the computer that is making it print in low quality mode.
Hi! I filled the bottle of ink with toner , however, a message is emerged “Add Toner” , I took the bottle of ink out of the machine all the same , the machine couldn’t recognize the ink Please, what should i can do about it especially printing is very faded and faint.
Hi Mohamed, if your printer isn’t recognising the toner cartridge try the suggestions on this page: https://www.tonergiant.co.uk/blog/2014/07/printer-not-recognising-compatible-cartridges/.
Hello! My Canon LBP3300 mono laser printer is only printing horizontal lines faintly – when I print out music, the staves are nearly invisible but the note-heads are fine.
If I print out the same thing in landscape then everything looks great.
So it’s really fine horizontal lines that are the issue.
I have so far replaced the toner cartridge, run the cleaning operation, adjusted print density to maximum, set half-tone to solid black. I’ve also confirmed I’m not running in draft or ink-saver mode.
The *only* thing that seems to help so far is if I print at say 105% scale, but that’s not as good as printing in landscape at 100% (which doesn’t work very well for portrait music pages!)
Hi Mike, try the tips here. I have a section on missing horizontal lines.
Hi, I have a Brother HL 2270 DW which had its drum and toner replaced three months ago. Now, whenever I print in duplex, the top of the front page has a horizontal band of smudge but the back page doesn’t have that problem. I have cleaned the pressure roller, the toner roller , and the drum, but the problem remains. Any ideas?
Hi, we do have another article which might help you here. Have a look and see if any of these work.
Hi, my epson xp-332 will not print black. If I change paper type to glossy, it prints in black! But if I choose plain paper as normal, it doesn’t print black!! Paper just comes out blank, or just in colour if there are colour parts on the document.
Why is this please?
Hi there, I’ve never actually come across this issue before. I’d suggest the black is faulty but as you mentioned changing the settings for paper type got the black to print, that can’t be the issue. The only thing you can try is a hard ret of the printer. Take all cartridges out, then power down and unplug. Then power on and reinstall all the inks and see if that corrects the problem.
hie..
I have a canon pixma mx494 I only used for about two weeks..when l refilled the ink it started to produce faint quality which is not readable..what can l do
Hi there, if you refilled the existing ink cartridge rather than replaced it then it’s likely a quality issue with the ink. Refilling inks never really works that well.
Hi Stuart, I have a DocuPrint CM225fw, have been using it fine until i adjusted the setting to Eco Print and Toner Saving Mode (Light). In deciding it was way too light i returned the settings back to normal but it will not print any other way now. I uninstalled the drivers and reinstalled but still no luck. Your help is very much appreciated, please and thank you 🙂
The only thing I can think of is that there will probably be a way to change the mode on both the printer or PC. Whichever one you used originally, try the other one. Ie if you changed the settings via the PC, try the printer menu settings way. Maybe it’s stayed in eco mode there for some reason.
WF-3640
Faded to faint print
On test showed missing sections of Black
and YMC showed no Yellow and faint Magenta and Cyan
Called Epson Tech Support (twice)
x^&&$#@#@#
Usual ignorance to the point that I almost junked this printer
Took one more look:
SETTINGS
SYSTEM ADMINISTRATION
PRINTER SETTINGS
AUTO ERROR SOLVER [was set to OFF]
SET TO ON
PERFECT PRINTS!!!!
Epson Tech Support ↓↓↓↓↓
Wasted a whole high capacity Black cartridge! Thanks Epson
Please I need you to help me fixing my printer Model LaserJet Pro 200 M251n which prints without writing
Do you mean prints blank sheets?
hi stuart,
i have HP Laserjet M1005,it was working absolutely fine from past 7 years but suddenly its not working properly only half side of the work is getting printed i have tried changing the ink but no improvement .kindly help me find the problem.
and thank u for the article.
This would normally be an issue with a drum unit or fuser. I believe the drum is built into the toner cartridge on the M1005 so replacing the toner might fix the issue, if not it would be the fuser but with such an old printer it’s unlikely it can be replaced.
Hi, I have a brother HL-3170 CDW, it prints fine for up to 2 pages between a couple of hours interval, but then starts printing faint black letters past 2 pages which gets lighter with horizontal streaks?? Other colours are printing fine, regardless of page count, just the black. I have been using an aftermarket toner which was purchased recently, so would you say its due to that or the drum unit??
Thanks
Normally I’d have said the fuser was the issue as it only happens after a few pages (as the printer gets hotter) but as you mentioned that your problem is fine with the other colours, I’d suggest it’s either the toner or the drum or both that’s at fault. If the hopper on the toner is faulty, too much toner is passing to the drum and causing issues, but you’d normally see some leakage in the printer if this is the case. It could also be the quality of the toner powder that isn’t sticking to the drum correctly. With regards to the drum (if it’s faulty), it would normally cause faint print or lines so I’d possibly say check the drum first. Unfortunately figuring out the issue can be trial and error.
I have an epson ET-2750. I print on paper called waterslide paper. kind of like photo paper but semi-glossy. The printer prints great quality photos for a while and then prints horrible quality photos for a bit and keeps changing back and forth. This is effecting my business! The horrible quality, is like too much ink ontop of the paper, its smudgy looking and spotty. you can see the image but it is horrible! not sure how to fix this problem. Epson tech support states it is because it is not epson photo paper. can only use epson brand. but im not using photo paper. HELP?
Hi there, It sounds like the ink is over saturating the decal paper with each print and eventually gets into a mess due to the buildup of ink on the print head. Epson’s advice was in a way correct. Their specific brands of paper are designed to work with their ink formula to seal it to the paper better, but the advice was silly because they don’t sell decal paper as far as I’m aware.
I have a hp envoy printer. Everything was fine until i changed the ink.
Now everything is printing too light!
The picture below shows what it’s doing.
The page on the right is great! Colors are bright. But that is the page that prints when i choose the ‘print quality report’ option.
Absolutely everything else prints the way you see the other 2 pages.
I would think it was the ink, except there’s that one thing that prints fine?
Hi, Id check the printer settings to see if it has changed to a draft or low quality print mode. Some printers automatically do that when you replace cartridges to make sure you’re printing economically.
Hi there! I have a pretty ancient Oki B4200 printer that I need to start using again because working from home! For years it worked very well (except for some persistent paper-feed issues which are annoying but can be worked around). But about a year ago it suddenly started producing light print, & I haven’t figured out a fix. Light all over, but fades out especially in a “gutter” or vertical channel down the middle of the page (and other gutters, slightly less pronounced, near the left and right margin). Wondering if those could be the traces of rollers that are removing toner before it gets fused, or something. Wiping/scrubbing old toner off what I think is the transfer roller (seems to be right under the drum) may have helped a little, but problem persists. Seems to be lots of toner still in the cartridge – although it does drop a lot of toner, more than I’m used to, when shaken, so maybe a problem there? Any thoughts appreciated!
Hi John, it could be a few things but mostly tend to be either drum or fuser issues. If it was a roller issue, cleaning the roller would usually fix the issue. I’d firstly try replacing the drums and see if that works but it’s a process of elimination I’m afraid.
Hi Stuart,
I hope you are well 🙂 I have a new monochrome Laser printer (FujiXerox 3505d with CT203096 toner). When I look at the printout, it appears that the print (the toner) has a sheen to it. I personally do not want the sheen because it is hard to see under stage lights. I have experimented with different types of uncoated paper but the sheen seems to be in the toner. Interestingly, my other printer (Brother HL5250DW with nonOEM toner) prints without toner sheen. What can I do to reduce the sheen of the toner on the 3505d? Thanks for your help!
Hi there, unfortunately I think the sheen is due to the composition of the toner so there really isn’t much you can do!
I’m using Epson WF-3640 printer. 3 lines of my simple text only document, consistently are faint. I’ve done the maintenance protocol (cleaned and aligned heads) multiple times even letting it set for 6 and 12 hours before running another nozzle check and cleaning. I’ve also tried increasing the density but still same results. All other suggestions above are ok. I’m using EJET re-maned cartridges but I’ve used them before and it’s worked. Error code came on to replace Maintenance box and I slid it out and back in and that cleared the code prior to having this faint problem. Could it just be a bad batch of cartridges?
It does sound like a bad batch of cartridges which is possibly a print head blockage. Sometimes you can gently wipe them clean with a damp paper cloth at the bottom of the ink cartridge where the ink comes out to clear the blockage.
Hi, I have a Canon Pixma iX6850. I don’t use it that often. We are having issues with faded or missing black ink on prints. I have changed the black ink cartridges but its getting worse with each print. What could be the problem? The cartridges aren’t the official cannon brand but are compatible. I was wondering if I should spend money on the official Canon ink cartridges but don’t want to waste money if its not the issue. The printer is definitely out of warranty. Again I don’t want to waste money on repairs if better to just buy new. Like I say I don’t use it often but does come in handy now and then . Is there anything I can do myself?
The best thing you can do is print a solid block of each colour and see if some come out as they should but one specific colour is faded. If it is, it will be a cartridge issue. If they are all faded, it is probably a print head issue or dirt on the rollers inside the printer.
My printer Hp Color Laserjet Pro MFP M477fnw prints from the computer alright and also scans into the computer properly. But when I place a document in the scanner to copy the print of the output is hazy and very light. What could be the problem?
Hi there, I’m not very knowledgeable about the scanners but it sounds like a hardware fault with scan part of the document feeder. You would need a technician to look at it.
thanks for your help
I use your toner in my Oki C822 with great results. Recently two odd things have happened.
The printer sometimes will not print a Word document or PDF. It says data present and processing but then nothing and nothing in print queue. Other times (more rarely) i get a printout but feint. Other times (even more rarely) I get a great printout.
The toner readout for magenta and cyan has suddenly gone from half full to empty. Help!
Hi Geoff, thanks for your comment. I think there may be a couple of reasons for the errors you’ve experienced.
When a print is processing but doesn’t come out, and there’s nothing in the print queue, its normally to do with read / write permissions on the document.
Faint print is more often than not due to an issue with the drum units. Replacing those will normally correct the issue but it does sound like there could be a fault with the cartridges you have. If you call us on 0345 365 3605 and explain the issue with the cartridges printing faint / dropped from half full to empty, we’ll see if there’s anything we can do to get them fixed or replaced for you.
Hi i have a hp deskjet ink adv 2010 k010a i know it wasnt been used for about a year now and its a bit dusty i have started using it today i already clean the print heads and wipe it perfectly clean i even place the cartridges in a mixture of water and isoprophyl alcohol to further remove ink gunk that maybe has it inside of the print head/cartridge? After i did that for a couple of hours i did let it rest for a few minutes to let it dry then do a print head clean on the printer’s program and a program to clean the printer after that i did a test print it has a dark print some has i dont know missing parts when i tried to print a doc file it was a light print
Hi. No one culd help me before so please try resolve my problem. I have oki c711, when I print any colour left half is different than right half. I think that for years I checked everything and still nothing. In black prints great but Im very disappointed that for nearly 1000e I can print only black. I dont know how to add photo here?
Hi there, its probably an issue with the drum units for the colour cartridges.
My printer is imagerunner it prints page half of page faint but the rest part of the page it is ok. Can you help me to fix this? I have tried to change toner but still problem persist
Hi, it will be an issue with the drum or the fuser unit. If the drums come separate in your printer model try changing those first (if they aren’t separate, they will be built into the toner so swap for a new toner).
Hi just bought new HP Ink put it, and now prints are so very faint, works well on realinement sheet but when prints just so faint help
Printers sometimes automatically set to draft mode when you install new inks. Try looking at the printer settings to see if that’s the case.
Hello I have an “Advent AW10” printer which will not feed the paper through to print what it shows on the advise screen is that the machine is out of paper !!! but the unit has plenty of paper supply
It sounds like it may have a fault on the paper pickup feed. I’m not sure how to fix that I’m afraid.
Hi
My name is Berly from Kenya I have been working with my printer now six months but recently it is printing fade and I replaced the developer and toner is still full but it is still printing fade what is the problem
Konika minolta c280
It sounds like a drum unit issue but if you’ve replaced those, it could just be a setting (print in draft mode) that needs to be switched off. I’m not sure how to check that in your printer model but the instruction manual should have the correct information.
My printer prints everything in outline & doesn’t fill in the words help me please Espon
Are you using Microsoft word? It sounds like a print setting in the document editor that you’re using rather than an issue with the printer and I know you can do this in Word.
Hi Stuart,
I’ve got an HP M402dn. I print onto 80gsm Rey paper. I’m using a toner giant replacement cartridge (26X (CF226X)) , with currently 70% toner left and print density set to 3 (out of 5). When I print most pages are fine, but regularly the left hand side is faded, although I have a LHS footer and that’s often fine. I can send you a scan of a sheet if that helps. It’s worse or most persistent when I print multiple copies of a document. I’ve shaken the toner cartridge around in case that’s the problem, but it doesn’t make any difference – it prints fine or faded randomly. Any ideas?
Hi Jack, I’m sorry its took so long to reply to your comment. It does sound like the drum in the toner cartridge might have a fault. If you haven’t already contacted us, you can call us on 0345 365 3605 and we’ll see if we can get that resolved for you.
My canon ir1024f prints faint and incomplete pages at the sides, what could be the problem and solution
Hi Ronald, its normally the drums but firstly check that the inside of the printer / rollers aren’t dirty.
Canon Pixma printer MX 492
It is printing letters on top of the line above.
So in other words ….double printing but not all lines. I’ve tried to realign it but no resolve.
Thanks,
sue
Hi there, its sounds like the paper could be slipping inside (and the rollers aren’t moving the paper through the printer correctly). Try cleaning the rollers inside the printer with a lint free damp cloth (make sure not too damp and printer is switched off and unplugged).
My Samsung SCX-4521F laser printer, prints faded prints, after I printed on some card stock. Replacing the toner cartridge made no difference. Having the printer manually clean the OPC drum made no difference. I can not see the difference between having the “Toner Save” on or off. Printing on standard 8.5″X 11″ white printing paper is readable with no print density change or dead spots. The print is just too light. Any ideas on what is causing this and how to fix it.
Thanks
I would normally say its the drum that’s faulty but as you’ve replaced the toner that can’t be the case. The only alternative could be an issue with the fuser unit (the heating element that seals the toner to the page).
Continuation of faint print problem from Scott on July 29, 2021 at 1:28 am.
If I rub the printed page, no smearing occurs. There are no streaks or other anomalies on the printed page. Is it still possible the fuser is causing the problem? Is there any test I can do to find out?
Thanks
Hi Scott, no you are correct if there’s no smearing I doubt its the fuser causing the issue. In that case it can only really be a setting in the printer or a drum / toner issue. I’m unsure what else it could be.
I have a Brother HL-3170CDW and I’m having problems when I try to print something in green. It comes out a very light yellow. It’s always been a good reliable printer until recently when some print was coming out too light.
I cleaned everything, replaced the waste toner box, and installed a new yellow toner. As a result everything is clean and crisp — except green.
Any ideas would be appreciated.
Hi there, it sounds like it could be the blue (cyan) toner that has an issue. Try printing something blue to check if there’s an issue.
Stuart, You are a legend. Still answering questions 4 years after posting an article. I’m about to start cleaning a laser printer that we have reset the life counter twice in one year and now the colors are faded/light in some spots. Especially red. Will let you know how it goes. Everything else looks good. I could not find the density settings on my printer. Is that something that is only available through your driver, in print setting, or adjusted in service mode? Trying to find the best place to get starte.d
Hi Matt, if your printer has an LCD screen / menu you can normally find the settings in there but failing that it would be in the printer preferences and settings that you can find on your computer.
Hi,
I have a Fuji Xerox Docuprint CM305df at home. It is a color laser printer with 4 cartridges
The black toner was empty, so I replaced it. Since then, it is printing very faint. I have tried 3 different (new) cartridges) , and all of them give the same faint printing.
They are non-OEM ones, but I have never had trouble in the past, so now having 3 in a row not working does not sound like the problem?
All other colors continue to work fine, just black is not.
What could be the cause of this. Can it be blocked somewhere?
thanks in million for a reply !
Hi there, normally if its a printer issue, the other colours would have the same problem so it can only be either the toners that you have tried all have poor quality or if your printer has separate drums for each colour, it could be a drum issue for the black toner.
hi, problem solved. Not sure why, but it worked from another computer. So deleted the printer, reinstalled it, and all is well again.
Hi
I’m running into a problem with printing on the HP Color LaserJet Pro MFP M477.
It makes very light prints.
The toners are just replaces, I’ve done a extended cleaning (about 15 times cleaning process as the print was almost non existence. But still the print looks faded.
Can you give me some tips?
Hi there, this could be an eco mode setting. Sometimes when you change toners the printer auto sets to eco mode. Check your printers manual and look for the economy mode settings.
Color LaserJet Pro MFP M477 problem. Tried to do lots of cleaning pages with better result on the pages that come out after cleaning. But then when just printing the printer seems to only print light prints as if it’s on ‘toner-saving’ mode. But can’t seem to find that setting to change it.
Hi Stefan, check the economy mode settings. You can find the instructions on the following link: https://www.manuals.co.uk/hp/color-laserjet-pro-mfp-m477fdw/manual?p=154
Hi my printer a Brother MFC-7460DN his printing very faintly with a lot of little white line. I changed the toner but it still continue to occur
Hi there, it could be a drum or fuser issue.
I have an Epson ET-3850 it was working fine and now the last inch of every page is blurred i had the same issue with the Epson WF-2850 surely it has to be something simple its becoming annoying and Epson are replacing the printer every time as its under warranty but I’m guessing it is something silly as it has happened to 2 printers different models the same fault HELP!!!!!
Hi David, I haven’t come across this fault yet but if Epson are replacing the printer then I’d guess that its an issue with the print heads getting clogged or breaking.
Stuart – You can delete my old post. I purchased a new transfer belt for my CLP-510. Ebay got me again. It was sold as ‘new’ and looks new but after installing the printer displays the message ‘install transfer belt’ after initialization. The first tell-tale sign that something was amiss was a small piece of plastic sitting in the bottom of the box. I figured out where it belongs and after struggling a bit installed the part properly. It’s a small square part with a pin that inserts into the tb on both sides and seems to be integrated with the latching assy (button in the center underside). Reinstalling the old tb and the message clears. I ohmed out the pins on the old tb and the new one and the readings match (with and without the underside button depressed. I’m wondering if I can dummy out the switch/sensor that detects that the tb is installed. Have you seen this before? I have a fairly comprehensive manual for this printer and am troubleshooting it now but thought I’d reach out to you to see if you have any experience with this. Thank you!
Hi Daniel, I’ve never seen that being done before I’m afraid!
Hi I have an Oki 511dn and been printing great now all of a sudden the black has pale patches in vertical line the rest of the colours are fine, I have taken the toners out and shaken and put back, cleaned the led and even put in a new black toner and still is the same, do you think its the drum even tho its just the black?
It is normally down to a drum issue but the following page might help https://www.tonergiant.co.uk/blog/2017/05/black-lines-down-the-page-4-causes-and-how-to-fix/
I have two Brother Lasers, a HL-2240 and HL-2270DW. The 2270 was exibiting very faint printing. The 2240 is fine. I switched the drum and toner between the two, and the 2240 is still fine but the 2270 is still faint. In fact it’s even fainter now after I ran a few cleaning cycles. I tried another drum and new toner cartridge but no difference. I also tried turning the print density up to max but it still made no difference. Any ideas?
Hi there, it sounds like the fuser unit could be the issue.
Hi Stuart:- I hope you can help me out. I own a Canon TS5020 printer, which I have had for a while, but it prints wonderful photos, but lately, I notice on my 8 X 10 prints, there are white vertical faint spaces that are about 1/50 of an inch wide and about 5/16″ equally apart. that go across the photograph from one side to the other side of the print. I have no idea why it is happening. I use to use for a very long time the Canon Cartridges, but the cost has increased so much that I have been using these others. I have been using remanufactured cartridges at a lot less money, and they have been working quite nicely. What would be the cause of my problem. Strangely some prints come out with no problem, if I print it directly from an email attachment. Hope you have a solution for my problem, because I make photos of wish results that MAKE-A-WISH children send back to the Foundation, for thanking them for their wonderful wish, that they made come true. Please send me an explanation, so I can solve my photo problem. By the way, have a happy and healthy New Year.
Hi Robert, thanks for your comment and question. The missing lines on your printouts seem to be very uniform which would rule out issues with the print heads being blocked. In my opinion, it’s either a software issue or an issue with the cartridges and how they are interpreting the information sent to the printer. I would first try to update the printer/firmware (which actually carries the risk that an update causes the remanufactured inks to stop working so be mindful of that before you do try it) and if you try it and that doesn’t work, the only other option is to try a set of original Canon inks to see if you get the same issues. If you don’t, you know it’s the cartridges at fault. If you do get the same issues, it could be a mechanical fault in the printer somewhere but by trial and error, you’ll have a better idea of what’s going wrong.
Hi there, I own a HP Color LaserJet Pro M454nw.
My supply levels are all at 100% but my files are printing out really faded and pale. I haven’t changed any settings on my printer nor have I played around with the ink cartridges. Any ideas on why this is happening?
Hi Olivia, some machines auto set the settings to a lower quality when you install a new set of cartridges. It would be worth checking the settings just in case that happened. Failing that, it could be stips that haven’t been removed correctly before install or fuser unit issues. Is there any leakage of toner inside the printer?
Hi Stuart,
I have Canon Pixma MP160 and am having some problems with the quality of the printing. I used the remanufactured ink cartridges. I once refilled them with universal ink myself before, the quality came out very good. But, this second time I refilled them, the quality of printing is not good. They are kind of fade and has some streaks. I added some more ink to the colour that didn’t come out good. I installed the cartridges into the printer and still the quality is bad. I did it several times. I did the cleaning, deep cleaning, print head alignment, nozzle check, and quality is very bad. I put the ink cartridge into a small container with warm water for a few minutes, and still there is no improvement in the quality of the printing. I tried to print different photos and the results are not good. So, I need your help. What should I do to fix this problem? I really appreciate it very much if you could help me with this problem.
Hi Andreas, refilling cartridges gives very inconsistent results and its not possible to keep refilling the same cartridges as they keep degrading over time. Companies that produce remanufactured cartridges will only refill once before they dispose of a cartridge.
Hi,
I recently bought a Hp laser MFP 137fnw printer,
and it’s showing very low on toner msg.
I don’t use it that much,
so if you can help me with the error.
It sounds like the toner is stuck inside. Take the toner out and rock it from side to side gently (being careful toner doesn’t get on you or spill out).
Hi
Please help me my printer is Cannon just forgot it’s model.It has been working well untill it developed a strange sound but continues to work untill this week Wednesday. When I tried to print out a document the paper came out very dark as if you’ve smeared black ink on a paper. I repeatedly tried with the same results. What might be the problem and how can you assist me.
Hi, this depends whether you have a laser or inkjet printer but if it’s a laser printer, its a drum or fuser issue. If it’s an inkjet printer, it’s likely a printhead issue. Either would need replacement parts.
Hiii Stuart! I am having such a hard time with my new HP m555 laserjet enterprise…
The first most frustrating issue is that the colors aren’t printing as I see them on my screen, I know they usually never print the same, but my dark blue prints light blue, light gray prints almost white… pink, light pink… so very dull colors, and I played with all the materials colors etc, and they print exactly the same
I am Printing from PDF, read somewhere that I should print from Microsoft word or another software, tried word and not succeed
I am new to color laser printers and don’t quite understand the CMYK or RGB situation, or anything haha!
I would appreciate your help a lot, I’m banging my head here and have waisted lots of paper and toner
The other issue that doesn’t bother me a lot, is that it prints smaller, than the actual size, I have to print in 104% scale, to get it right
Thanks!!!
Barbara
Hi Barbara, that does sound frustrating. Basically CMYK has a smaller range of colours available than vs RGB. CMYK is colour used for print but RGB is specifically for screens which have higher quality. Some of the shades are just not available when printing out but the program you’re using should pick very close replacements. PDF’s are notoriously bad at getting a close matching colour which is why you got the advice of using an alternate computer programme.
If the shades are very dull, it sounds like the settings of the printer might be in a low quality setting. I’d suggest trying 2 things, make sure the paper is suitable for the printer (a good quality specific laser paper is best and its also sometimes best to buy paper that matches the brand so HP in your case) and check your printer settings and pick the absolute highest quality setting. If you still have issues, it’s likely that the thing you’re trying to print is made in colours that just don’t suit CMYK printing. Sometimes you can alter them with a program like photoshop so they are saved in CMYK.
I think the scaling issue would likely be a setting but it’s difficult to diagnose without looking at the printer / software.
I have an Epson xp15000 I am getting surface scratches on my prints irrespective of paper weight this does not happen on my other xp 900 what is causing this and how can I resolve it the faint scatchline is 1 and a half inch in from the papers edge left and right it is most annoying can you help thanks
It sounds like there might be something stuck on the rollers that move the paper through. All you can do is try to clean them.
Hi Stuart,
I have Konica printer C258 biz hub, but the black printout is faded, we have replaced the developing kit and black developer twice now. The prints became clearer after I poured black developer into the developing kit but will fade after printing some documents. What could be the issue?
It sounds like you might have an issue with the fuser unit but it could also be down to the paper type being used. If the incorrect paper is being used, it could cause the issue.
Hello, and thanks for your great page. I have an ET-3830. It is suddenly scanning defectively, with one-fourth of the page with lighter or no color. This is not a printing issue, it is a scanning issue. I’d be very grateful if you have any ideas!
Thank you.
Shain
The only thing you can try with scanner issues is to update the firware / software and see if it fixes the issue, if not, it’s likely you’ll need a technician to look at it.
Hi, Stuart. I have a Canon ImageClass MF653cdw printing too light brand new out of the box. Tried new toner, found a new Windows driver, messed with density settings. No joy. My son updated the firmware during setup. We’re out of ideas.
Hi Dawn, it seems like you’ve tried a lot of fixes and anything like that brand new out of the box should be working perfectly. It will have a standard 12 months warranty so I would contact Canon and ask them to replace it. I think the issue would be the fuser unit but you shouldn’t be having problems and need to replace it when it’s brand new.
I’m baffled by faded printing on an OKI C5500 laser jet, but ONLY in black text and other areas. Color areas print fine. I’ve swapped out the toner cartridge 3 times (wiping the LED heads each time) thinking I might have had a bad cartridge, but that hasn’t helped. Printer shows K drum life at 56% remaining.
Before I order a K replacement drum, is there any other possible cause I can test for? Or any way to know for sure that it’s the drum?
BTW, I really love this printer, which has served me well for many years. I fear it may be replacement time, and I’m not fond of the all-in-one printer+scanner models, as I already have a reliable Canon scanner. It’s too bad that Oki no longer sells in the US. I’ve relied on their printers since the late 1980s. I see that Epson is phasing out laser printers because of environmental concerns. If it is inevitable that I retire my Oki and move to an inkjet printer, what would you recommend for a home office that probably prints around 2k pages per year?
Thanks for the very informative page and all your efforts help get our printers back up and running well.
Hi Sue, it does sound like an issue with the drum. You can normally lift the plastic cover up to see the green cylinder and see if there is damage or if it has excess toner still on it but be careful not to touch the cylinder as if it’s not already damaged, touching it will damage it. There’s not really any other way to test if the drum is the issue than trying a new drum.
I’m sorry, I can’t really recommend a new printer as models here in the UK are very different from models in the US. Brother or Canon branded printers tend to be quite good.
Thank you for all the help provided here. My problem child is an Oki C5500 that stopped printing full black several months ago. Black text and images are always faded to varying degrees over the whole sheet. Color prints fine.
I’ve tried 3 new K toner cartridges, wiping LED heads each time, and still no joy. Time to replace the drum? Printer says K drum has 59% of life remaining. Anything else I can try before I go for a new drum?
Hi Stuart,
I have three brother, black-and-white, printers, and previously they used to completely stop whenever I ran out of toner. Lately they have been continuing to print, causing me to waste paper unnecessarily. Do I need to reset the printers after changing the toners or is there something else that you know about that can help me? Many thanks in advance!
Hi Martha, it could be that the memory needs to be reset. You can do that by switching off and unplugging the printer, replacing the toner and then after 10 minutes, plugging back in and switching back on. The memory should reinitialise. Often as well, Brother printers have a reset mechanism in the menu but you’d need to check your printer manual for instructions. If you don’t have one, they can normally be found on google.
Hi, my brother printer MFC-L2710DW prints really light. Just changed the cartridge but still not darker.
Hi, it’s best to check the printer settings / density and print quality settings as it might be in draft or eco mode. If that’s not the case then it could be an issue with the drum unit.
I’ve been having the same problems with the MFC-L2710DW. Purchased in 2023, the mfr’s toner that came with didn’t seem to print dark when compared with our HP laser jet printers. Then, we purchased some toner off EZink and it prints like grey.
Hi all. Up to now nobody could help me out. Let’s see here 😉
It’s an OKI MC842W. Ran perfect and all of a sudden the prints are very pale and do have white lines top to bottom. No ghost shadows.
5 Years old
17000 prints
Drum 48%
Belt 29%
Fuser 64%
All toners good
I cleaned the belt, the interior and the ledbars.
No difference. All colors affected the same way.
Any ideas?
Thanks in advance.
Cheers Andy
Hi Andy, the white lines are a telling sign. There are a few issues that can cause this. As you’ve cleaned the LED bars, it rules that out but it could be an issue with the drums and the only thing you can do is try new ones to see if that fixes the issue.
Hi Stuart,
I have just seen how helpful your comments have been so \i wonder if you can help me. I have a Xerox Versalink C400DN laser printer which has served me well but just started to print in grey text rather than black. I have 20% left in toner cartridge. Any ideas how I can cure this? Help much appreciated.
Hi Chris, we actually have that printer model in our office as well. It’s likely due to the toner reaching end of life but generally you can take the toner cartridge out and gently rock it side to side to try and redistribute any compacted toner. Be careful in case any leaks out as you won’t want to get it everywhere. Hopefully that helps but if not, I’m afraid it may require a replacement cartridge.
Hi Stuart, I have an OKI mc363 currently printed pages of text have white vertical lines top to bottom in places (but not right across the documents) I have tried cleaning the LED heads, and the transfer roller, the fuser is clean and toner levels ok, is there anything else I can do or am i looking at new parts and if so which part is the most likely culprit? Transfer belt, fuser, or the main print drum? Any help would be gratefully received.
Is there any lose toner inside the printer? If the rollers are all clean inside, it could be the fuser or drum units causing the issue. Unfortunately all you can do is replace them on a trial by error basis to see if it fixes the issue.