
Updated: 14/08/2017
Given that laser printers have no end of hi-tech wizardry under the bonnet, you’d expect them to be difficult to clean and maintain. But compared to inkjets – whose innards are often flecked with messy ink residue – laser printers are surprisingly easy to clean, provided you have the right tools and equipment that is.
In this step-by-step, fool-proof guide, we’ll be demonstrating how to safely and effectively clean a laser printer, as well as divvying up some advice on the tools you’ll need to get the job done right.
What You’ll Need
As laser printers use powdered toner in the print process, you’ll need to use a few specialist tools to ensure the complete removal of any fine particles. Below, we’ve outlined the specialist tools and equipment required to clean a laser printer effectively.
Activated Toner Cloth: A disposable cloth which, when activated by stretching the cloth has a non-oily coating that traps the toner particles for easy removal.
Isopropyl Alcohol / Aerosol Spry Duster: Sometimes known as rubbing alcohol, isopropyl alcohol is ideal for cleaning mechanical equipment as it quickly evaporates leaving no fluid behind. Use this to ensure no residue is left behind after cleaning. The Air spray duster can be used to help reach those difficult places and blow the toner particles away.
Dust Mask: If inhaled, whilst not dangerous, powdered toner can sometimes cause irritation. Before you open the printer toner compartment, ensure the room is well-ventilated and don a dust mask just to be sure you don’t cause yourself any problems.
Latex Gloves: If exposed to the skin, toner can cause irritation; wear latex or rubber gloves to prevent this.
Toner Vacuum (Optional): A toner vacuum is a powerful handheld device capable of gently removing toner from inside a laser printer. Though extremely useful, toner vacuums are expensive, so we’ve marked them an optional tool.
How to Clean Your Laser Printer
Once you’re tooled up with the equipment above, it’s time to open your printer and get to work. Before you do that, we’d like to remind you that should you feel uncomfortable handling any internal components, make sure you contact an experienced printer technician or someone with prior experience who can complete the cleaning for you.
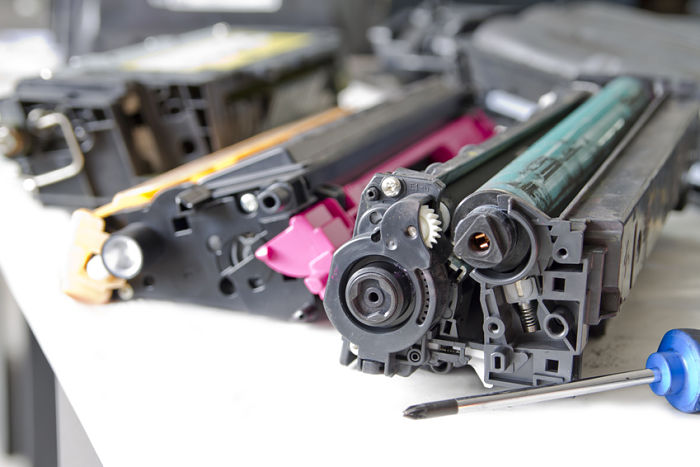
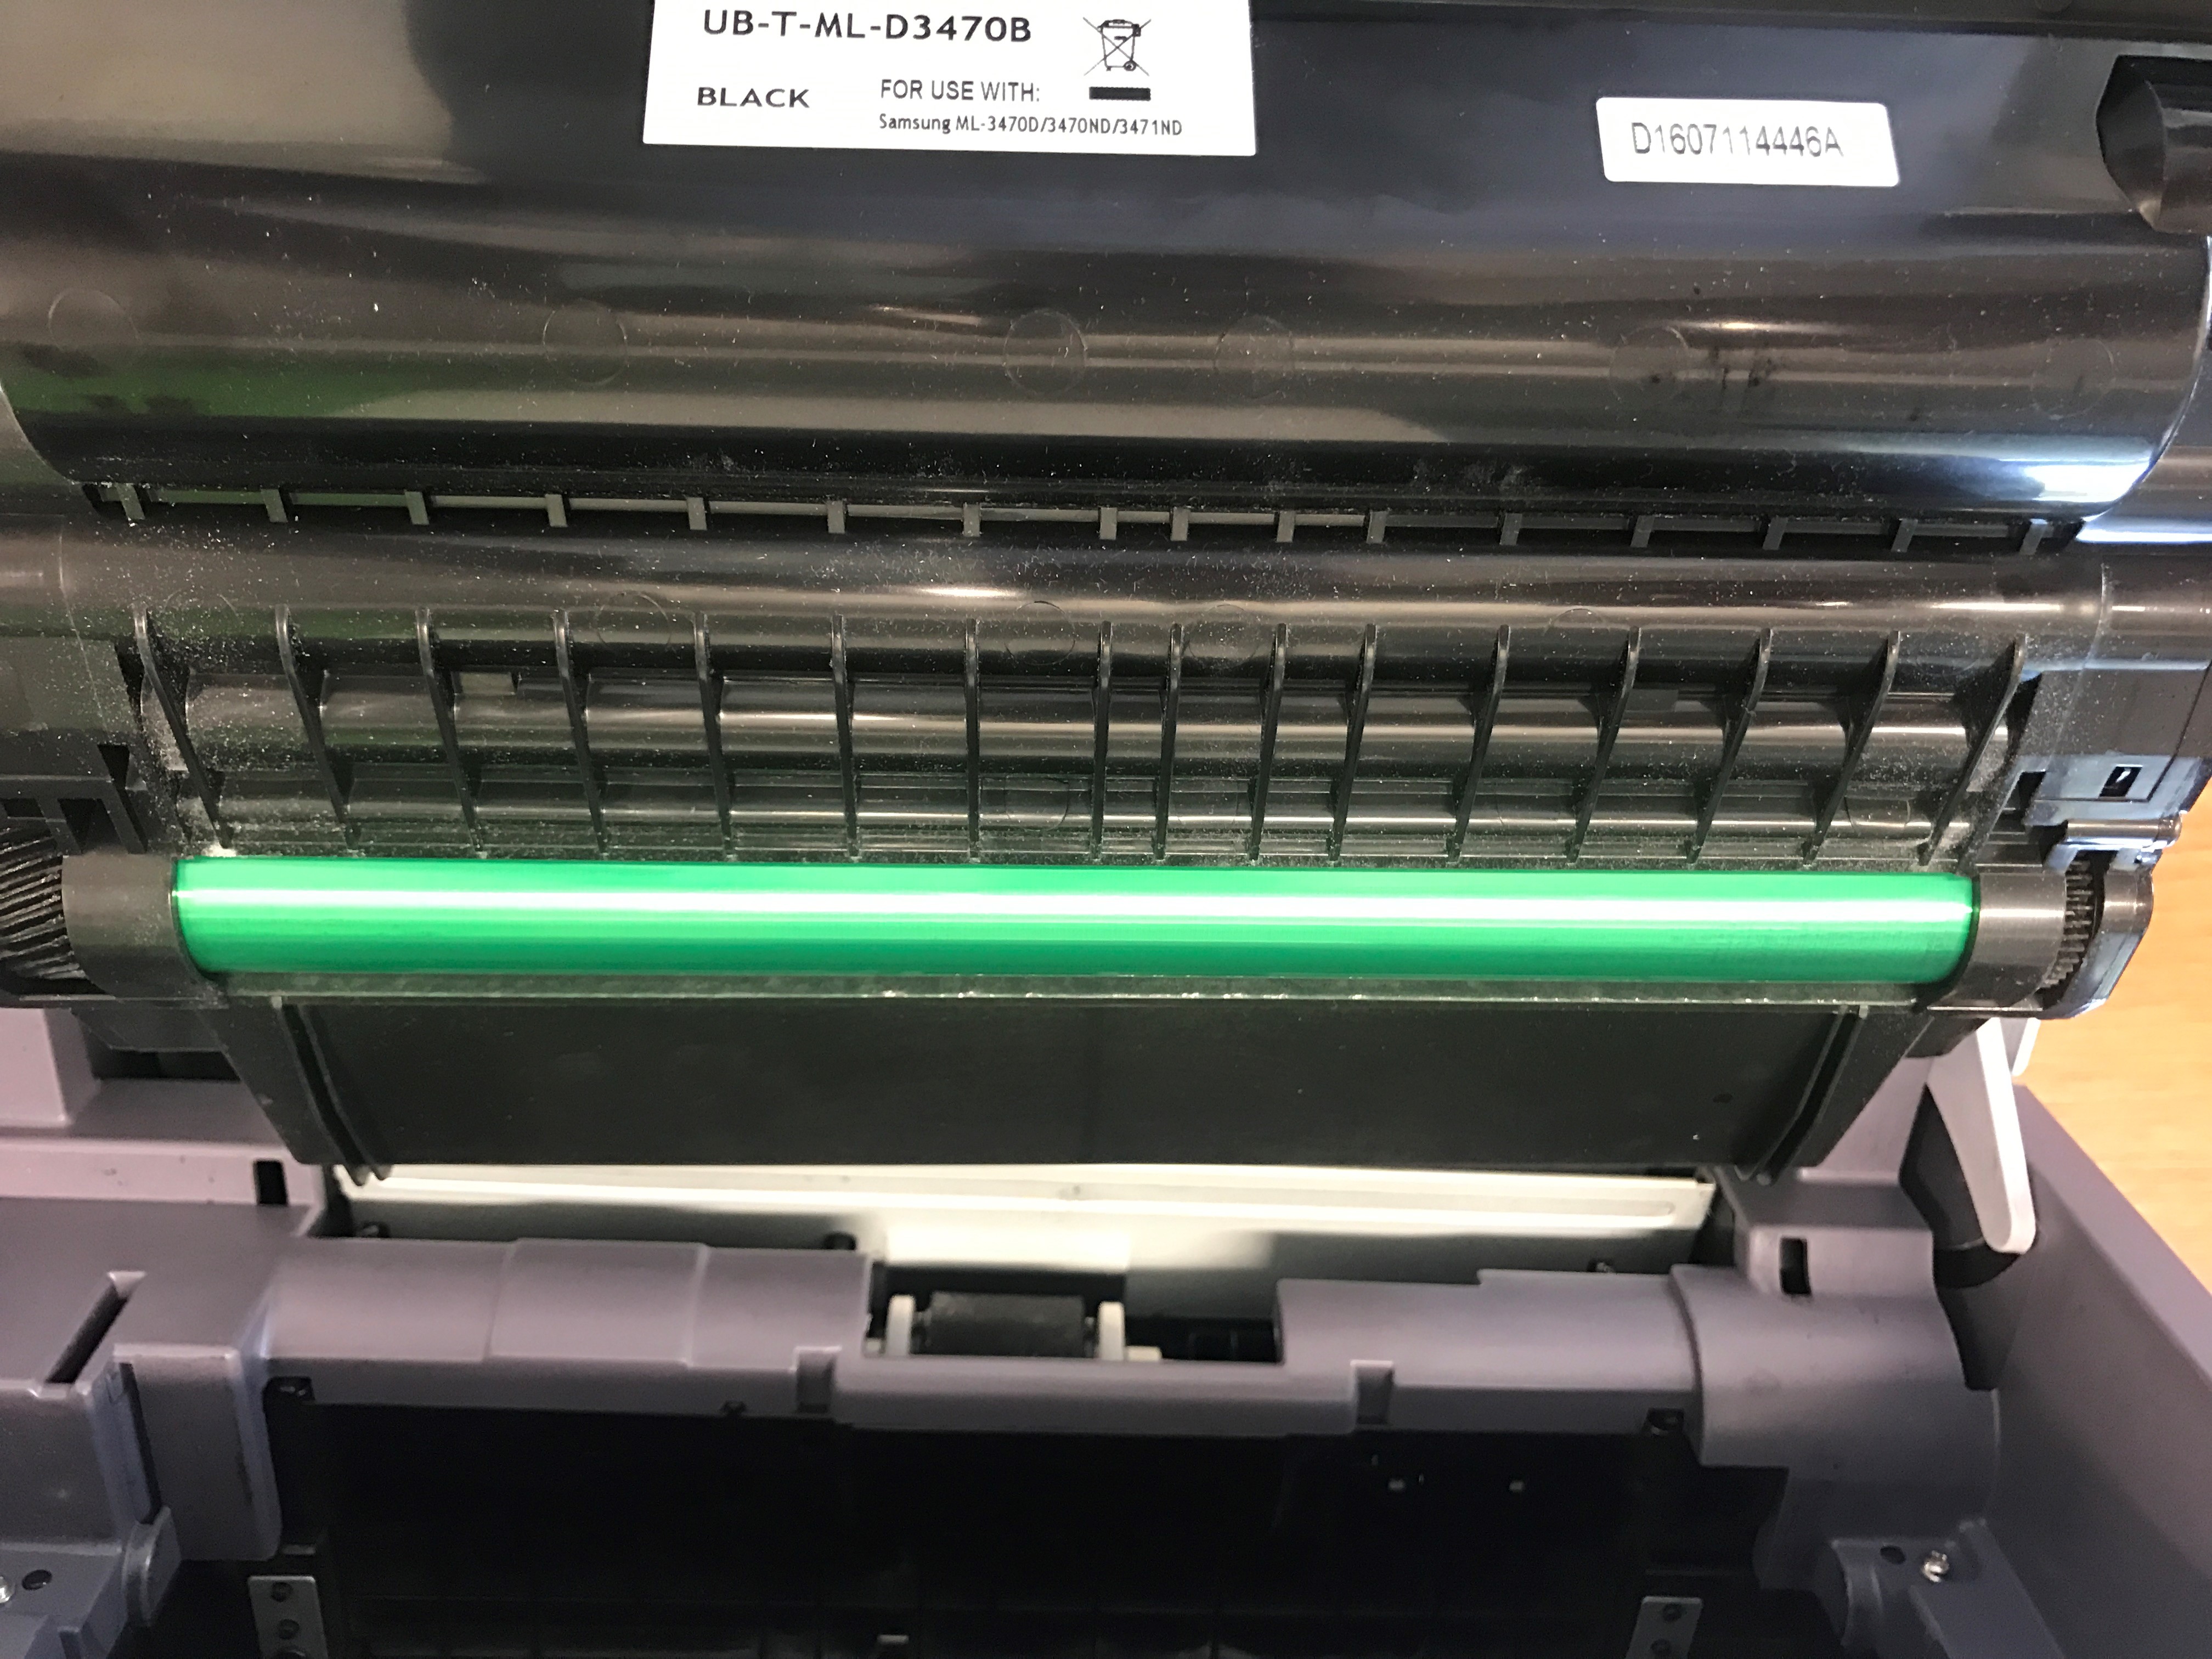
A prior word of warning…There are a few areas inside your printer that you must not touch with your fingers and be as gentle as possible when cleaning residue from them as they are easily damaged and would need to be replaced if they were. These include the toner drum unit which can often be built into the toner cartridge but sometimes a separate unit. This will look like a green cylinder and will be covered by a plastic cover called the toner hopper.
Here’s what the drum looks like:
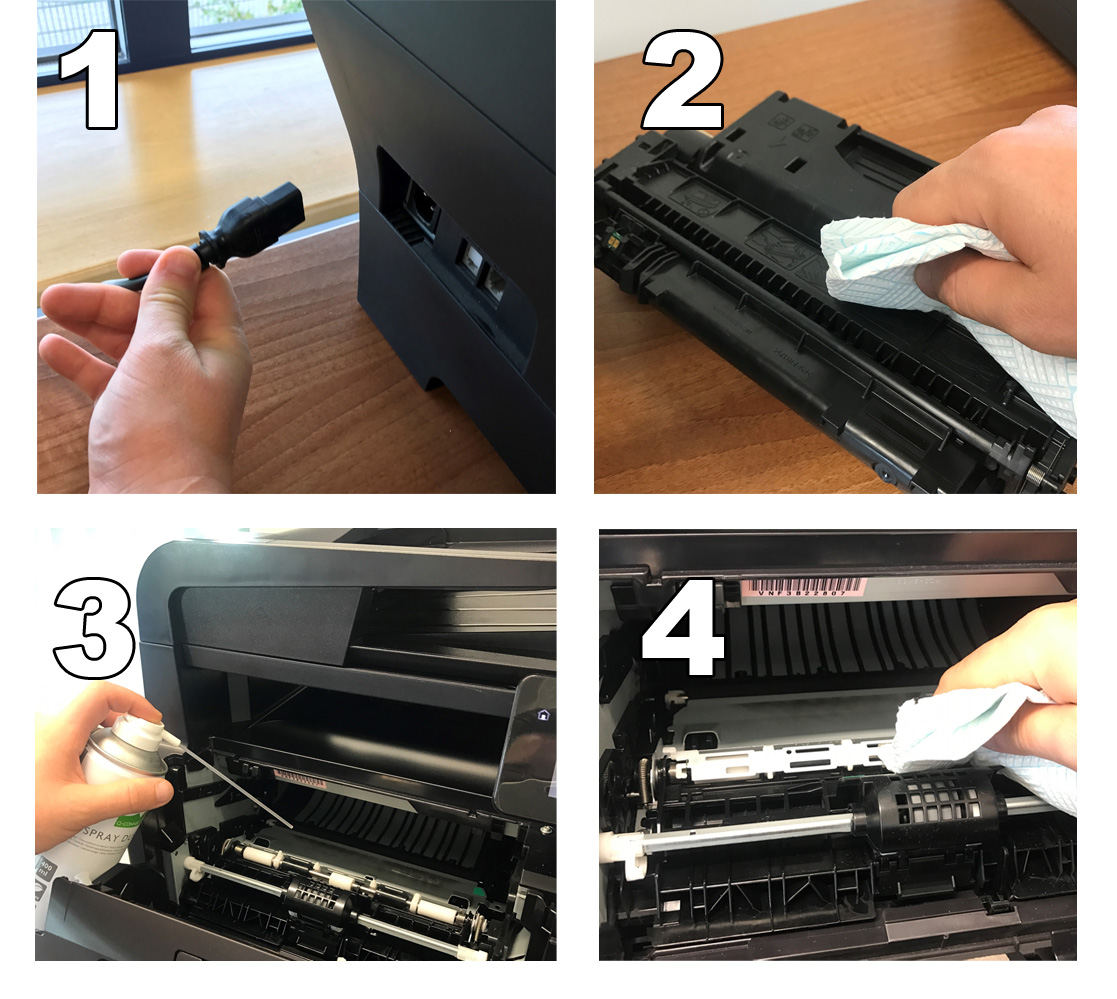
Step 1: Switch Off, Cool Down
Before you open up your printer and start scouring – hold your horses. First, you’ll need to turn the printer off at the mains as you don’t want to electrocute yourself and – if you’ve recently used the machine – wait for it to cool down. Laser printers grow extremely hot when switched on, so it’s important to give them time to cool.
Step 2: Removing and Clean the Toner Cartridge
Once the printer has cooled, open the back or front panel and remove the toner cartridge (your printer’s manual can tell you how to do this). Using a square of toner cloth, remove excess toner from the cartridge, before setting it to one side on the second piece of toner cloth.
Step 3: Remove Excess Toner from Internal Components
Using a square of toner cloth (or a toner vacuum if you’ve purchased one) reach inside the machine and remove any and all excess toner from internal surfaces. Toner is likely to build up around the cartridge housing, as well as on other components that may prove difficult to reach. Try to be as gentle as possible when cleaning inside the machine, as some components are fragile and costly to replace if damaged.
Step 4: Swab Surfaces with Isopropyl Alcohol
For intricate components such as cables and wires, moisten a cotton swab with isopropyl alcohol and gently wipe with isopropyl alcohol to ensure a safe, sterile clean. This 99% pure chemical will remove debris from internal parts whilst leaving no trace of residue. Be careful to only rub components as gently as possible to be sure not to cause any long-term damage through scratches.
Step 5: Reassemble
Once you’re happy you’ve carefully removed any and all toner from within the machine, it’s time to reinsert the toner cartridge and its accompanying bottle. Making reference to the user manual where necessary, insert the cartridge and close the machine before performing any cartridge realignment checks as recommended by the manufacturer. It’s also a good idea to produce a couple of trial prints to ensure everything is working as it should. And you’re done.
If you enjoyed this article and would like to find out more about printer maintenance, be sure to check out the rest of the Toner Giant blog. Alternatively, if you’re interested in purchasing replacement toner cartridges for your laser printer, visit our homepage.
I have been working in the printing industry with TonerGiant for over 18 years, and I'm the resident technical printer expert, helping people fix their printer problems for over 16 years. I have taken part in many training courses with HP, Samsung, Brother, Canon and Xerox to further my knowledge, and I'm also the Digital Marketing Manager at TonerGiant.co.uk (degree qualified).
i have changed new toner cartige, and also cleaned everythig with isopropyl alcohol, eventhough the white 1/2 inch vertical spacing is coming while printing. give me the solution. my printer is ricoh sp111.
If you have a large white vertical space in your print outs, it’s likely to be caused by a fault to the drum unit.
we have changed the entire cartige unit. it includes drum also. eventhough we are getting 1cm vertical white space throught the full length paper. please give the solution which part we have to rectify.
This will possibly be an issue with either the transfer belt / rollers having damage or dirt on them, or possibly the fuser unit.
Regular cleaning of your printer is very important because increases your printer’s performance and also increases your printer’s life. In addition, always keep your printer in a clean environment and avoid places with a lot of moisture because it can destroy your printer’s internal parts.
after cleaning the printer I still get the dirty grayish is possible that the cartridge is leaking it is a new cartridge
Hi Ruby,
what is your printer model? Depending on if you have an inkjet or laser printer, the issue could be caused by a few different things.
Stu
Hi we have a brother L2530DW printer we are getting a 20mm wide grey smudge down the centre of the page.
We can see a roller which seems inacseesable that has a corresponding band on it, tried cleaning with dry cotton bud but nothing comes off?
Any help greatly appreciated
Tony
Hi Tony, I would try isopropyl alcohol on the cotton bud to see if that shifts the roller. Failing that you may need a roller replacement and that would need a technician to look at it.
HI, I have the Samsung c1810 series, about every inch there are red lines and there are ink blotches on the back side of the paper.
Hi there, this is probably due to a drum unit or fuser unit problem. You can find more info on our page about black lines down the page
When I print doublesided on my Borther laser printer the top side comes out smudged while the reverse side is perfectly clean. Does this indicate a particular area of my printer that needs cleaning?
Hi there, it sounds like there could be a fuser or roller issue as it will be as the paper is taken back into the printer for a second pass. Have a look at the page about lines down the page and how to fix
My Samsung Xpress C460FW laser printer is constantly spreading flecks of magenta and bits of cyan horizontally across most, if not all, sheets of printing. No sheet is ever quite the same, but has patterns, such as a lot of pink on the top of each sheet, and the fact that it’s not a smear or a smudge, but what look like tiny lines of magenta/cyan pixels scattered throughout each page like a rash. None of these issues is consistent with any common laser printer problem I’ve seen online before, so I’m a bit stumped.
Hi there, it could possibly be a waste toner collector that’s full or faulty.
How do you turn the individual toner cartridge drums in order to clean completely around it? All the mechanisms on the sides seemed to be ‘locked’. Thanks.
Hi Scott, I’d be very careful when trying to clean the drum. You aren’t meant to clean the green metal cylinder as it’s easily damaged. This is why it’s in a locked position.
Ah, good to know…thank you. I’m getting marks along the edge of my printed paper. I have cleaned the rollers I can see. Would I need to then open the case to clean other such rollers?
Hi Scott, that depends on your printer model. If you can easily open the printer case with a latch and see more rollers then you can give them a clean. If it’s a laser printer it could also be a problem with the fuser / damage to the drum that may need replacing but see if you can check the rollers first.
Goody Day… I have a Samsung MultiXpress C9250ND when printing solid background colours with cyan it does not print properly leaving a white horizontal streak with faded edges in the same position every-time, every other colour prints perfectly fine…Please Help!
Hi Gerard, If it’s in the same position on the page every time, this is normally a problem with the imaging unit or the rollers are causing the issue when the page comes through. There could be a mark on the drum or the rollers. It’s easy enough to clean rollers but the drum would likely need replacing as you can’t touch the cylinder without causing damage.
Hi, I have a Brother DCP 9010cn. Recently I have been getting a thick black line down the right hand edge of the paper. Today I have removed all the cartridges, cleaned thoroughly inside the printer, taken the cartridges out of the holders, gently brushed (with a clean make up brush), every area. Reinserted all the colours except the black I inserted a new black cartridge …and this black ‘edging’ is now worse. I have tried 3 black cartridges and its the same. Driving me nuts! What is causing this please?
Hi there, it could be a few possible things. The first thing to try is to check the rollers aren’t dirty as a black line down the same side for every print can often be caused by rollers. The next possible issues could be caused by the drum unit being damaged or the waste toner being full. Unfortunately its a process of elimination to check each thing. I’d check the rollers first, then possibly try replacing the waste toner cartridge as it’s the cheapest and if that doesn’t fix the issue try replacing drums.
On a samsung CLP680 series, ive replaced and cleaned all toner cartridges, replaced them and cleaned drum but still keeps printing “ghost” style, on colour only. Black prints OK.
What else would you suggest?
Hi Dimitrios, this type of ghosting is normally caused by the drum unit but in your printer the drums are part of the toners and so changing the toners would have corrected that issue. The only remaining thing that could be causing the issue is the fuser unit which melts the toner on to the page. Sometimes toner from the previous print out can stick to the fuser and then get distributed on to the next print. To check it you can sometimes see the fuser unit towards the back of the printer and see if it’s dirty. To fix this you’d need to replace the fuser.
Hi I have a samsung 4195fw just recent started have blue streaks on each side of page with some yellow in middle of pages
Hi there Will, have a look at the advice on our black lines down the page which should help:
I realise your lines aren’t black but the problem will be the same.
HI There, my HP Laserjet cp1025 has started leaving a “strip” down the page where it looks like the ink has had something drag down over it. Checked the paper after and it seems to be happening before the fuser but i cant see anything causing it. Any ideas?
Hi James, the best tips for fixing the issue you have are here.
Hello, I have an Okidata C3200n. A couple months ago, it started leaving various colored specks all over. Any ideas? It’s about 15 years old but has had very little use. (768 pages) so I hate to waste money replacing it if not needed. I just made a large printout of 88 black and white pages and the colored specks were on all of them. Thank you!
Hi Tim, It sounds like it could be one of a few things. Normally, the drum units that are the culprit and they would need replacing. However you can check in the printer and make sure everything is clean inside before replacing them because it could be as simple as loose toner particles inside the printer.
hey I own a Samsung Xpress SL-M2625D/SEE and there are approximately 4-5 lines on every page that I print. Do you know what is the most common solution in this case?
Hi Petar, yes we have an article for that: https://www.tonergiant.co.uk/blog/2017/05/black-lines-down-the-page-4-causes-and-how-to-fix/
E260d printer. He gets a white line down the paper to the left side of the printed page. My brother and I have the same printers, so we took his cartridge out of his printer, put it into my printer, and no white line emerged, so the problem must be with the printer itself. How should this be cleaned? Is it simple enough for us to do?
It’s likely to be the drum unit rather than the toner cartridge. Try also putting the drum unit in your printer and see if you get the same issue. If that is the problem, you would just need to replace the drum unit.
I have a Samsung CLP-680ND printer, I just changed the black cartridge and the first page I printed was half black. Now all pages are completely black. Does this mean I have a defective cartridge? or is there a bigger issue? I do not have an additional cartridge to test.
Hi
Here is a link to the manual for the CLP-680ND printer. Looking at the manual, removing the toner cartridge and then reinstalling may correct the issue, or you could have a defective toner cartridge.
Hi, I have an HP LaserJet 200 color M276 printer and it just started printing black vertical lines on each page, with some gray background as well, both margins and some inset about 2 inches from left. All color cartridges have been in the printer for awhile, so there has been nothing that has changed. I cleaned what rollers I could reach, and since only a small portion of each color drum is exposed, that’s all I could clean. I ran several clean cycles, to no avail. Any ideas? I don’t print much, but have had this printer for a few years.
Hi John, we have practically the same printer M425 in our office but I can see that there isn’t much access to the rollers or fuser. One last thing you can try is to insert a new toner and see if it corrects the issue. If it does then the drums (built into the toners) were the culprit. If that doesn’t work then it is likely to be the fuser. Unfortuantely you may need a technician to sort that out as the printer would need to be opened up.
Hey Stuart,
I have an HP CM1312nfiMFP Laser Jet that needs cleaning. The cartridges have left color lines on the rollers that are then transferred to my copy. Is there any toner cleaner on the market, and is there a way to move the rollers in the cartridge tray to clean them?
I thank you in advance for your time. God Bless . . .
Dennis C.
Hi Dennis, there isn’t a cleaning cartridge as such but if you open the printer up (as you would when replacing toners), its possible to get to the rollers and its would be possible to clean them using isopropyl alcohol and a lint free cloth. Alternatively sometimes you can spry some alcohol on the paper and print one letter in the middle of the page so the paper goes through with the alcohol on and would clean the rollers that way.
I have an HP477fdn that is leaving a light pink background, on printed pages. i have changed the toner cartridge thinking maybe it was bad. It didn’t fix the issue.
This would normally be an issue with the drum units but for the M477fdn, they are built into the toner cartridges so replacing them should have fixed the issue. It could be 2 other things. 1. dirt or spillage inside the printer / on the rollers or 2. an issue with the fuser unit.
Hey Stuart,
I have an HP CP4525dn that is giving me problems. The printer has worked wonderfully for years, but now the finished product contains a diminishing streak on the first 3-5 pages I print. After those first prints, the prints are perfect.
I’ve taken the whole printer apart, cleaned what I thought I should clean with 90% Isopropyl Alcohol, and cleaned out the excess toner collection bottle, but this line continues to appear.
I’m hoping you can help!
Hi there, it might be something to do with either the drums (not sure if they’re built into the toners on your printer or separate) or the fuser unit (which melts the toner to the page at the end of the printing process). The drum is normally the cause of streaks (if all rollers are clean) but sometimes the fuser can get gunk on it. Unfortunately I don’t think you can clean the fuser as it’s an electrical wire. It would need to be replaced.
Hi Stuart, I have a Samsung pro express m3820nd. The first issue started with a 1cm curl on the top lip of card ( less than 220gsm allowance) and a slight horizontal streak of toner on that curl and then repeated every 11cm, and a slight ‘haze of toner’ across most of the page – almost making a white page slightly greyish if that makes sense. I replaced the toner cartridge, and have now replaced the fuser unit. The curl is about 90% better, with no horizontal streak… but the whole page still has this very very light haze of toner. Most ppl would see it – but the problem is I use the printer to foil – and the foil adheres to any toner, so this excess toner on the page is causing me great issues. Please help with your wisdom!
It’s possibly an issue with the drum unit (which is built into the toner on your machine). Try a new toner cartridge to see if that fixes the issue.
Hello Stuart; I have a Brother MFC-L2700 lazer printer. It was printing perfectly fine until I changed the toner cartridge TN660. It is now leaving large black horizontal smears all over the printout. I was extremely careful when handling the cartridges. Help, I can’t read my document.
Hello, I have a Canon Imageclass MF743cdw. I put new Toner Cartridges in and now I can’t print because it keep blinking and says “Performing Auto Clan Fixing Assembly” How can I get this to clear so I can print?
Hi there, this may have something to do with the paper size that’s in the printer versus what its expecting. Check the settings to see if the set paper size matches what’s in the tray. If not, try changing the settings to match the paper you have in there.
Hello Stuart; I have a Brother MFC-L2700, and it has printed perfectly until I changed the toner cartridge TN660. It is now leaving very large horizontal smears all over my printouts. Help, I can’t read anything. Thank You!!
Hi there, the issue sunds like a faulty cartridge or faulty drum. I’m not sure if the drums are separate in your model of printer but if you have a spare toner, try that first.
Stuart, I have a Canon MF644cdw and on my black & white print jobs, I have horizontal and full streaks of color on the paper. About 1-1/2″ of Cyan at the top, 3″ of magenta below that and then 3″ of yellow below that. The lower third is printing correctly.
If I print a color page, the entire page is splashed with all of the colors mixed as a background to the black printed items. I’ve only had this printer for a couple months and did replace with original cartridges with generic cartridges.
Hi there, it does sound like you have faulty cartridges. Try to get them replaced and see if that fixes it for you.
Hello, I’m not sure what’s happening with my HP laser printer. It’s like its gets “backed up” on its printing thinking and it results in a line of what seems like a full page shoved in a space of 1/4 an inch. I have replaced the toner cartage already and it worked for a little bit and now is doing the same thing. I can print more than one page at a time if I want the best chance to have a full-page or one without line blips.
Hi Hannah, it sounds like a software issue to me. I would first try to update the printer / printer drivers to see if that fixes the issue (you can download new printer drivers via the printer manufacturer websites). If it doesn’t fix the issue, try to uninstall and reinstall the printer.
Hi Stuart, I have an HP M451mw that has problems (only) with printing Cyan on the left side of the paper (cca 6cm from the left edge). It’s a non-OEM toner cartridge which I have had replaced already once. Any recommendations? I have yet to do any cleaning. Many thanks.
Hi Tom, check inside the printer to see if there is any leakage (if there is it could be a fuser issue). It sounds like cyan is working correctly but the other toners have damage to their drums and their colours aren’t coming through on the left.
Stuart,
I have a Canon MF269dw and the printing is horrid with large shadow images on one side of the paper. I have cleaned drum and cartridge, replaced cartridge, have not replaced drum. Any ideas?
Hi Kelly, the issue you’ve described is normally either a drum issue or fuser. I’d imagine the drum is faulty.
Hi Stuart I have an older HP 1320 that was in storage a few months. I went to print with it and only the right side of the paper would print and the left side remained blank. I replaced the cartridge thinking it was a toner issue but the problem remains. I cleaned what contacts I saw without any success.
Hi Sean, it could be the fuser that isn’t melting the toner to the page. Normally you’ll see leaked toner inside the printer when you open it up. If not try updating the printer driver to see if that helps.
I have a Lexmark MC2535adwe. It keeps printing dirty pages. The print quality is great but the more pages it prints the dirtier they are. Any ideas?
I would check for toner spillage inside the printer. If there is, it could be a faulty toner. If not it could be an issue with the developers or possibly fuser.
Hello.
I have an HP LaserJet Pro 400 M401n that I bought in 2014 and has been a true and reliable workhorse. In the last couple of days, though, it has stopped printing solid black but, instead, pixelated gray. Neither HP nor Staples, where I bought it, can help me because it’s so old. I don’t want to replace it because it has features that newer ones don’t, including a drop-down tray for putting in paper that’s not in the main tray. It is not printing smudgy or streaked, so I doubt that printer cleaner sheets would help. Do you have any advice for me, please?
I’d probably first try a new cartridge to rule out a fault with the current one and if that doesn’t work it could be an issue with the software so maybe try to update the software or firmware.
DESPERATE: I have a HP Color LaserJet Pro MFP M281fdw. One day it was printing fine and the next day the printed material (black and/or color) has faded. After several attempts the printed material can barley be seen.
I has genuine HP Cartridges and they are all over half full of toner. I have cleaned and blown out the parts and have deleted the printer and all associated files and reinstalled. I have reset the printer to factory settings and have tried all setting – both for the printer and the software that I am using to print.
HELP ME IF YOU CAN
Hi David, try the advice on the following page https://www.tonergiant.co.uk/blog/2014/10/faint-print-5-things-that-could-be-causing-your-printer-problem/
Dell C1765nf color lazer printer, carmine has stopped printing, albeit we have tried 2 new cartrisges. Blockage? If so how to clean? Thanks
Hi Robert, laser printers don’t often get blocked so I don’t think that would be the issue. The hopper on the magenta may have got stuck or damaged. Is there any leakage of powder inside the printer? It sounds like a faulty cartridge to me.
We have a Canon ImageClass 2300 laser copier. We replaced the toner cartridge, Canon Cartridge-P Laser Toner Cartridge, Black, back in June of 2021, and we have been having problems with smudging/dirty print. When we remove the cartridge, the drum is covered in toner. Any help would be appreciated.
Hi there, when the drum is covered in toner its likely that the toner hopper on the toner cartridge is broken. If you have a spare toner cartridge, I’d vacuum out the lose toner and try a new cartridge to see if it fixes the issue.
I own a laserJet PRO M15 and bought it to make wine bottle labels. No matter how long I allow the ink to dry on the label, it smears when I run my finger across it just enough to cause the words to become slightly blurry. The same thing happens when I used CardStock paper, but not when I print on plain paper. Any idea? Thanks.
Hi John, I’m not an expert on this but it’s definitely the type of paper. Toner doesn’t absorb into the paper so requires specific types of paper / card. If you’re using the correct paper, it could be an issue with the fuser.
I have c480fw laser printer. I’m frustrated with the print out quality.
There are red lines spread throughout the papers, it made the same pattern. I tried to clean and changed the new color toner. It doesn’t help.
However the problem doesn’t exist if grayscale or black white is used.
This will be caused by an issue in one of the colour toners, most likely cyan or yellow.
Hello Stuart. Firstly, thank you for all of the suggestions above.
I have a Samsung CLP-510 Printer and it sat in my basement for about 10 years. The existing toner cartridges were practically full. I was getting faint, dirty, cloudy, vertical lines mostly uniform across the page. Black text seemed to print perfectly but color portions were blotchy at times. There was also a 2-inch periodicity of horizontal lines as well, although those were somewhat faint and not consistent. The drum appeared clean. The waste canister was emptied. Upon inspecting the transfer belt I noticed a thin, inconsistent layer of toner blotched throughout its entire length. I wiped the belt down with isopropyl alcohol. I went ahead and inserted brand new toner cartridges just to rule them out. I printed a double-sided test page and it got about 10x worse. I inspected the transfer belt and saw toner stuck to it once again. I’m leaning towards replacing the Transfer Belt (if I can find it) but thought I’d run it by you first. Your readers may benefit as well.
Thank you in advance.
Bucky
Hi Bucky, yes any marks or damage across the transfer belt can pass onto the page and cause print issues so that would need to be replaced. This is quite an old machine so you might find it hard to find one these days. With regards to the horizontal uniform lines in colour, that could be a drum or fuser issue though the drums are possibly built into the toner cartridges so it would mean replacing those instead.
Hi
I have a colour laser printer. If I print black and white or if I print colour text and graphics such as graphs it works fine. But if I print multiple copies of a single page with a colour photo on it (including if there is also text on the page) then for the first few copies it works fine and then after that the ink doesn’t seem to stick to the page and I get flaky, smeared photos and flakes onto the rest of the page. It used to work fine but has got worse. Any suggestions? Thank you
Hi there, it sounds like a fuser unit issue. The fuser unit heats the toner and melts it onto the paper so it doesn’t smudge and it could be failing after several pages.
I read your article with interest. Then I tried to get some Activated Toner Cloths locally and then on the internet and can’t locate them anywhere – even on your website.
Are you able to elaborate, perhaps manufacturer’s name and product codes please?
Hi Kevin, try searching ‘magnetic toner cloth’ as well.
Hi Stuart, hope you can help.
I have a Samsung Xpress C1810W and the issues are;
1) vertical white stripes on printouts,
2) faint print,
3) horizontal magenta lines on the left of printouts, every inch or so.
Cyan and yellow cartridges are new, magenta is half full and black apparently still has 5% left…
Many thanks,
Gary
Hi Gary, I’d check if the transfer belt has any marks or damage (if the printer has one). It could also be damage to the toners or fuser unit. Have a look at the following:
https://www.tonergiant.co.uk/blog/2022/04/why-is-my-printer-printing-lines-how-to-fix/
https://www.tonergiant.co.uk/blog/2017/05/black-lines-down-the-page-4-causes-and-how-to-fix/
All letters and documents work fine but in pictures, designs, or drafts there is a vertical line showing. I have an HP M255W Laser Printer.
Hi, try the advice on this page https://www.tonergiant.co.uk/blog/2017/05/black-lines-down-the-page-4-causes-and-how-to-fix/
I have a Canon MF269dw printer that prints multiple black half moon shaped images down the right side of every page. I replaced the toner cartridge but it still does the same thing.
Hi Ivy, that sounds like it could be a problem with the rollers leaving marks as the paper passes through. They may need a clean.
Hi–TIA for taking the time to answer everyone’s questions. Mine is: Canon MF 644 printer prints a black streak down the right side of the page top to bottom. Replaced the toner cartridge but the problem persists. I didn’t check the other cartridges as I generally only do “Black only” printing. I tried the cleaning procedures from the maintenance menus but those didn’t change much. Please advise!
Hi, that sounds like an issue with either drum, rollers, or possibly the fuser unit. You can find more help here.
I have a canon color image class MF743Cdw. Somedays it make perfect copies, the next, the copies are streaked with different colors. Sometimes pink, other times blue, yellow or black. I have tried cleaning the cartridges and even replacing. It doesn’t seem to make any difference. Then, the next day it will make a clear copy. Can’t seem to find a solution or even a pattern.
It sounds like it could be a fault with the fuser. The fuser is the part that heats and applies pressure to the toner to seal it to the paper. It’s possible it’s working sometimes but then having issues on other prints.
First, amazing to have you help support a bunch of us who are desperate to not have to shell out a lot more money for another laser printer. Thank you. I have a HP M477fdw that has started to print a shadow magenta behind every design/letter. Clearly misalignment in magenta causing a 3d image affect. I changed cartridges but it still does it. I restarted it and cleaned alignment but it doesn’t help. Suggestions on how to get rid of the misalignment/misprinted magenta?
I figured it out. I used a generic toner and tested color page and yellow was out so the printer didn’t read it and think the yellow was being compensated by the magenta creating a shadow.
Hi, my b&w Brother printer is mostly working, but it leaves small (~1mm) white blobs in the output. The blobs appear to be regularly spaced vertically (~5cm), but they aren’t constant in shape, and do come and go. Did someone sneeze on the drum? Is it cleanable? Thanks!
Hi, it will be as you mentioned, either damage to the drum or something on the rollers. First, try cleaning the rollers inside and if that doesn’t work it will be the drum. The drum can’t be cleaned unfortunately, it would have to be replaced.
I have HP LaserJet 428dw printer (black & white). I have installed a new genuine toner but still, the printout is dirty with powder like particles on the paper. What could be the problem
It sounds like there is an issue with the fuser unit. It’s the part that melts the toner to the page.
can you mix brands? i have a brothers DRUM DR630 and I thought it could be used with a Mustashe brand TONER TN660
but my unit keeps saying to put the cartage back in or replace toner. now were states if this is do able
They can be mixed, however, it will often throw up issues similar to what you’ve experienced. This is because the printer is constantly checking the software on the cartridges and it won’t like the differences.
My printer creates coloured edges on every page. Blue on one side and red on he oher. About a 1/4″ thick from the endges. Is this a cleaning problem?
Hi there, it sounds like a fault with the cartridges or the drum.
I have a Canon MF733C laser printer that has streak marks. Can you fix it or do you know how, I am in North Dallas. Al
Try the info here: https://www.tonergiant.co.uk/blog/2017/05/black-lines-down-the-page-4-causes-and-how-to-fix/
Hi, I have an HP LaserJet Pro 400 M401n printer. I abandoned it for like five months, when i picked it up again it started printing blurry. the printout looks distorted. I replaced the cartridge with new one yet the same output. Any idea what can be done please?
It could be a couple of things, have a look at: https://www.tonergiant.co.uk/blog/2014/10/faint-print-5-things-that-could-be-causing-your-printer-problem/
I have a HP Laser P1102W. Printing along right side is dirty. Cleaned green colored drum upon seeing it being dirty with toner.
After a few more pages printing, the pages became dirty again along the right side, and the drum became dirty again.
Sounds like the drum isn’t statically charging correctly and you need a new toner. It could be a damaged hopper on the toner as well.
I have a Lexmark CS417dn laser printer. I constantly get 10 Black “dots” about 3 cm apart with each printet page (dots appear on left side of the paper, about 5 cm from the edge).
I then tried to clean the black toner drum with iso, but i still get the dots. I can´t figure out where the problem is.
Supplementary info:
When printing coloured pages the black dots appear larger when coloured objects are at the same area.
Any advice to the solution of this problem would be nice.
Unfortunately you have to try a process of elimination on this issue. Firstly try to clean all the rollers inside the printer with Isopropyl alcohol and a lint free cloth, if that doesn’t work, replace the drum, if that doesn’t work then replace the toner, if they don’t work then it could be the fuser that has an issue.
I tried to print on a piece of rice paper and the HP laser printer ate the paper. (In hindsight I know this was a bad idea!)I don’t see lost paper anywhere. Machine prints but all images smear. Any idea where the paper went and how resolve? Would greatly appreciate your help.
The paper could be over the back near the fuser or stuck behind the transfer belt (depending on the model). It might be difficult to access those areas unfortunately.
Hi,
I have a Brother HL- L2370 DWXL printer.
I just replaced the toner. After I did that the printed pages started having “ugly marks”.
I followed the manufacturer’s instructions to clean the drum (took out the toner, turned the drum upside down, cleaned the drum with a Qtip dipped in 91% alcohol, while rotating the roller) and then cleaned the corona wire.
I have doubts that the drum reached its end of life because last time when that happened, the printer notified me. What else can I do to get clean printing? I would much appreciate your answer.
–
Can you tell me a little more about what the marks look like when you print?
I have a Samsung Multixpress C9201. It recently started leaving a faint, even, cyan tint on the white parts of any colour print (doesnt do it on b/w prints). We have swapped the cyan drum, cyan developer unit and finally the HVPS board. All to no avail. It was almost out of cyan toner when it first started doing it so we replaced that in the first instance so Im sort of ruling toner out as well. Any ideas?
Hi Andy, sounds like you’ve replaced most things. I can only think that it could be the fuser that has some cyan toner attached to it. Fusers aren’t easy to replace or cheap so it might be worth investigating with a printer technician before you try.