

Having a wireless printer offers you the convenience of printing from any connected device, in your work or home network. But, connecting a wireless printer isn’t always easy and in fact can feel like a really complicated task.
One thing to bear in mind is that there is more than one type of wireless printing, such as Bluetooth enabled printers and infrared (IrDA) connections. However, when most people are discussing wireless printers, they are talking about WiFi printers.
Installing and configuring a wireless printer requires a it more work than installing your traditional printer using a USB cable. If you’ve been struggling to sync things up this guide should straighten things out:
Setting up your wireless printer
First of all, you need to place your printer somewhere relatively close to your wireless router, so that it receives a good wireless signal. Long term, your printer placement options are a lot more flexible as long as the printer is in range of your wireless router.
Now it is time for you to install the printer and set up the configuration for the first time. You need to connect your power cord and plug it into a power socket, install your cartridges (if needed) and turn it on. Then, run the configuration wizard, work through this to install your device on your laptop or desktop PC.
Before installing on any of your devices, you need to connect it to your network. For this, look through the menu and search for Wireless LAN settings or something similar. Once you have clicked on this option, you should find the option to connect the printer via the wireless network card. Depending on your printer model, you may need to find an option that connects it via a network cable.

How to connect a printer to WiFi
This step can be one of the three alternatives below:
- Connect your wireless printer to your home network by entering your network’s name, known as SSID and the password in the configuration options (this will only work if your printer has a screen and buttons on it). Select your wireless connection and then go through the setup wizard. If you have a security password set up on the router, it will ask you to enter the password. Once you have entered all the details your printer will begin to connect.
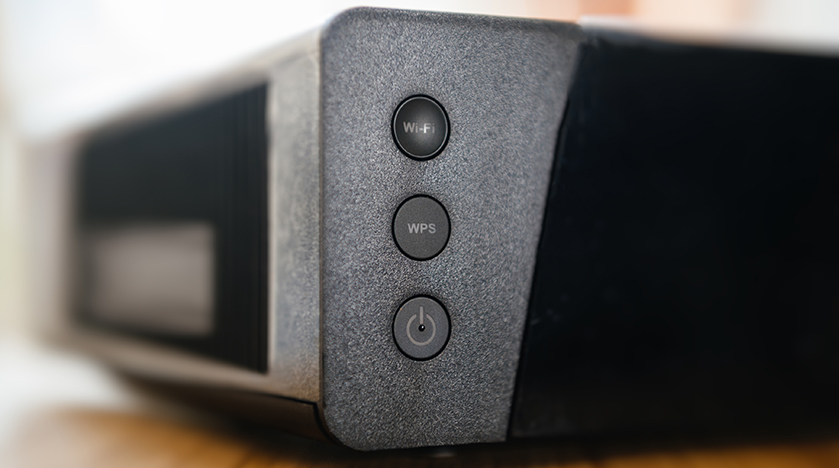
- Connect your wireless printer to your home network by clicking on the WPS button on your printer and router. You will then have to press the WPS button on your router to discover new devices, then push the WPS button on the printer. This will automatically detect and connect to your wireless network.
- The final method is using an Ethernet cable. Your printer will have an IP address which you can find on the routers web admin page. Enter your IP address into a web browser so you can visit the web interface. Then look for a section called Wireless LAN, enter the name, password and other details needed for your wireless network. Note that some wireless printer models will offer you the same settings directly in their driver installation software and if that is the case for you then you are able to use the software to automatically detect if your printer is connected to the home network as well as configuring it to connect to the wireless network.
Now you need to check that the printer is connected to your wireless network. If you are encountering any issues you will want to refer to your printers manual for the troubleshooting instructions and your router’s configuration for anything that could be blocking the connection.
If you want to double check everything you can make the printer print it’s network configuration details so you can see all the important information such as the MAC address and IP address etc.
How to install a wireless printer
It is now time to install the printer on to your computer. If you are using Windows 10 or 8, part of the process will be handled automatically by the operating system. If you are using Windows 7 or below or, if your Windows did not detect and configure your printer then you can use you’re the built-in operating system to add the printer to your computer or, run the bundled printer software.
If you go for the printer bundled software option then you will need to follow the installation steps. Remember to choose the options “Use the printer with wireless LAN connection” for the printer connect method.
If you would much prefer to use Windows own build in wizard then they have detailed tutorial: How to install a local printer on your Windows computer.
If you are on Windows 7, the process is a little different. When asked to find your printer, you will need to choose one of the following:
- Add a bluetooth, wireless or network discoverable printer
- Add a printer using a TCP/IP address or hostname
- Add a local printer or network printer with manual printer
How to add a printer on a mac
If you are using a MAC, here are your steps:
- Select your Wi-Fi network using the built-in controls on your printer. You may be prompted to enter your network username and password if it is a secured network.
- You need to install the necessary printer driver on your MAC r from the CD that came with your printer. If it doesn’t come with CD came with your printer, go to the manufacturer’s website and download the software for your printer model.
- Select “System Preferences” from your Dock.
- Choose “Print & Fax” control panel in the Hardware section.
- Click the “+” on the left side of your control panel.
- You will then need to select the “IP” tab at the top of the window and choose “Internet Protocol IPP” from the list of protocols.
- Type in your wireless printer’s IP address and the queue name.
- Select the correct printer driver from the “Print Using” drop-down menu.
- Finally click the “Add” button to finish setting up the wireless printer. The printer will now continue to show up as an available device the next time you print.
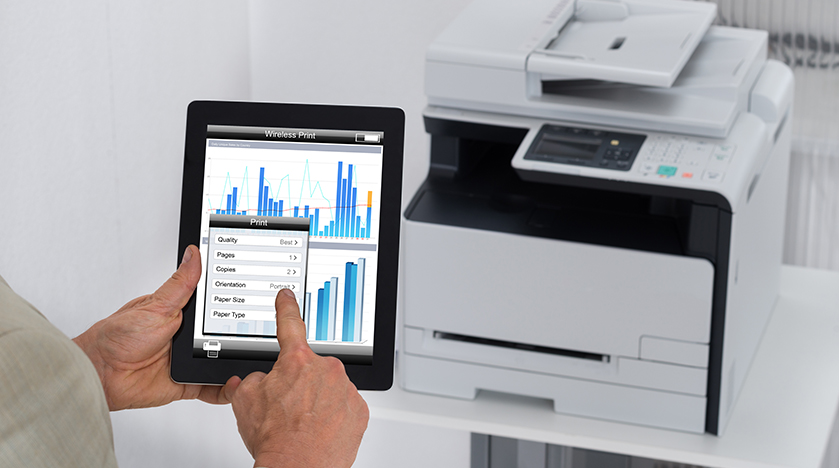
Did you know you can also print wirelessly from your smartphone or tablet? All you need to do is look for printer applications from your manufacturer of the printer.
As we have proved installing a wireless printer to your devices can take some time and effort. You must be careful not to miss any steps or it will not work. However, once completed the time you have spent on it will have really paid off and being able to print from anywhere in your home, at anytime will help improve your overall productivity.
Looking for a deal on printer cartridges? Here are our most popular cartridge ranges.
I have been working in the printing industry with TonerGiant for over 18 years, and I'm the resident technical printer expert, helping people fix their printer problems for over 16 years. I have taken part in many training courses with HP, Samsung, Brother, Canon and Xerox to further my knowledge, and I'm also the Digital Marketing Manager at TonerGiant.co.uk (degree qualified).
i got a new router. i am trying to hook up my wireless printer. first it said printer offline. so i tried to put in the password off the router. it needs to be 8 digits. but its 10 digits. so i am stuck.
Hi there, thats strange that it limits the characters! You may have to change the router password to get a connection.
There is a yellow light on both printer and router but not going blue?
It sounds like it’s not connecting to the wifi network. It’s very hard to diagnose as it could be an issue with the router. Sometimes, rebooting the router can reset the i.p address and help it to connect.
trying to connect my brothers L2395DW printer to my computer..
I put my passcode on the printer WIZARD like I always did before but it is not connecting wirelessly.
All you can try is to reboot and try again. If it stops working it would need setting up again from scratch.
I have a hp printer but change router box and can not connect it to computer the blue light is blinking
It’s likely that your ip address has changed. You may need to reset the printer and connection as if you were setting up the printer for the first time so a new ip address is set for it.