
Dell printer offline fix
Are you constantly asking yourself, why is my dell printer offline?
If you’re at the end of your tether and ready to throw your printer out of the window through sheer frustration, there is something you can do to fix this common Dell printer issue before you release the beast! So, step away from the printer for a few minutes, take a nice deep breath, and read on…
Here’s what you’ll learn from this article:
- What causes the Dell printer to not work?
- How to quickly get your Dell printer online
- How to fix the dell printer down issue.

What causes – Dell printer offline?
There are several possible causes for your ‘Dell printer offline’ message such as the computer software is updated, a connection issue between the hardware of the printer and PC (including cables or Wi-Fi hardware), the printer may need firmware updates, or the printer driver on the PC needs an update.
However, the most common reason for this issue, and the one I’m going to focus on fixing in this article is the issue caused by a miss communication between the PC, Wireless router, and printer through its WIFI connection that causes the i.p address to change. This issue has 3 possible causes or a combination of all:
- The computer is turning off the wireless adapter to save power.
- The Firewall / antivirus software is causing the communication error.
- Network information is missing in the printer settings / incorrect i.p address.
How to get your Dell printer online
If you’re just looking to quickly get your printer back online again to finish a print job then there is a quick fix that will do the trick, But a word of warning…. It’s highly likely that in a few days or even a week, you’ll experience the same issue again! Here’s what to do:
- On your computer find the device manager settings in your control panel.

2. Scroll to the USB controller’s area and click the plus symbol or arrow to open the list.

3. On each ‘USB Root Hub’ in turn, right-click with your mouse and select ‘Properties’ (Make sure to only do this for USB Root Hub).
4. Select the ‘Power Management’ tab.
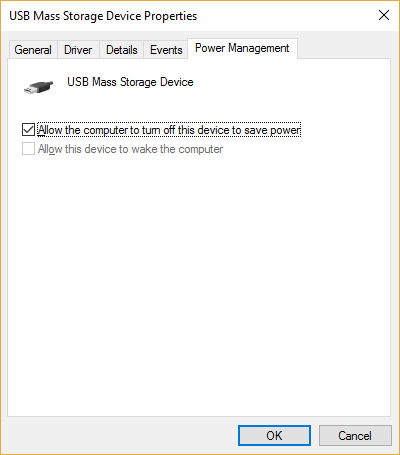
5. Untick ‘Allow the computer to turn off this device to save power’.
6. Restart your computer
7. Lastly follow step 1 again, navigate to ‘Network adapters’, right-click the wireless adapter > properties > power management, and untick the same option as step 5 above.
This should then get your Dell printer back online and up and running again temporarily but you may find that within a short period, you have the same issue again.
If the above steps didn’t work for you, other things to try include:
- Finding & installing an up-to-date printer driver on the dell support website.
- Updating your printer firmware.
- Checking the print list in the control panel and deleting the full list.
- Check your firewall/antivirus settings to see if printer functionality is being blocked.
If you’re still struggling, let us know in the comments and we’ll try to help you further.
How to fix the Dell printer offline issue permanently
You’ve managed to temporarily get your Dell printer online again but low and behold, 1 week later, it’s happened again! Grrrrrrrr! You’ll be looking for a permanent way to fix the dreaded Dell printer offline message and here’s what you need to do…
You need to configure your printer to work on a static or fixed i.p address, here’s how to do it:
1.On your computer navigate to the printers and devices in the control panel.
2. Click your printer in the list and either right-click / properties or as in the example if you have Windows 10 click ‘Manage’.
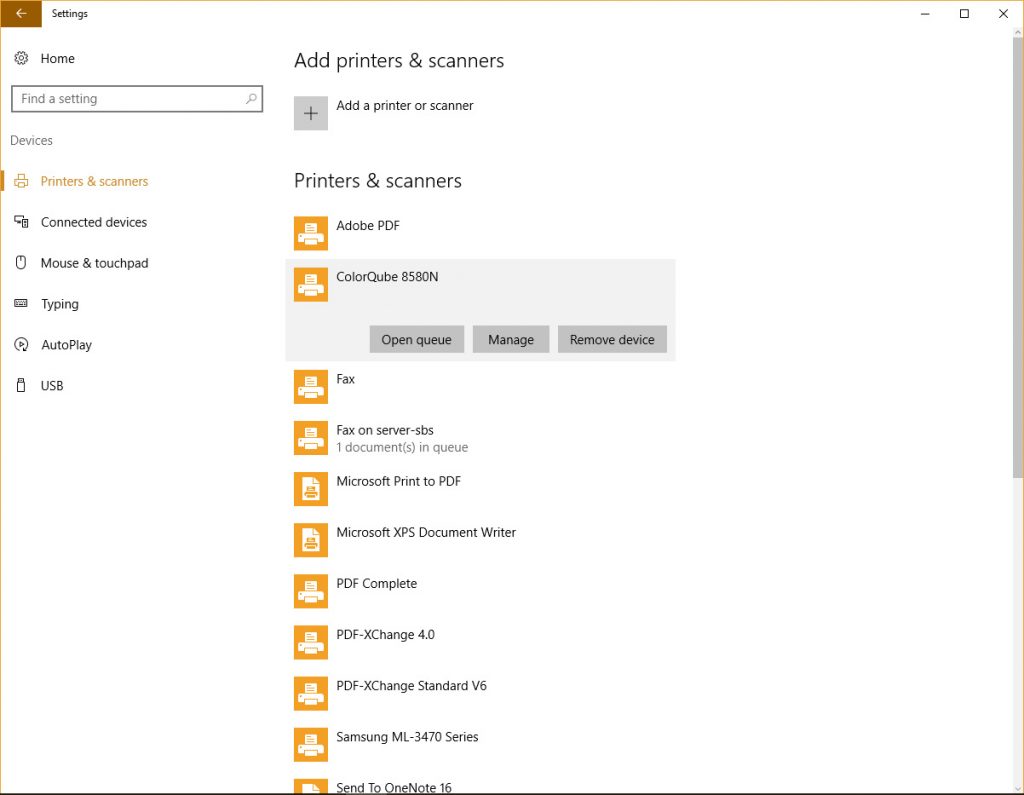
3. Click properties (or printer properties).
4. Click the ‘Ports’ tab.
5. From the list, you’ll be able to see the current i.p address of your printer (see example).
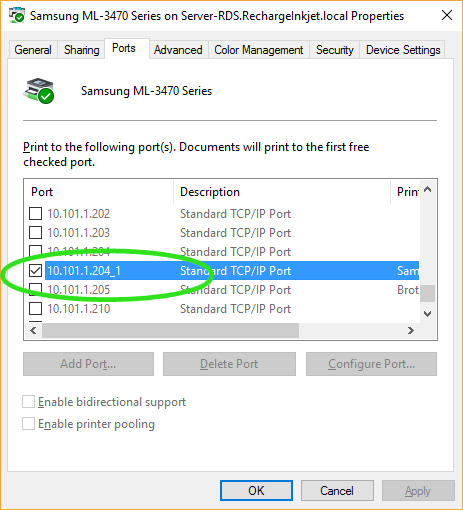
6. Type this into the browser address bar of a computer connected to the same WIFI or Ethernet network. (ignore any extra characters like underscore/numbers following that) eg. You only need something like 10.121.123
7. You’ll now see the settings menu for your printer (note: you may have to log in with a username and password if one was set or try Admin / leave the password blank).
8. You’ll then get a screen like the one below (I don’t have a Dell printer but it’s very similar for all printers).
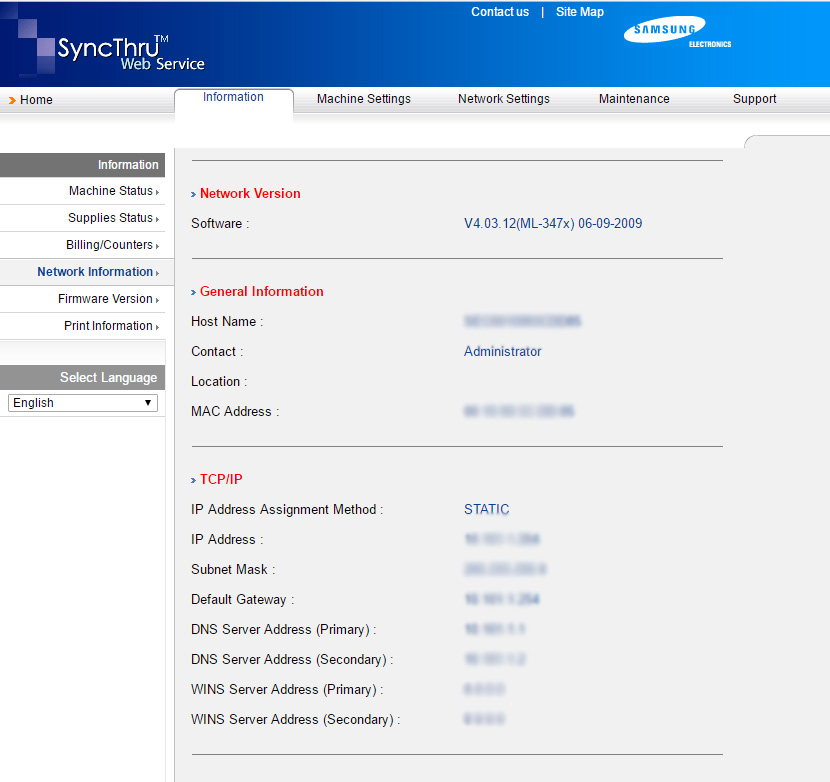
9. Click the Network or connectivity option
10. From this screen, you should be able to set the option to static or manual instead of automatic.
11. There should be an option for the manual i.p address to be suggested, if not you may have to set it yourself. Try something like the original i.p address but increase the last number by say 5. Write that number down and the MAC address for later, then click save or apply.
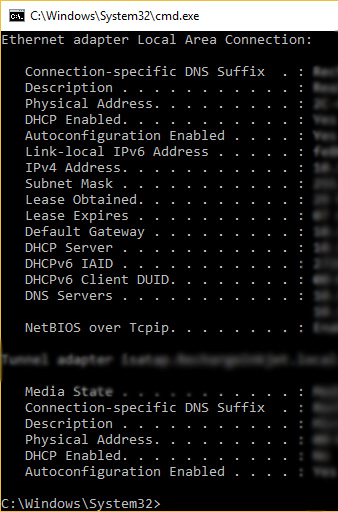
12. Get your router’s i.p address and log in online like how we did in step 6 for the printer (to get your router’s i.p address open a command prompt and type: ipconfig/all, you will see something similar to the below image).
13. From one of the menu options you will need to add the MAC address and new printer i.p address so that it can communicate with the printer (you may need to refer to your router manual for this as each is different).
14. Finally go back to step 1 to find your printer’s i.p address again where you will add the new i.p address and set the printer to it.
Your printer should now be set to a static i.p address and your problem should be solved! Please remember that if your router ever reboots it may undo this work.

Let us know in the comments if this worked correctly for you, I’d love to hear from you!

I have been working in the printing industry with TonerGiant for over 18 years, and I'm the resident technical printer expert, helping people fix their printer problems for over 16 years. I have taken part in many training courses with HP, Samsung, Brother, Canon and Xerox to further my knowledge, and I'm also the Digital Marketing Manager at TonerGiant.co.uk (degree qualified).
Troubleshoot result screen will show the detected problems and solutions to test your printer.
In step 5, after selecting “Printer Properties” and then the “Ports” tab, I do not get the printers IP address. Instead it has “NtwkPort00” checked. I’m running Windows7, and want to keep it that way.
Hi, it sounds like you are accessing via the network rather than it’s own connection. You would need to log on as the administrator of the network to get the ip address.