
To achieve a high standard of printing, no matter what the model or age of the machine, performing printer maintenance is important. Any machine can break down if you don’t take proper care of it – especially when it comes to inkjet.
No matter if you use branded, compatible or reused cartridges, there is a chance of the ink drying out and clogging the nozzle. This can cause further problems if not addressed properly and could even cause your printer to break down. However, this can be solved by cleaning the printhead.
Here are some of the ways you can clean the printhead both manually, from a PC or Mac and via a programmed system.
How do I know when I need to clean the printhead?
If your printer is printing blank pages but your ink levels are normal the problem will, more than likely, be the printheads. If it has been a while since your last print, some of the ink in the cartridges may have dried out. This blocks up the printheads and allows no ink to pass through onto the paper. To fix these issues, the printheads will need cleaning.
Another sign is if your printouts are faded and not reaching the standard you’re used to, or if your documents are blurry. If this is the case, you may find that when you print images you’ll noticed that the image is missing one colour overall. This is due to the CMYK cartridge not producing all of its dot work.
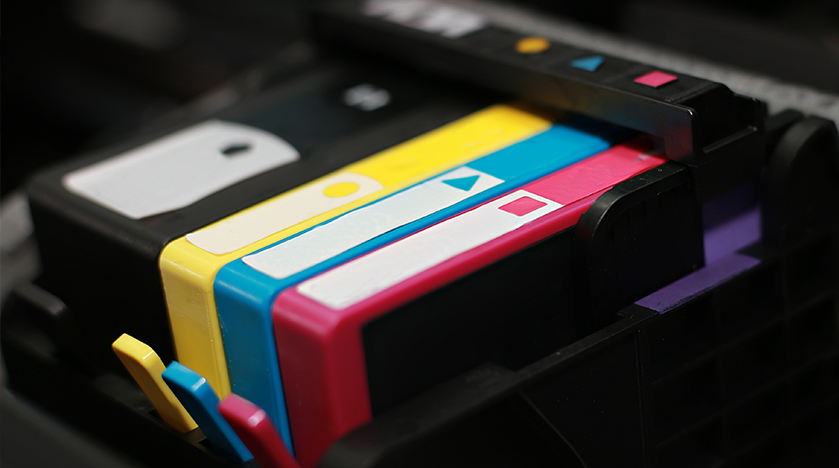
A printer works by layering tiny dots in various formations, using CMYK to create the broad range of colours we see with the naked eye. CMYK stands for cyan, magenta, yellow and key, which is usually black. Each colour has its own nozzle, so if one is blocked such as, yellow, this will alter the layering technique of the dot work and affecting the colour produced on the page. Cleaning the printhead will help improve the quality of the printout.
It’s important to try to avoid cleaning the printhead as little as possible as it consumes quite a bit of ink. Only clean the print head when the quality of the print has declined and is noticeable.
You can clean the printhead either manually or from your printer or computer. Before you start, you’ll want to perform a nozzle check to ensure your printhead needs cleaning, as this will save ink.
How to perform a nozzle check
You can perform a nozzle check either from your printer’s control panel on the machine, or via your computers utility settings.
Via the printer’s control panel:
- You’ll need to locate the maintenance screen – this is usually through the setup page via the printer’s home button.
- Select Print Head Nozzle Check and make sure you have paper in the loading tray.
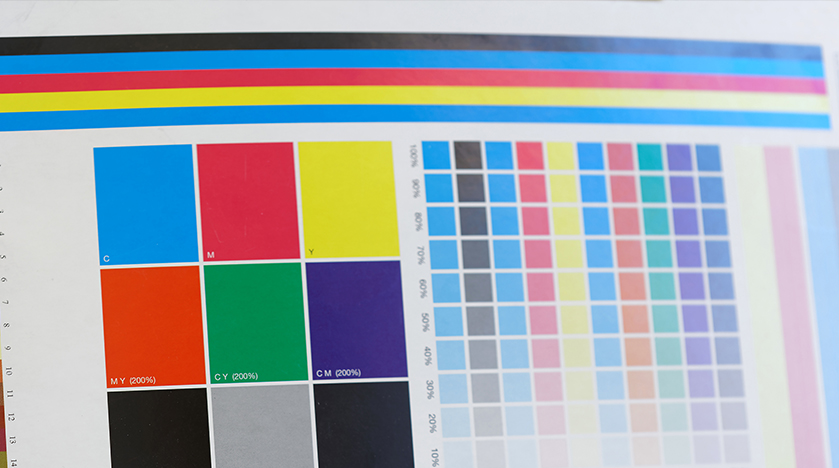
- The printer will print a CMYK colour chart made up of lines. If these lines are blotchy, with gaps, you’ll need to clean the printhead.
Via a computers utility settings:
- Locate and open the printer utility. This can usually be found through System Preferences, or Settings, via the task menu.
- Once you’ve opened Printers & Scanners, select your printer and open the Printer Utility.
- Select Nozzle Check and see if the printout is clean with no gaps or blotches in the lined colour chart. If the printout is not precise, you’ll need to clean the printhead.
How to clean an Epson printhead
If you’re unsure on how to clean an Epson printhead these instructions should provide guidance. Most modern printers will have similar cleaning functions to the Epson, so this should help even if your printer isn’t of the Epson brand.
- If the low ink light is flashing or permanently on, you do not need to perform a nozzle check. This is because you’re out of ink so the cartridge itself needs replacing.
- If the ink light is off, hold the ink button down for three seconds, this will start the cleaning process. You’ll know the printer is working as the power and ink light will start flashing. It’s important you do not turn the printer off while this is happening as this could damage the machine.
- Once the flashing has stopped, perform a nozzle check again to confirm that the print head is clean.
If you find that the problem continues, repeat the process. You may want to leave the printer overnight for the ink to settle before trying again.
How to clean a printhead from a computer
You can clean a printhead from the computer, which is quick and easy to do. You’ll just need to make sure the paper tray is loaded. These instructions may vary slightly depending on your printer make.
Windows:
- Open the start menu search, or select, the Control Panel.
- Select Devices and Printers and right-click your printer model.
- From the next drop down menu, you’ll need to select, Properties.
- Click the Maintenance tab. Here you’ll be able to find Tools, where you can select, Clean Ink Cartridges, Clean Heads, or something similar.
- Follow the on-screen prompts and leave until it has finished the cleaning process.
Mac:
- Open the Apple menu in the top left corner and click System Preferences from the drop down menu.
- Find Printers & Scanners and click your model.
- Select Options & Supplies and click the Utility tab.
- Open Printer Utility and select the Deep Cleaning function.
- Leave the printer to complete the cleaning process before performing a test print.
How to manually clean a printhead
To successfully clean a print head manually you’ll need some basic supplies. Gather a bottle of water and a lint-free cloth or a paper towel.
- Make sure the printer is off and unplugged to prevent damage to the device and yourself.
- Open the printer, locate the cartridges and remove these.
- Remove the tray the cartridges sit in – this is the printhead unit. It will have several holes in the bottom.
- Some printer models, such as a HP, will have the printhead on the cartridge, if this is the case, it won’t have a tray to clean. So, move onto step 5 and 6.
- Lightly dampen the cloth with water.
- Gently brush this over the foil, electrical contact area with the damp cloth until no new ink shows up on the cloth. Remove all dried ink debris from the printhead contacts, edge and ramps. Make sure you clean the electrical contacts inside the printer as well.
- If you’ve removed the print head unit, soak in a bowl of shallow water for around five minutes. This will loosen any dried ink. Dab the print head unit on a paper towel to remove any ink and moisture. Make sure it is completely dry before inserting back into the printer.
- After everything is cleaned and back in place, perform a nozzle check to see the quality of the printing.
If you have been struggling with poor printouts and your printhead required cleaning these tips should help you get the job done. If your ink needs replacing, be sure to check out our range of ink cartridges – with both branded and compatible available to cater to every budget.
I have been working in the printing industry with TonerGiant for over 16 years, and I'm the resident technical printer expert, helping people fix their printer problems for over 14 years. I have taken part in many training courses with HP, Samsung, Brother, Canon and Xerox to further my knowledge, and I'm also the Digital Marketing Manager at TonerGiant.co.uk (degree qualified).
I have an epson R2400 that is, according to two different printer repair shops, beyond hope of repair due to severe clogging of the printhead, due to my not having it used it for a couple of years. Is there any point in my trying to clean it myself?
Hi Frank, I believe that the print head on the R2400 is separate from the ink cartridges and would be very difficult to get access to and clean. You can buy replacement print heads but they look very expensive and probably not worth the money and effort trying to replace it.
Hi, I have an Epson Workforce WF2650 that I would like to clean manually. How do I clean the print heads on this model? Thanks.
Hi Charles, I think you can buy print head cleaning fluid that would flush it or you can replace the print head but I’ve never seen one of them cleaned manually so I can’t advise.
I have an Epson R320 that is new, but old and only used a few times. I got it to barely print so I removed the print head and soaked it in distilled water then gently pushed distilled water through each of the 6 ports to be sure all dried ink was removed. I let it dry thoroughly and put it back in the machine. Though the printer goes through the printing motion the pages are blank. I’ve run head cleaning to charge the ports several times but the pages are still coming up blank. The ink is fresh, the head is clean but I am getting blank pages when trying to print a test page.
Hi John, It could be that the ink in the cartridges is dried up. Have you tried new cartridges?
Hi there. I have an Epson XP-400. We haven’t used it in a few years, but with my boys doing school virtually, I’ve needed to start it back up. It’s working, but it’s not printing well. Instead of just black and white, it will print three layers of ink…red, yellow, and black…sometimes adding in blue. I’ve replaced the ink, so all colors are new, and I’ve performed the head cleaning through the printer. It still has gaps. What do you recommend I do to get it to print correctly? I’m going to try it manually, but other than that, what else can be done? Thanks
Hi Debi, it sounds like there may be issues with the print-head being blocked. Sometimes you can buy printhead cleaners that flush the blockages out.
Hi,
I have an Epson ET-4550, it looks like yellow and blue is failing…
Is it possible to manually clean the head on this model?
I’ve never seen it done myself unfortunately but there may be cleaning fluids to flush the system that you can buy.
hi i have an epson xp415 i have a problem with the yellow not printing i have done head cleaning and used head cleaning fluid on it but still nothing it prints all the other colours fine any ideas ?
It could be a damaged print head I’m afraid.
Hi Stuart I have a HP officejet pro 8600 and have spent considerable time on the phone with a supposed printer expert – truly after a good 6-7 years of use is it worth keeping – sad thing is I bought $200 of replacement toner that I can no longer use.
Error message which I can not seem to resolve = There is a problem with the printer or Ink system – I have been thru all of the scenarios to no avail – any advise please
Hi Russell, unfortunately I’ve never come across this issue. One possible suggestion I saw was that their could be something stuck in the printer carriage path so to check all the inside for any small bits that could have torn off and got stuck.
hi my printer is epson wf-7711, i had my ink cartridges changed to ciss . but now i always experience printer error due to cleaning of the printhead that the printer requires every time i turn it on. send help
Hi there, I’m not very familiar with the CISS ink systems but I am aware that they aren’t the best and can cause issues with print heads. I don’t think there’s much you can do to fix it.
I have a HP ENVY 5530. Black ink ran low installed brand new hp blk cartg. And it won’t print any black. Tried cleaning print heads using printer touch screen. Nada.
Tried cleaning electrical contacts.. nothing.
H. E. L. P !
I would remove the cartridge again and just check where the ink comes out to see if there are any blockages. Try wiping that area with a lightly damp cloth to see if the ink flows. If it does, then it could be a damaged print head.
Can I just say that you are going above and beyond for responding to individual printer issues for like 2+ years on this thread. I have some printer issues too, and I found your guide really helpful. Cheers!
Hi! I have wf-r5690 printer and the ink levels are full but print so faintly. The machine was down for some months. I have cleaned the nozzle heads but no change.
This could be a draft printer setting. Try to look through the settings on the screen or on the PC to ensure it hasn’t auto-defaulted to a draft or energy-efficient setting.If that isn’t the case, it likely there’s a mechanical issue with the printer.
How do I clean the print heads on hp 2680
Depending on the inks, they could be built into the cartridges. you can use a lightly dampened cloth the wipe underneath where the ink comes out. For print heads built into the machine, you can use cotton tips to wipe under the cartridge carriage.
how do you clean the printhead on hp 2755e
Hi there, I don’t have instructions for specific printers but the best bet is to have a look in the printer manual as it should tell you if its possible to clean the printhead there.